Table of Contents
In this article we’ll dicuss lists in phpList. Users can subscribe to a particular list you have setup, and then the administrator of that list, can send an email to all users subscribed to the list.
In phpList, a list is a one way communication method, meaning that all of the subscribers to a certain list will receive any messages that the list administrator sends out. However those subscribers won’t be able to start a discussion with other members of this list by replying to those messages.
Using a combination of phpList’s lists and attributes, you’re able to make your mailings even more personalized. For instance if you were requesting the attributes of Name, State, and Favorite animal using your subscribe page, you could then use your list of possibly thousands of users, but only actually send a message out to users that live in a particular state, or are only interested in a certain animal.
A list can only be owned by one administrator, and each administrator can own several lists. If you have multiple phpList administator accounts setup, it’s important to note that each administrator will only have access to users of lists that they own.
Delete default test list in phpList
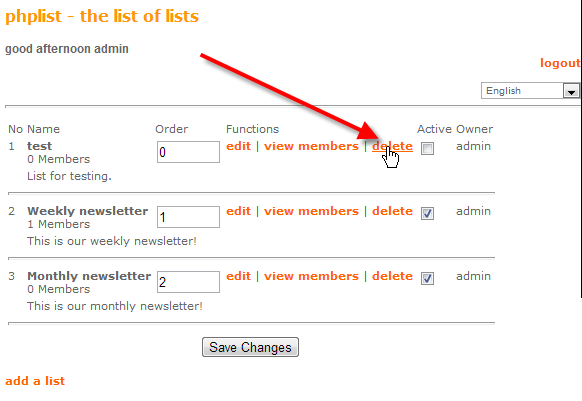
If you’ve been following along in this educational channel on phpList, we created two lists already, but there is also a default test list that phpList creates by default. Using the steps below, we’ll walk through how to get to your lists in phpList, and in this case how to remove the test list.
- Login to your phpList admin dashboard.
-

From the right-hand menu, click on lists.
-

Click on delete beside the test list.
- Confirm the deletion by clicking OK in the confirmation pop-up.
Create a new list in phpList
It’s pretty simple to create a new list with phpList, just follow these steps below:
- Login to your phpList admin dashboard.
- From the right-hand menu, click on lists.

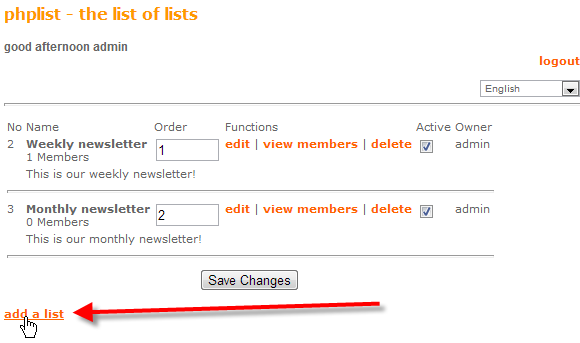
Click on the add a list link at the bottom of the page.
-

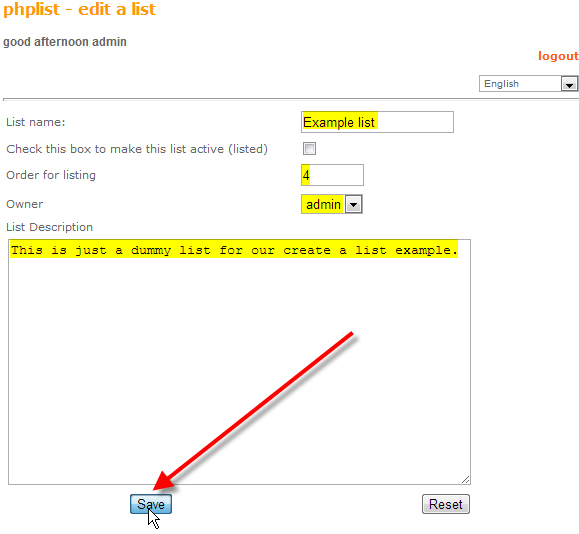
Fill in the details for your new list, in this case we used:
List name: Example list Check this box to make this list active Un-checked Order for listing 3 Owner admin List description This is just a dummy list for our creat a list example. - Click on Save at the bottom of the page.
Modify an existing list in phpList
Now that you know how to create a new list in phpList, if you wanted to go back in and modify or edit the settings you chose for that list, you can simply follow these steps.
- Login to your phpList admin dashboard.
- From the right-hand menu, click on lists.
-

Click on edit, beside the new Example list that we created.
- Now we can modify any of the settings of the list, then click on Save to make those active.
You should now understand how to create, delete, or modify a list within phpList. Further articles in this education channel section will cover some of the more advanced things that you can do with lists.


