Load testing is a good way to see how your site is able to handle requests from visitors. But stress testing can help identify the breaking point, where it is no longer able to respond within a reasonable time. This can be an important tool when benchmarking your website in order to determine if it is time to optimize specific items or upgrade your hosting platform.
In this guide, we will explain what a website stress test is and how it can be done, then we’ll go over the top 3 website load test tools. Finally, we’ll review the differences when stress testing a site, an image, or a javascript file.
- What is Stress Testing?
- Who is Stress Testing For?
- When Should You Stress Test?
- Top 3 load Testing Tools
- Differences When Stress Testing Different Items
What is Stress Testing?
Stress testing is a method used for identifying how your website or server performs when it is under heavy load. This is done by simulating an extremely high spike in requests or traffic using a tool built specifically for performance testing sites.
For example, you can send a set number of concurrent HTTP requests to a website in order to see how it responds and recovers. You can then increase the number of requests until the site’s performance deteriorates. This simulated “stress” can help you gain insight into the limitations of your hosting environment or identify portions of your site that could be optimized. You can then collect and review this data to make an actionable plan and ensure your site will perform well when it is under load from real traffic.
An actionable plan could range from fixing a script that is causing slow response times or upgrading your hosting plan so it is able to handle the amount of traffic you receive.
For more information, see our guide on Website Stress Testing Methodologies.
Who is Stress Testing For?
Anyone that owns or manages a website can benefit from stress testing since it can help you prepare for large influxes in traffic. We’ll now go over some of the specific users that can benefit from stress testing.
System Administrators
Since the goal of a system administrator is to keep the server running without issues at all times, stress testing can be very beneficial. These tests not only check the server’s performance but the specific site that’s hosted on it. A good stress test can help you identify whether a site is on the correct hosting plan or could benefit from an upgraded platform.
You can also do before and after tests in order to determine how much a hardware or software upgrade improved the performance of your site.
Web Developers
When developing a site, stress tests can help you determine how your code, scripts, or CSS responds to heavy load. This information can be used to build more robust code and help avoid being the cause of load issues.
For example, you may have multiple JavaScripts running within a site that have poor response times when put under heavy stress. This indicates that there’s an opportunity to improve the code within the javascript file. After updating the JavaScript code, you can then run the tests again in order to see if the web performance has improved.
eCommerce Sites
Not only is stress testing important for eCommerce sites, but any site that is running scheduled promotions. This is due to the fact that there are planned times when you’re driving traffic to your site and expecting a spike. You don’t want to waste your money on a large budget and then have the site fail or crash due to the influx of traffic. Stress tests can help you confirm if you are ready for the incoming load.
An example test for an eCommerce site would be to determine the projected amount of visits and requests you receive for a typical promotion, then hit the server with that same amount of simulated traffic. This data can help you identify areas for improvement and determine if your site is prepared to handle the upcoming event.
When Should You Stress Test?
Another critical step in the stress testing process is determining how often to test. In this section, we’ll go over some of the testing strategies to help you determine when you should perform stress tests on your website.
Schedule-Based Testing
Performing regular tests can help you locate any potential problems that might occur before it actually happens. The specific interval will depend on how often you update or modify your site. If you make changes often, then you will typically want to test more often as well.
Pre-Release Testing
Before you roll out any changes to your site, it is a good idea to test them before they are implemented. This can help you avoid foreseeable problems and save you time by allowing you to react before a problem affects the live site.
A good way to accomplish this is to make a copy of your site on a test server where you can deploy and test the changes in a controlled environment or sandbox.
Post-Release Testing
Even when performing stringent testing before releasing updates to your website, there can still be unpredictable factors that cause problems with your site. Due to this, post-release testing can be a vital step in identifying any unforeseen changes that may affect the performance of your site. This can also be used as a metric for how your updates have improved the site’s ability to handle a heavy load.
For example, you can compare the pre-release and post-release data and have true metrics for how the updates are operating on the live suite. This can help identify if further improvements need to be implemented.
Top 3 load Testing Tools
We will now go over the top 3 load testing tools and compare them to help you decide which ones to use.
ApacheBench
ApacheBench or ab is one of the most popular and commonly used tools for testing the ability of your site to handle a heavy load. I reached out to some of the network engineers for InMotion and this was at the top of their list for command-line-based stress testing tools. It can be installed on Windows, Mac, and Linux and easily configured to send more or fewer HTTP requests. You can have it send multiple requests concurrently (at the same time) and even leave the connections open (KeepAlive) in order to add even more stress to the test.
Here is an example of a basic ab stress test command. In this example, it is sending 10 requests for the website example.com
ab -n 10 "https://example.com/"
Here is an example of what the ab test results will look like:
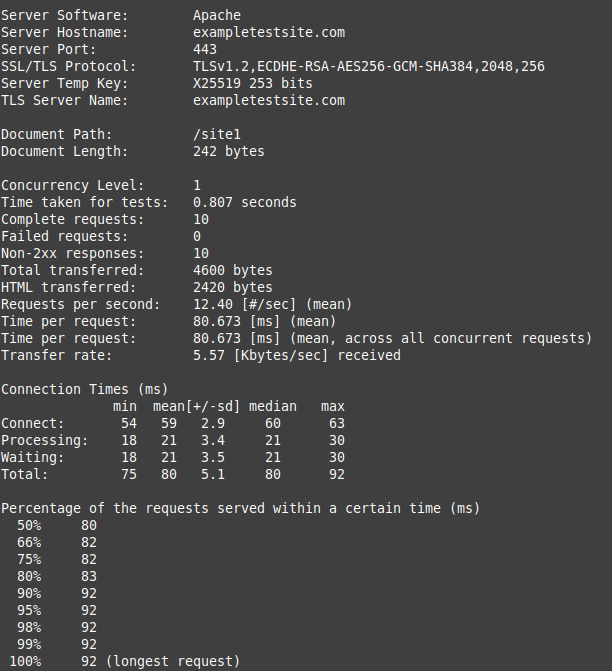
For more detailed information about using ApacheBench and an example case study, see the following guide.
k6
k6 is a free open source JavaScript tool for stress testing how your site responds to load. This is a much more robust customizable tool than your basic ApacheBench or Loader.io test. This is due to the ability to create custom JavaScript tests. Here are some examples of some tests you can include with k6 is:
- Fill Out and Submit Forms
- Upload Files
- Test Websockets
- Interact with cookies
- Run Tests That Include Uploading Files
- Include Authentication Options in Load Tests
In order to run a test, you must create and edit a .js file first, then it can be run from a command prompt. Here is an example of what a basic test would look like:
import http from 'k6/http';
import { check, sleep } from 'k6';
export let options = {
stages: [
{ duration: '20s', target: 100 },
{ duration: '40s', target: 100 },
{ duration: '20s', target: 0 },
],
};
export default function() {
let res = http.get('http://example.com/');
check(res, { 'status was 200': r => r.status == 200 });
sleep(1);
}
The above example, is a 3 stage test that sends 110 requests in 20 seconds, then 100 requests in 40 seconds, and finally zero requests for 20 seconds in order for the load to slow down.
Here is an example of what the test results will look like:
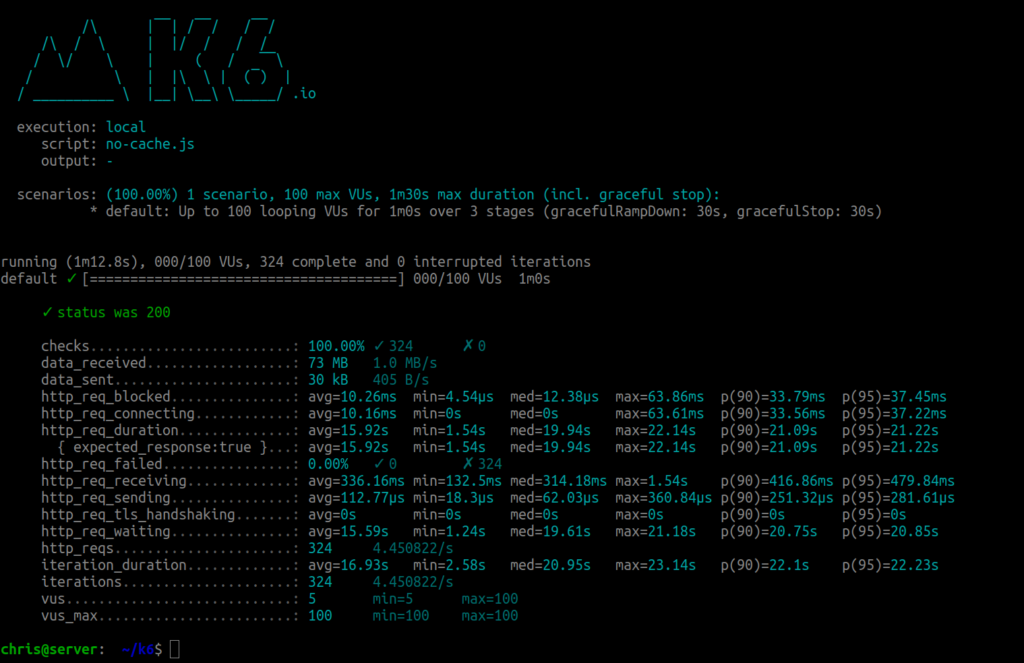
If you are ready to learn more about using the k6 tool, see the following guide.
Loader.io
If you prefer to run stress tests from a graphical user interface (GUI) instead of from the command line, Loader.io is a good option. Unlike k6 and ApacheBench, you must create an account and run the tests from the Loader.io site. After verifying your domain, you can choose from the following primary test options:
- Clients per test – Set the number of client requests to be conducted over a period of time.
- Clients per second – Choose the amount of requests to be made by a client per second.
- Maintain client load – This lets you choose how many clients you want to send requests simultaneously over a period of time.
Once you have chosen the test you want to perform, you can then select the specific test options.
For more detailed information, see the following full guide.
Differences When Stress Testing Different Items
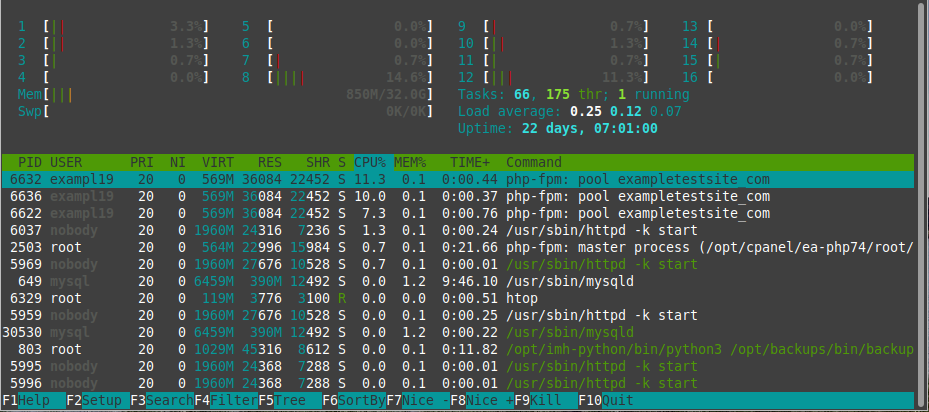
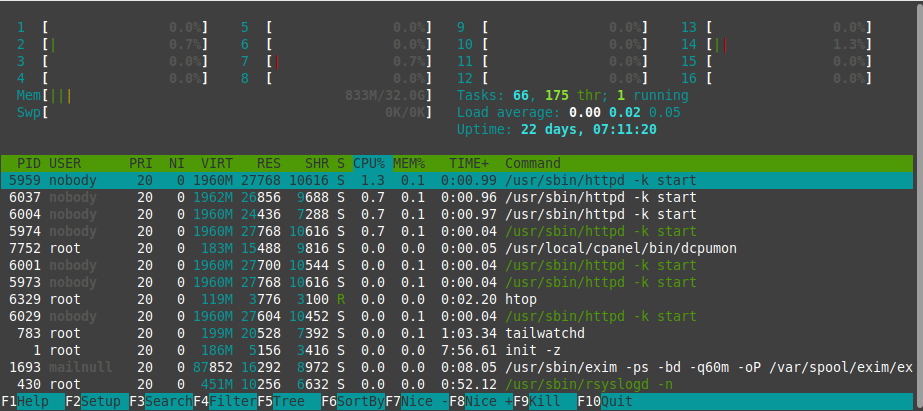
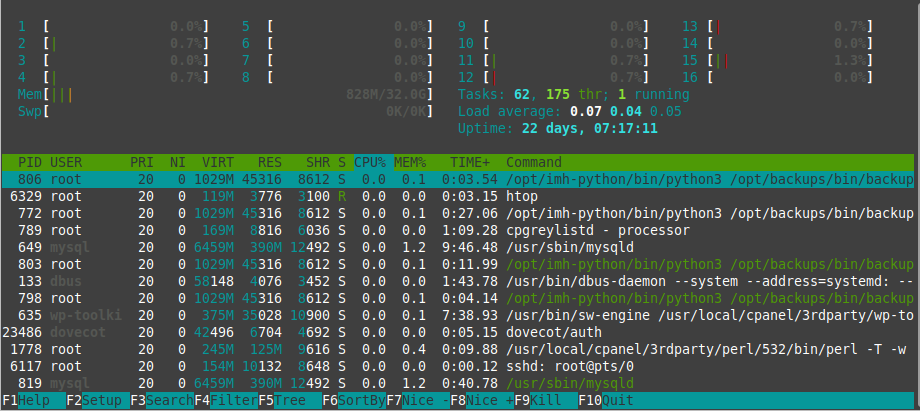
We will now specifically stress test website items in order to compare the results. In this example, we will be comparing the response times between a WordPress site with no caching set up, a 1MB image, and finally a small JavaScript file. We will also be monitoring how the server handles the requests by logging the server’s uptime status during the test. This should help you better understand how each asset can affect the overall performance of your website, and provide ideas on what aspects of your site to stress test.
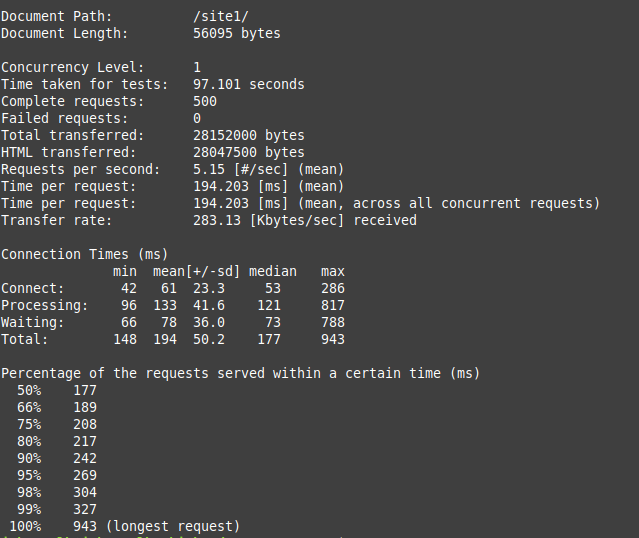
Here is an example of the command we’re using to stress test using ApacheBench. In this example, we are sending 500 requests for the WordPress website.
ab -n 500 "https://example.com/">https://example.com/"
Testing a WordPress Website (Without Caching Setup)
This first stress test was performed on a new WordPress website with no caching setup. We requested the site 500 times using the ab command.
WordPress Site ApacheBench Results
WordPress Site htop Results
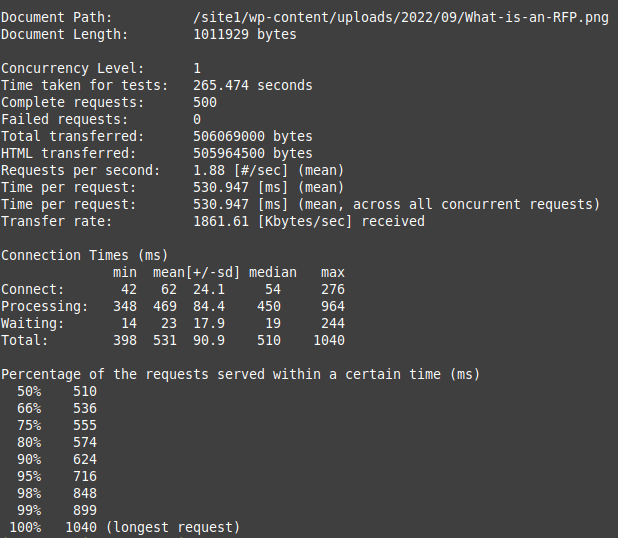
Testing a 1MB Image
For the second stress test, we will be requesting a 1MB image file 500 times.
1MB Image ApacheBench Results
1MB Image Test htop Results
Testing a JavaScript File
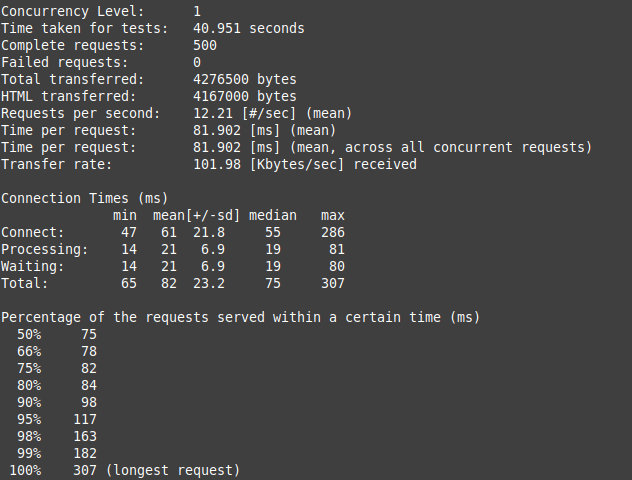
In this final stress test, we will be requesting an 8.334 kB JavaScript file 500 times.
JavaScript ApacheBench Results
JavaScript htop Results
Comparing Results
Now that we have stress-tested three different parts of a website using ApacheBench, we will compare the resulting data.
| ApacheBench Data | WordPress Site | 1MB Image | JavaScript File |
|---|---|---|---|
| Seconds Taken for Test | 97.101 | 265.474 | 40.951 |
| Requests Per Second (mean) | 5.15 | 1.88 | 12.21 |
| Connection Times (Total Median) | 177ms | 510ms | 75ms |
To generate this graph we used the following script to log the uptime of the server once every second.
watch -n 1 "uptime >> wp.log"
The above script will save the uptime information to a file called “wp.log”.
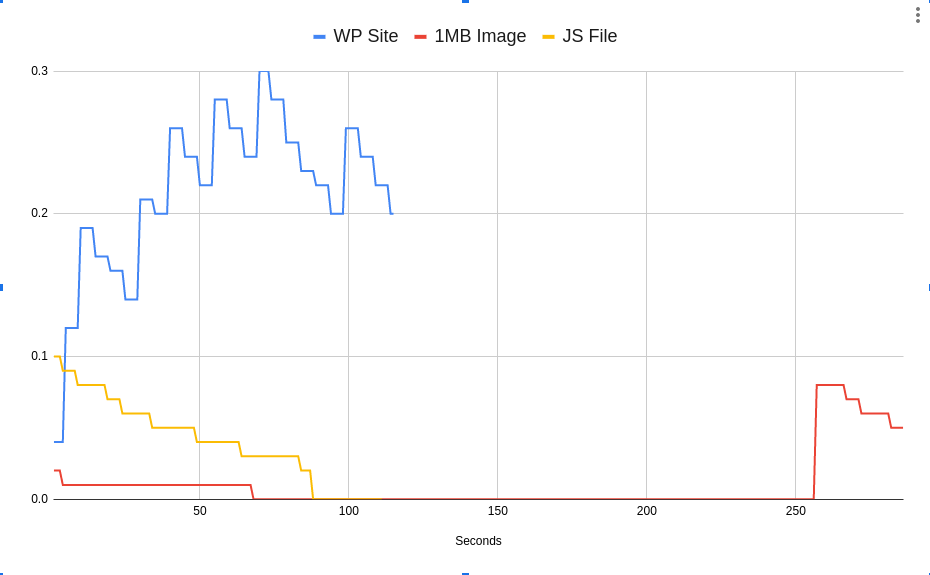
The above data indicates the following points:
- The 1MB image requests took much longer to complete than the other items.
- The JavaScript requests spiked the server usage and then quickly recovered.
- The WordPress website spiked the server’s usage much higher than the other items.
These test results indicate the WordPress site could benefit from optimization. For example, you could try enabling a cache plugin like W3Total Cache, then test again to see if the response time improves and the load goes down during the test.
Congratulations now you know how to stress test your website, and you are familiar with the top 3 load testing tools.