The Wordfence Login Security plugin for WordPress allows you to use two-factor authentication, XML-RPC Protection, and login page CAPTCHA. Two-factor authentication (2FA) is a vital layer of defense that you can add to your WordPress installation to protect it from intruders. The use of 2FA prevents intruder access through compromised passwords.
This tutorial will focus primarily on using the Wordfence plugin for two-factor authentication, but we will also briefly describe the other features.
- Setting Up Wordfence 2FA – Video
- Installing WordFence Login Security
- Using Wordfence Two-factor Authentication
- Login Page CAPTCHA and XML-RPC Protection
Setting Up Wordfence 2FA – Video
Installing WordFence Login Security
The WordFence Login security plugin can be installed through the WordPress Plugin page or the WordPress Administrator Dashboard Plugins page. The steps below walk you through the installation in the dashboard.
NOTE: Installation of the plugin does not automatically turn on two-factor authentication.
- Login to your WordPress Administrator Dashboard.
- Click on Plugins.
- Click on Add New.
- Search for “WordFence Login Security Plugin.”
- Click on the Install Now button.
- When it completes installing, click on the Activate button.
The completion of the installation will place a Login Security section in your WordPress menu. The Wordfence Login Security plugin contains only a portion of the full functionality found within the full Wordfence plugin.
Using Wordfence Two-factor Authentication
Two-factor authentication works by challenging you to enter a code or key after you have initially logged in with your password. Wordfence 2FA uses Time-based One-time Passwords (TOTP) that can be obtained from applications like Google Authenticator, FreeOTP, and Authy. Wordfence provides a list of supported TOTP-based apps.
You will need a mobile device that can connect to the internet and use a TOTP-based application. The steps below use Google’s Authenticator on an iPhone. Authenticator can be obtained from Apps on Google Play for Android devices or through the App Store for Apple devices.
Activating the Wordfence Two-factor Authentication for an Administrator
- Click on Login Security to open up the main page.
- Open your authenticator app. The screen below is an example of the Google Authenticator. The numbers indicate several previously created accounts.
- Add a new account. For Google Authenticator, you can click on the plus sign in the bottom right corner. You will see the options to Scan a QR code or Enter a setup key.
- Scan the QR code on the Login Security page, and an account will immediately be created in the Google Authenticator app.
- Once the account has been created, click one box in the bottom right corner and then type in the current code that you see in the Google Authenticator app for Wordfence.
- Copy or download the five Recovery Codes. Keep these codes secure as they can be used to log in, bypassing 2FA. These codes can only be used once.
- Click on Activate.
Some apps allow you to enter a code instead of using the scanner. This is handy when you don’t have a working camera. The code for activation can be found immediately under the QR code.
Setting Up Non-admin Users for Two-factor Authentication
You can also set other user roles to be required to use 2FA. These users can set it up independently after being notified of the requirement. Notification can occur through a note displayed when the user logs in to WordPress or through an email. To notify a user through email, you can select their user role, then click on Notify as per the screenshot below.
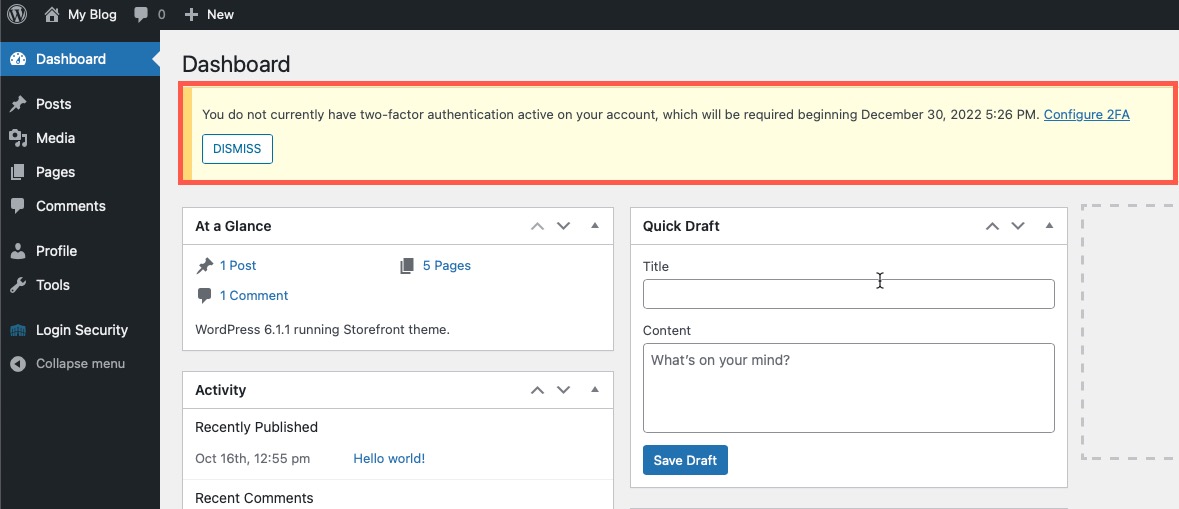
If a user who is required to set up 2FA has not done so, then they will also see a notice when they login to the WordPress Administrator Dashboard:
The steps for a user activating two-factor authentication are identical to the seven steps above. The main difference is the access to the Wordfence setup page. Each user can click on the link in the notification or in the email. They can also access the Wordfence 2FA settings through their WordPress user profile page.
Users will not be required to use 2FA while the grace period is active. If you want to make 2FA immediately required, you must first activate 2FA for the user, then change the grace period to 0 in the Wordfence 2FA settings.
Congratulations, you’ve activated Wordfence’s 2FA! After the grace period has expired, you will be required to enter a code from your authenticator after you log in with your username and password.
Recovery Codes
In the right column, you will see five lines of codes that can be used if you do not have access to your authenticator or the device with your authenticator app. Note that each line of code is for one-time use only. You can create recovery codes through the User Profile Wordfence options if needed.
2FA Settings Tab
The settings tab includes two-factor authentication, XML-RPC, and CAPTCHA settings. The following settings descriptions focus on the 2FA settings.
Managing Users
You can manage users to enable 2FA. This is based on the Users who are registered on your WordPress site.
- Click on the Settings tab.
- Click on Manage Users in the top right corner.
- Hover over the user name, click Edit, or click on 2FA.
- If you click on Edit, you must scroll to the bottom of the User’s profile until you find the Wordfence Login Security section. Clicking on 2FA or Activate 2FA will bring you back to the setup screen to activate 2FA. Manage 2FA Settings returns you to the Settings tab. This allows you to enable or disable 2FA for that user.
- Click on Update Profile to save the changes.
Setting Up User Roles to use 2FA
- Under the settings table, you will see 2FA Roles. Use the drop-down menus to make a role required to use 2FA.
- When you change a role, you will see the blue SAVE button under the users’ table light up. Click on SAVE to save your changes.
Grace Period
This period of time allows for a certain number of days for a user to set up 2FA through the WordPress user profile interface. When the time expires, the user will lose access unless 2FA has been set up.
Allow Remembering Device for 30 Days
This option is a checkbox that allows a user with 2FA to be prompted for the code only once every 30 days.
Login Page CAPTCHA and XML-RPC Protection
The WordFence Login Security plugin also includes the option to use CAPTCHA on the login page and XML-RPC protection. reCaptcha helps to stop robots and automated attacks.
Login Page Captcha
The Login Page Captcha used by WordPress now uses reCaptcha v3. This particular version of reCaptcha works by analyzing the website traffic and identifying suspicious activity. There is no checkbox or CAPTCHA puzzle used in the verification. It is invisible to the user.
In this case, the analysis is primarily on the login page. Suspicious visitors will be automatically flagged and sent a verification email. For more details, see WordFence Logging Page Captcha documentation.
XML-RPC Protection
XML-RPC – Extensible Markup Language Remote Procedure Call – is a protocol that allows WordPress to communicate with other systems using HTTP. The problem is that it also introduced security problems.
XML-RPC has been largely replaced by the REST API but remains in the WordPress core. The Wordfence protection provided in the plugin disables XML-RPC authentication or requires that the authentication use 2FA.
The Wordfence Login Security plugin for WordPress is a great solution for adding security to your WordPress logins without loading the full version of Wordfence. Two-factor authentication improves security by helping to prevent intruder access through compromised user passwords.
With the additional features of the login CAPTCHA and XML-RPC protection, the plugin provides a solid option for adding login security to your WordPress site.
Other 2FA Plugins:

