Creating packages in Control Web Panel (CWP) allows administrators to effectively define and allocate resources for user accounts. Packages include limits on disk space, bandwidth, email accounts, databases, and other features that help manage server resources efficiently. This guide will walk you through the process of creating packages in CWP.
What Are Packages?
Control Web Panel (CWP) allows you to manage multiple user accounts by creating packages. Packages standardize the allocation of resources and ensure consistent account management across your server. This step-by-step guide will help you create packages in CWP, facilitating effective resource management for your hosting environment.
Creating a Package
- Log into CWP Admin Panel

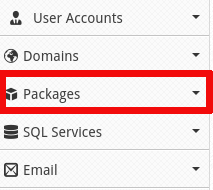
- Navigate to the Packages section
- Look for the Packages section in the left-hand sidebar.

- Look for the Packages section in the left-hand sidebar.
- Click on Add a Package under the Packages menu

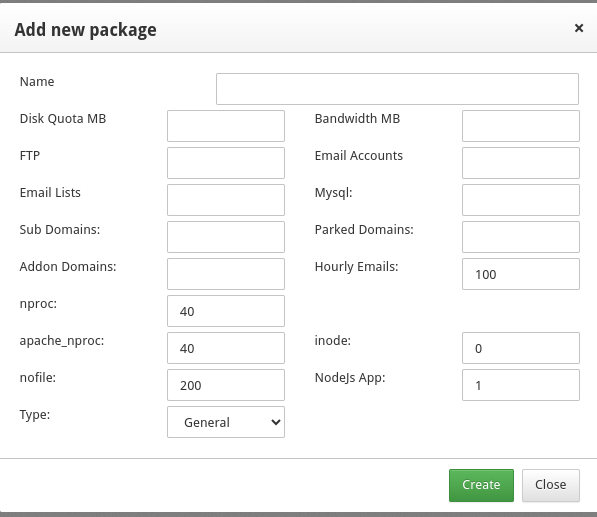
- Define the Package Name

- On the Add Package page, start by entering a unique Package Name. This name will help you identify the package later, so choose something descriptive, such as
Basic_Plan,Silver Package, orGold Package.
- On the Add Package page, start by entering a unique Package Name. This name will help you identify the package later, so choose something descriptive, such as
- Set Resource Limits

- Disk Quota (MB): Enter the maximum disk space allocation in megabytes. For example, enter
5000for 5 GB. - Bandwidth (MB): Specify the bandwidth limit per month. For instance,
10000for 10 GB. - FTP: Set the limit for FTP accounts. If unlimited, enter
0. - Email Accounts: Define the maximum number of email accounts allowed.
- Email Lists: Enter the maximum number of email lists.
- Mysql: Set the number of MySQL databases the user can create.
- Sub Domains: Specify the maximum subdomains.
- Parked Domains: Set the limit for parked domains.
- Addon Domains: Define the number of addon domains.
- Hourly Emails: Restrict the number of emails that can be sent per hour.
- Disk Quota (MB): Enter the maximum disk space allocation in megabytes. For example, enter
- Configure Additional Options
- nproc: Set the maximum number of processes per user.
- apache_nproc: Set the maximum number of Apache-specific processes per user.
- inode: Set the maximum number of inodes.
- nofile: Number of file descriptors that are allowed to be read/executed at the same time.
- Save the Package
- After configuring all the settings, review the information to ensure accuracy.
- Click the Create button at the bottom of the page to save the package.

- Verify Package Creation
- Navigate to Packages > List Packages to confirm that the newly created package appears on the list.
- Ensure all settings are correctly applied by editing the package if necessary.
Conclusion
Creating packages in CWP streamlines user account management by standardizing resource allocation. Following this guide, you can create and manage packages efficiently, ensuring optimal resource distribution across your server.
Upgrade to VPS Hosting for Peak Performance
Upgrade to InMotion VPS Hosting today for top-notch performance, security, and flexibility, and save up to $2,412 – a faster, stronger hosting solution is just a click away!
SSD Storage
High-Availability
Ironclad Security
Premium Support


