In this article:
Access control lists are one of many ways to block malicious activity, protect data, and save server resources.
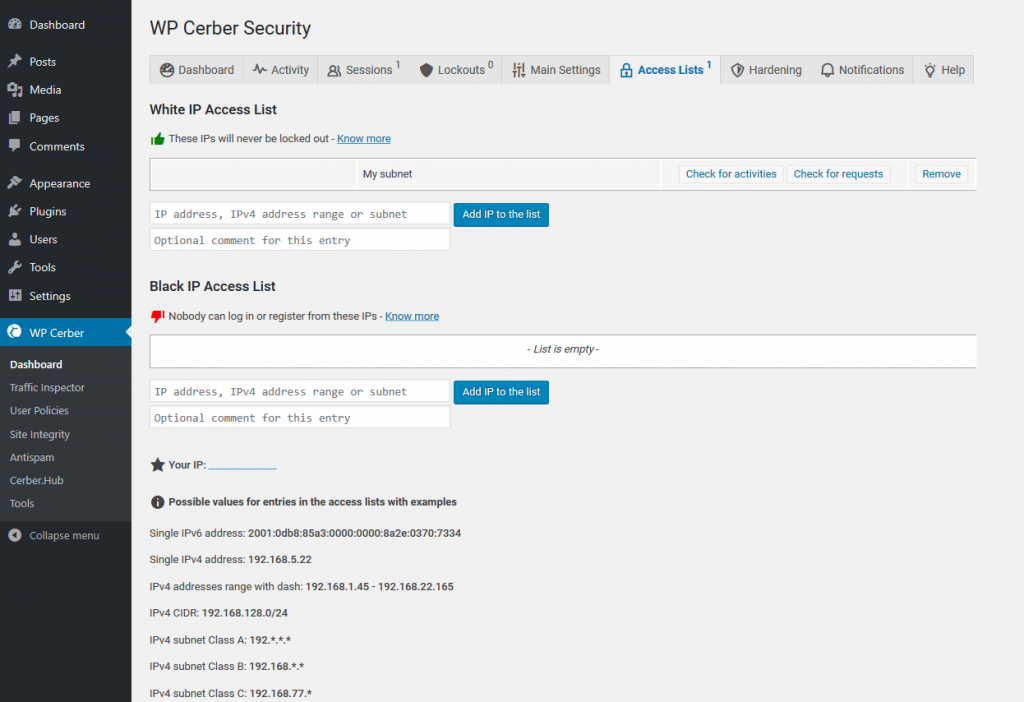
WP Cerber’s white list allows IP’s to bypass spam check, country geofencing rules, and two-factor authentication.
Cerber’s black list controls the ability to register, log in, comment, submit forms, use WP REST API, use XML-RPC, and other PHP scripts such as wp-login.php. It does NOT affect access to media, Javascript, and cascading style sheet (CSS) files.
Similar to other rule lists – e.g. software firewalls and cPanel email filters – WP Cerber follows a set order of precedence:
- White list
- Black list
- Locked out list
- Specific WP Cerber settings
Note: When you activate Cerber, it automatically adds your current IP address to the white list. If WP Cerber isn’t detecting IP’s correctly, it’ll add your server IP instead.
Improve WordPress performance without extra plugins with our Nginx-powered WordPress Hosting.
Ensure WP Cerber Detects IP’s Correctly
Check this to ensure Cerber’s firewall settings work correctly. You’ll likely need to complete these steps if you enabled Nginx Cache Manager and/or PHP–FPM on our WordPress, VPS/ Dedicated Hosting plans respectively.
- Check your current IP address using our online tool.
- Log into WordPress.
- Click WP Cerber on the left.
- Click ?Access Lists# from the top.
- If the white-listed IP address matches your current IP, continue to the next section. If the IP’s are different, click the Main Settings tab in Cerber.
- Under Site-specific settings and Site connection, click My site is behind a reverse proxy.
- Click Save Changes at the bottom.
- Log out and log back in.
- The dashboard activity section should now show the correct IP address.
Warning: If this doesn’t work, you’ll need to configure your wp-config.php file. Don’t forget you can contact our 24/7 Live Support for additional assistance.
Note: Cloudflare CDN users will need to reconfigure some WP Cerber settings.
Manage White and Black IP Access List
The White IP Access List and Black IP Access List have the same management options. To summarize the permissions listed earlier: white-listed IP’s are never locked out and blacklisted IP’s can’t log in or execute certain PHP scripts.
Add IP Addresses
- Type an IP (1.2.3.4), IP range (1.2.3.* equals all IP’s starting with 1.2.3.), or subnet.
- Add a comment for when reviewing later.
- Click Add IP to the list.
Manage IP Addresses
- Once an IP is added to an access list, you’ll be able to do each of the following:
- Check for activities – redirects to the Activity tab and filters info for that IP including hostname, date, time, event, and user.
- Check Requests – redirects to the Traffic Inspector page and filters traffic for the IP such as URL, hostname, user agent (browser and operating system), and local user.
- Remove the IP from the access list.

Manage IPs from Activity Page
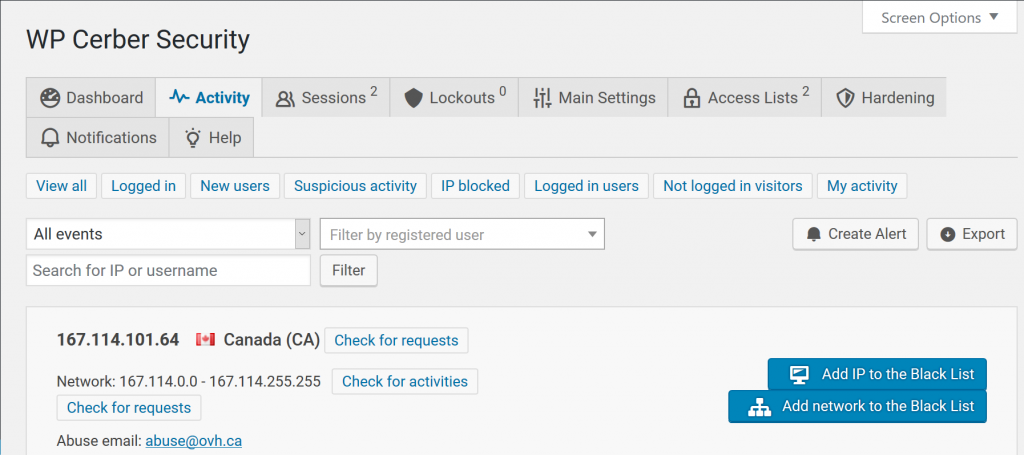
Unknown IPs can be blacklisted from the Activity section with ease.
- Click on the Activity tab.
- Click on the IP address.
- Click Add IP to the Black list or Add network to the Black list. You’ll then see
Black IP Access Listbeside the IP address.

Allow Only Specific IP’s
To further harden your WordPress security, add *.*.*.* to the black IP access list. Afterwards, anyone attempting to access your login page from an IP not on the white list will be redirected to your 404 page.
Do more to protect your website with 10 Ways to Secure WordPress.

