When first purchasing an InMotion Hosting Cloud VPS system, you have a dedicated IP address and built-in SSH security. This means that as soon as your server has been provisioned you can immediately log in and start working.
In this article, you will learn about the default SSH configuration and how you can optionally harden gateways into your server as well as take advantage of secure file transfer (SFTP).
Before reading this article, check out our full guide on how to create a strong passphrase for SSH. You will need this information in order to properly complete the steps outlined in this article.
SSH access makes your Cloud VPS server easier to manage, but can create security issues. Read on to find out how to mange your secure shell in Ubuntu.
How SSH Security Works In Your Ubuntu Cloud Server
Your Ubuntu SSH configuration comes with some attractive default security parameters.
No Password Authentication
By default, your cloud server disallows any password authentication. This means you, or any other users you create, cannot log in with a username/password combination.
SSH key authentication is required by default. This latter type of authentication protects your server from brute force password attempts.
The Root User
When you first log into your cloud server, you can do so as the root user.
ssh root@<hostname, IP address, or domain name>
The root user has access to read and write to the entire file system hierarchy. This is the highest level of access. The root user basically has the power to do anything, so you must exercise caution when using it.
The default SSH configuration permits root login without password but with SSH key authentication instead (as explained above).
Creating and Managing Public and Private Keys
Public/private key security provides you with advanced cryptographic protection, but the benefits depend on your ability to manage your keys properly.
In concept, the key arrangment is simple. Below, we will show you how to create two keys on your local computer: a public key and private key. The public key is safe to share and place on your server, while the private key must only remain on your local workstation.
The following procedure is operating system agnostic. So whether you’re using Windows, Mac, or a Linux-based operating system, you should be able to open your default terminal app and run the following commands.
This command will start the process of generating your keys:
ssh-keygen -t dsaWhen prompted on where to save your key, press Enter. Then provide a strong passphrase. Follow any remaining prompts, and your keys will be generated.
The keys are saved, by default, in the ~/.ssh directory. This
directory is hidden by default, but while you're on the terminal you
can just "change directory" into it:
cd ~/.ssh
Your keys will be saved as id_dsa (private key) and id_dsa.pub
(public key).
Some tutorials will use the RSA encryption algorithm instead of DSA. You may have your own preference. If you used RSA, the keys will be appended with "rsa" instead of "dsa" but they will function exactly the same in practice.
Adding Your Keys to Your Server
As with other security configurations, you can choose different key management options.
Quick and easy, you can add a key to your server from the Account Management Panel (AMP).
This will allow you to log into your server as root. However, if you want to add other users and upload other keys, you can add additional keys to user accounts with the following command:
ssh-copy-id -i ~/.ssh/key user@<hostname, IP address, or domain name>
Managing the SSH Service
Whenever you make changes to your SSH configuration you must keep in mind that the program is not yet aware of the changes you made. The app needs to be restarted with the new configurations in place.
The easiest way to do so is to restart the SSH service itself:
service sshd restart
How to Connect to SFTP With FileZilla
By default, FileZilla will not allow direct connections to your Ubuntu SFTP server as configured.
Configure Your SSH Server For FileZilla SFTP
Comment out this line in the sshd_config file:
Subsystem sftp /usr/libexec/openssh/sftp-server
And add under it:
Subsystem sftp internal-sftp
In order to do this, you must open your sshd_config file for editing
with your favorite text editor. In this example, I will use nano:
nano /etc/ssh/sshd_config
The resulting lines in your configuration file should look like this:
# Subsystem sftp /usr/libexec/openssh/sftp-server
Subsystem sftp internal-sftp
Why comment out the line instead of deleting it? In general, whenever you can avoid deleting your default configurations, you should avoid it. Because if anything breaks, you can easily restore your conditions back to where they were.
And, again, restart your SSH service:
service sshd restart
Configuring FileZilla for Ubuntu SFTP
Before configuring FileZilla from inside the app, do yourself one quick favor and copy your private key from the ".ssh" directory and into a convenient location; that done, rename the file and append the ".pem" extension.
For example, you should have a file that looks something like this:
my-key.pem.
Later, when adding this key to FileZilla, it will be converted to a format that FileZilla uses to establish your secure connection.
Again, as with SSH logins, you are not going to use passwords. You will be using your private key, which is more secure.
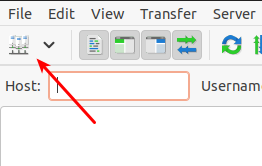
Now that you have your key saved in a secure location, open the FileZilla app and click on the site manager icon:

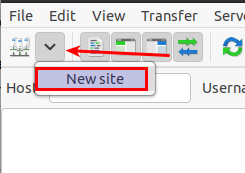
Click the New Site button to create a new site.
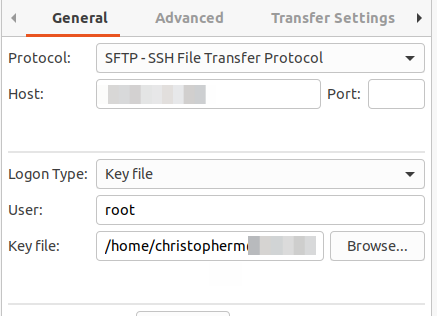
For the new site settings, configure the settings with these parameters:
- Protocol
- SFTP
- Host
- <hostname, IP address, or domain name>
- Logon type
- Key file
- User
- root
- Key file
- <browse for your key file>

Now, you will be able to select your new site from the site manager dropdown:

Continue to build up your skills with these articles:
- How to Secure Your Cloud Server Hosting
- How to Re-OS Your Cloud Server in AMP
- How to Manage Your Cloud Server
Be sure to let us know below if you have any comments or questions or can help improve this article.