Rocket.Chat makes it easy to implement video conferencing with native Jitsi options. All you need to do is enable the Jitsi Rocket.Chat integration and customize a few settings to fit your needs. Suddenly, anyone can start a video chat among teammates with the click of a button.
This Rocket.Chat Jitsi feature is in beta as of version 4.0.0. We noted the one bug we encountered during testing within the tutorial.
integration How to Configure the Jitsi Rocket.Chat Integration
- Log into your Rocket.Chat instance.
- Select your user icon in the upper-left corner, then “Administration.”
- On the left, scroll to the bottom and select “Video Conference.”
- Select “Jitsi” to show Rocket.Chat Jitsi integration settings.

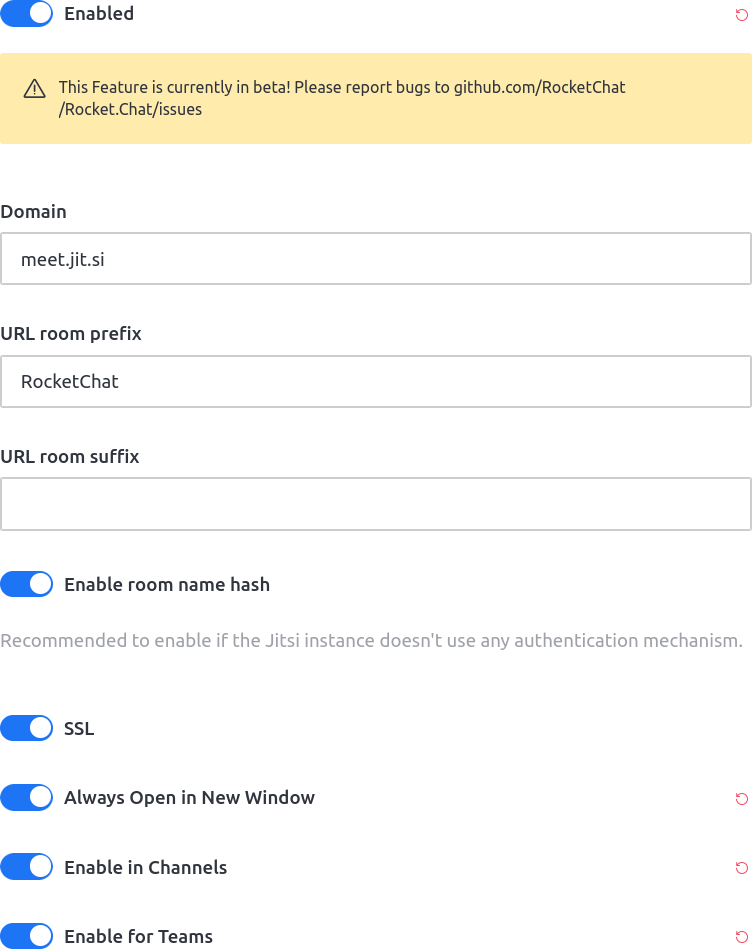
- Select the “Enabled” toggle switch to edit settings. The color will update to blue.
- The domain is set to “meet.jit.si” for the external web application by default. If you have private Jitsi Meet hosting, change this text field to your Jitsi domain or subdomain.
- We recommend changing the URL room prefix from “RocketChat” to something unique to further mitigate the chance of using a video conference created by another Rocket.Chat instance. This will be the beginning of the URI.
- Add an URL room suffix to further ensure a more unique room URL. This will show in the URI after a number of random alphanumeric characters.
- We recommend leaving the “Enable room name hash” and “forced SSL encryption” features enabled regardless of Jitsi settings.
- We recommend enabling “Always Open in New Window” for a better user experience.
- Enable Jitsi in Channels and/or for teams as desired.
alert alert-warning During testing, the “Enable in Channels” and “Enable for Teams” options didn’t show if not enabled in later visits. Refresh the page to fix this. - The Chrome Extension Id is for the Rocket.Chat Screen Share browser plugin (discontinued since May 2017 as of September 2021). You can leave this.
- If your private Jitsi server supports JSON Web Tokens (JWT), enable and configure JWT authorization.
- Select “Save changes” at the top.
- Exit the administration page.
- Now you’ll see a phone (
 ) icon in the upper-right corner of team and/or channel chat rooms, depending on the options you enabled. Select the phone icon to test your configuration.
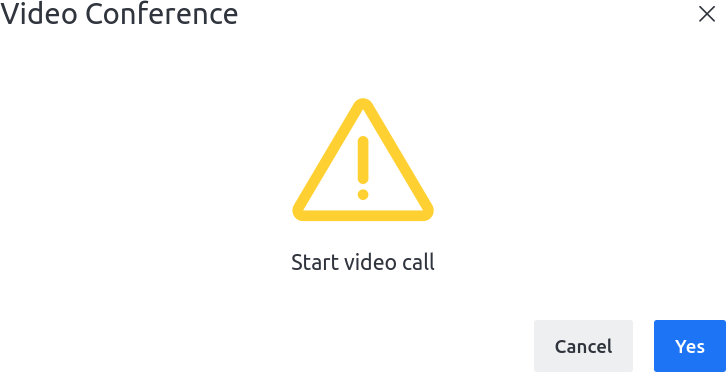
 - Select “Yes” in the video conference prompt to open a Jitsi video conference.

A notification will show in the chat with a “Click to Join!” button for teammates. The link is valid until everyone leaves the meeting.
For more information about managing Jitsi Rocket.Chat video conferences, learn how to use Jitsi Meetings.
No matter if you're a developer, system administrator, or simply a fan of SSH and command line, InMotion's Cloud Hosting plans provide a fast, scalable environment that is budget-friendly.


