In this article, you will learn how to sync a local WordPress development project with GitHub, and how to automate deployment of the site files from GitHub to your production server.
If you do not want to use GitHub to host your code, you can also set up a private Git server.
- Why Integrate Git With WordPress?
- Creating a Remote Repository at GitHub
- Setting Your Local Environment For Git
- Deployment Using GitHub Actions
In order to follow along with this article you will need:
- Git installed on your computer
- Local WordPress development site
- GitHub account
- A server with FTP or SSH access
Why Integrate Git With WordPress?
If you have been using WordPress for some time, you likely know that much of the administration of the site for all of your day to day needs can be accomplished in the WordPress Dashboard.
However, there will be occasions in which you will want to edit core files, plugin, or theme files, and doing all of those edits in the admin area of the site can be tedious or even hazardous.
This is why many users will install a local WordPress development. If you are reading this article you likely understand the benefits of local development, so they need not be repeated here.
The benefits of integrating Git and GitHub start to accrue by saving you some time and effort. Instead of making your local changes, logging into your server, and uploading files, you can use Git to automatically push your changes to your server, as well as providing redundant file security, branches, and all of the other nice features of Git. This kind of continuous deployment cycle is easier than ever to set up, and this article will tell you exactly how to do it.
Creating a Remote Repository at GitHub
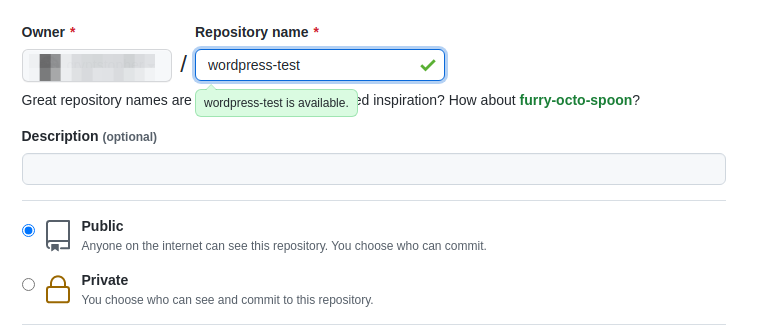
In order to sync your local WordPress files with GitHub, you will just need to create a free public repository.
- Log into GitHub
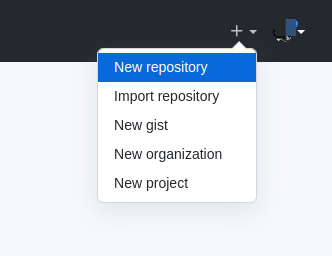
- Create a new repository from the dropdown menu

- Name your repository

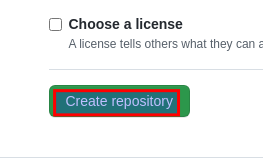
- Click Create Repository when ready

You now have a remote repository at GitHub. Be sure to note your live repository link. It will look something like this:
https://github.com/username/wordpress-test.git
You will later use this link when adding your repository to your local Git project.
Setting Your Local Environment For Git
This article assumes that you already have a local WordPress development environment. If you have not already, the steps outlined in this section will show how to set up your local environment with Git and add your remote repository.
Adding a remote repository may sound complicated, but it simply means you will tell your local Git installation where to push changes you make to your site.
First, initalize Git in your local WordPress directory:
git init
Now, add the core files. Remember, this command will add all files. If you wish to exclude any files, such as media files, you will want to create a .gitignore file for WordPress:
git add -A
Now, commit the changes to the local repository:
git commit -am "Initial commit"
The commit is the last step before pushing your files up to GitHub. But first, you will need to add your repository to the local configuration. This command will basically tell your local Git which repository to push to. You will give Git the name of a repository (in this example, “github”) and a link to the repository:
git remote add github https://github.com/<username>/<name of repository>.git
Of course, be sure to substitute the example URL with the correct URL for your site.
Finally, it’s time to push to GitHub:
git push github master
In the above, “github” is the name of the repository, and “master” is the local branch you are pushing up.
That’s it! You are now pushing your project changes up to GitHub. Next, you will want to set up deployment to a live production server.
Deployment Using GitHub Actions
With GitHub actions, you can use either FTP or SSH to push your changes to your server.
Be sure to check out our full guide on deployment with GitHub actions. As written in the guide, the deployment will be triggered on the “push” action. This means that when you push your changes to GitHub, they will be deployed to your server.


