Table of Contents
In this article we’ll discuss manually adding a user into phpList, and subscribing them to a list that you have created.
In most cases phpList is used in order to allow users to subscribe themselves to your mailing lists via a subscribe page. However there are also many cases where you might have already been maintaining a mailing list of your own in a desktop email client, or you just have a list of email accounts already that you’d like to send mail to.
Add a new user to phpList
Follow the steps below to add a new user into phpList, and then subscribe them to one of your mailing lists. We will also be setting them to un-confirmed, so that we ensure they want to receive further mailings from us.
- Login to your phpList admin dashboard

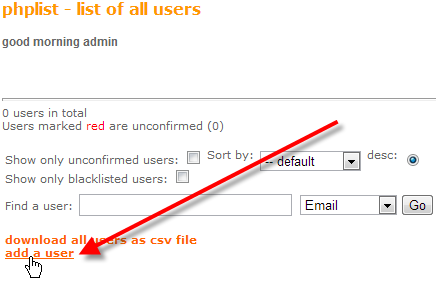
From the menu on the right, click on Users.

Towards the bottom, click on add a user

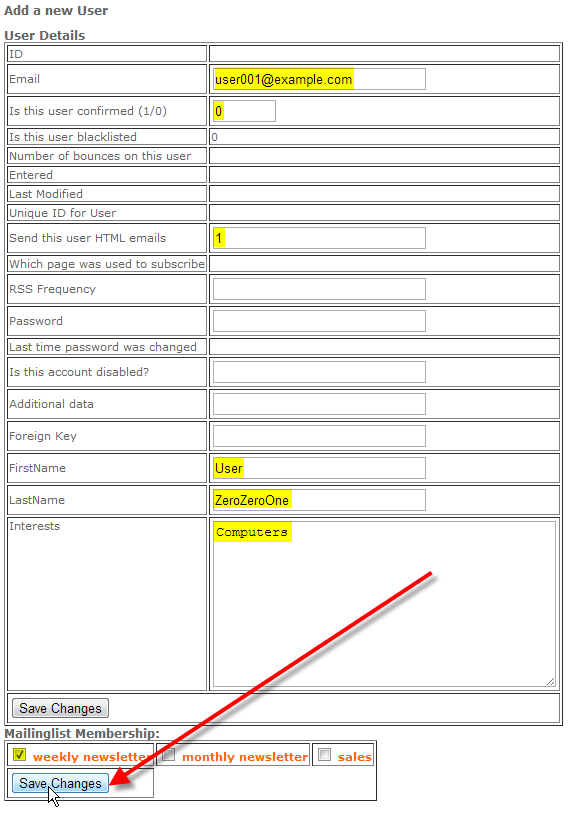
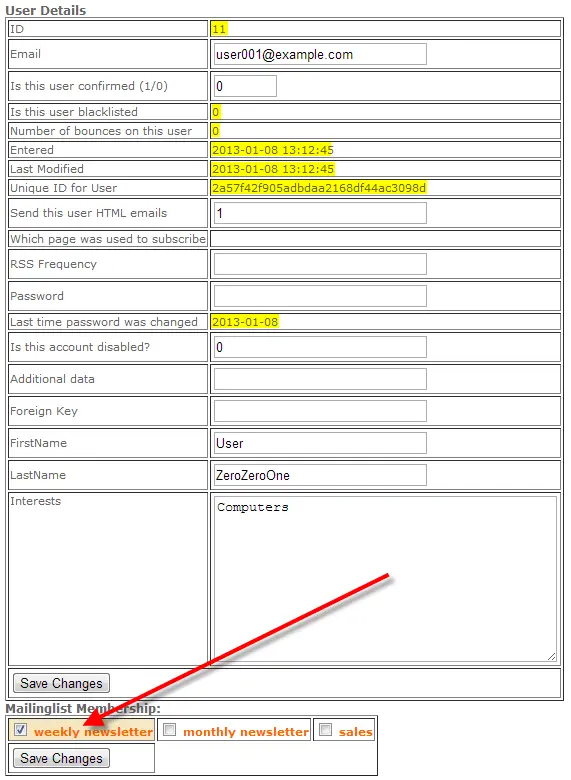
Now you’ll want to fill in the details for the user you’re adding. Below are the values that we’re using for this example. Not all of the fields have to be filled out, some are filled in by phpList which I’ve indicated by a Green background, and some aren’t needed in most cases, indicated by a Yellow background. Ones that are Red should almost always be filled out.
ID phpList automatically assigns a unique ID to each user. Email The email address of the user, we used user001@example.com. Is this user confirmed (1/0) Set if a user is already confirmed or not, 0 = No and 1 = Yes. We set our user to not confirmed yet. Is this user blacklisted If a user chooses to unsubscribe from your lists, their email address is still stored in the phpList database to prevent someone else from signing them up again. 0 = No and 1 = Yes. Number of bounces on this user. Indicates how many times a message to a user has bounced, and did not deliver. Entered phpList sets the date and time when a user first signed up. Last Modified If the user, or the admin changes any details for a user, this will reflect when that change was last made. Unique ID for User This is a longer unique ID that phpList assigns per user. Send this user HTML emails Set if this user should receive HTML emails, or plain text ones. 0 = No and 1 = Yes, we set ours to 1. Which page was used to subscribe If a user subscribes via one of your subscribe pages to a list, this will show which one they used. RSS Frequency If you’ve enabled RSS feeds in your mailings, this will set the frequency of when they’re updated. Available settings are empty, daily, weekly, monthly. Password Users can be allowed to edit their own personal preferences file if they’ve been assigned a password. This does require changing the ASKFORPASSWORD setting in the phpList config.php file, and isn’t a commonly used feature. Last time password was changed If you are using passwords for your users, this shows the last time it was updated. Is this account disabled? This setting is not used currently in phpList, and should be left blank.
Additional Data The phpList documentation currently lacks any information on this field, and it should be left blank.
Foreign Key This is used if you’re using phpList in conjunction with another application’s database. If you only use phpList you can leave this blank. FirstName This is an attribute that we defined. We’ve set ours to User. LastName Another attribute that we defined. We’ve set ours to ZeroZeroOne. Interests Yet another attribute that we defined. We’ve set ours to Computers. Finally under Mailinglist Membership, we’ve selected our weekly newsletter, and then click on Save Changes to add this new user into phpList.
You should now notice that phpList has automatically filled in some of the fields, and our weekly newsletter mailing list is selected and highlighted.
Send out confirmation email
For the new user we just created, we set them to un-confirmed. They aren’t going to receive any of our mailings until they’ve confirmed their interest, so you can use the steps below in order to send out a confirmation email to any users that aren’t currently confirmed yet

From the menu on the right, click on manage users

Next, under Control values for, click on reconcile users.
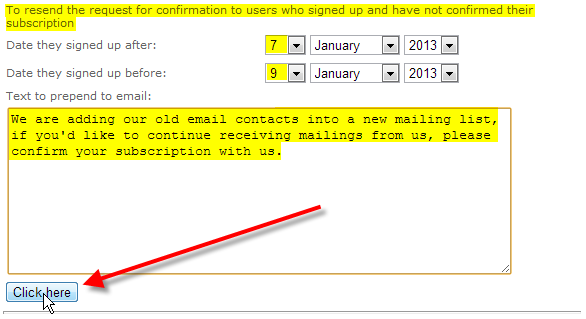
- Now at the bottom of the page look for the To resend the request for confirmation to users who signed up and have not confirmed their subscription section.

Today is January 8th, 2013. So we would want to set:
Date they signed up after: 7 | January | 2013 Date they signed up before: 9 | January | 2013 Fill out a message to your un-confirmed users in the Text to prepend to email: section.
Then click on Click Here prior to the horizontal line on the page to send the confirmation email.
You should see a notice that the confirmation email was resent.
You should now understand how to create a new user in phpList, assign them to a list, and resent the confirmation email to ensure that they show continued interest in receiving your mailings.


