Table of Contents
As flexible as dynamically generated sites are, they aren’t without potential issues. There’s bound to be an instance of database corruption at some point between web server requests and complex PHP executions. This is why it is important to know how to repair MySQL databases on your Control Web Panel (CWP) server. We’ll also cover how to check MySQL databases beforehand to identify what tables need to be repaired.
Repair MySQL Databases in CWP
For users with access to the CWP dashboard, you can repair MySQL databases in less than a minute by clicking a few buttons.
- Log into CWP.
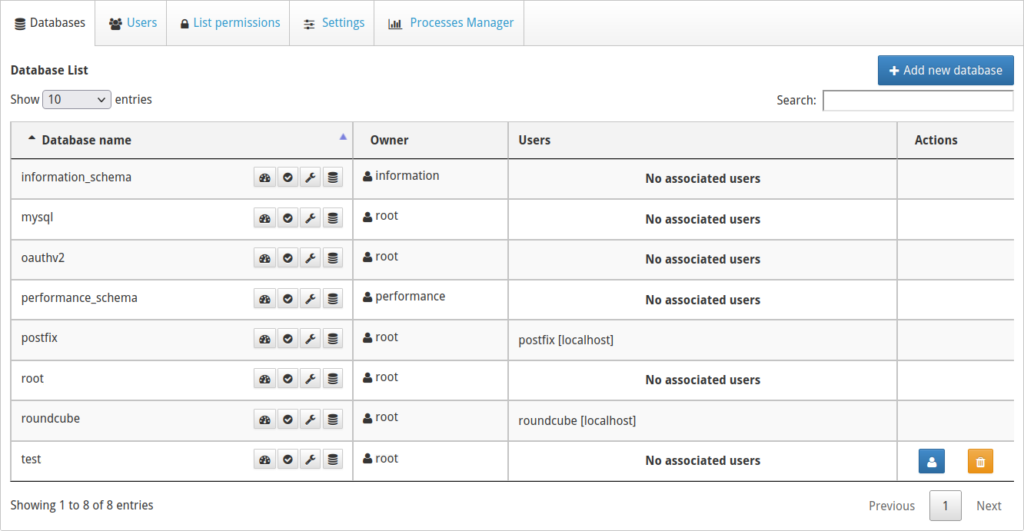
- Admin users: search for and select MySQL Manager from the sidebar.
End users: select Databases on left, then MySQL Manager.
- In the “Database name” column, each database has buttons to optimize, check, repair, and backup the database. Select the “Check database” (second) button.
- A notification will show in the corner stating “Your database was Checked successfully.” A pop-up window will show which tables were affected. Take note of any tables not marked “OK” on the right before selecting Accept to close the window.
- Select the “Repair database” (third) button.
- A notification will show in the corner stating “Your database was Repaired successfully.” A pop-up window will show which tables were affected. Note any tables not marked “OK” on the right and select Accept to close the window.
phpMyAdmin
phpMyAdmin is a popular graphical database manager installed on CWP servers. In the case that you need to repair MySQL databases and make other changes, you can do so in the same place.
- Admin users: search for and select phpMyAdmin from the sidebar.
End users: select Databases on left, then phpMyAdmin. - Click on the database you wish to repair in the left-hand menu.
- The right side will update to list all tables in that database. At the bottom, select Check all to select all tables.
- Select the With selected drop-down menu and Check table.
- The page will refresh and provide a summary of tables that may be corrupted. Note any tables that show errors for further troubleshooting. Select Structure at the top.
- Select Check all again to include all tables.
- In the With selected menu, this time select Repair table.
MySQL Command-Line Interface
Sysadmins working in the command-line interface (CLI) with root access can use MySQL CLI to repair MySQL databases.
MySQL Database Repair Tools
Simpler website builders like SitePad don’t commonly suffer from database issues and, therefore, do not have features to resolve such issues. On the other hand, PHP-based web applications commonly used for large, multi-purpose websites generally have one or two recommended methods for how to fix MySQL issues.
Repair WordPress Databases
WordPress developers know they have a db corruption case when their domain only shows a blank page stating “Error Establishing a Database Connection.” Luckily, there are a few ways to resolve this without CWP or installing plugins, meaning website owners can maintain their site without elevated system privileges.
The first method is to modify your wp-config.php file so that WordPress automatically repairs the database when problems arise.
- Open CWP Terminal or log into SSH.
- Navigate to the root folder of your WordPress installation.
- Edit your wp-config.php file:
- Add this short code block in the WordPress configuration file:
- Save changes.
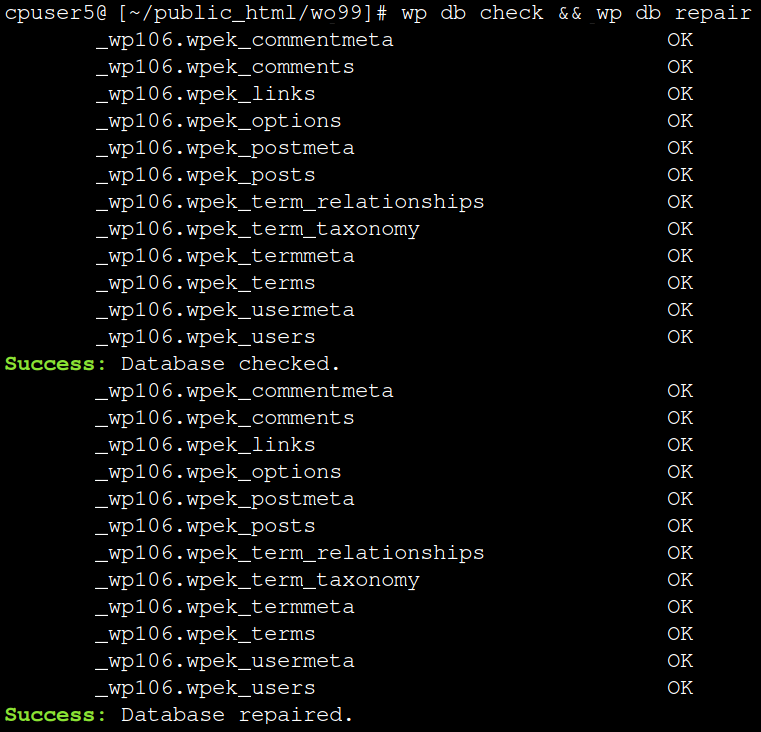
The second method requires having WP-CLI installed on your web server. Instead of editing your wp-config.php file, simply run these two commands together to check and repair a WordPress database:
Repair Drupal Databases
Drupal users can install OptimizeDB, a module that optimizes, checks, and repairs MySQL and PgSQL databases.
- Install the Drupal module using the download link for your Drupal version.
- Click Enable newly added modules.
- Under “Development,” check the box for Database Optimization.
- At the bottom, select Install.
- At the top, select Configuration.
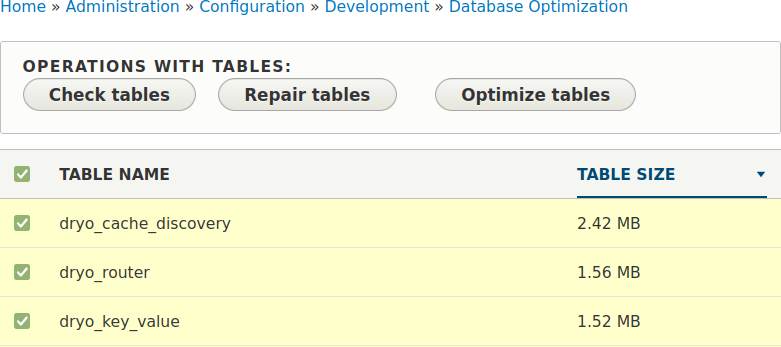
- Under “Development,” select Database Optimization.
- Select the List of tables in the database tab.
- Select the checkbox at the top to select all tables. Then, select Repair tables.

Repair Joomla Databases
Joomla 4 includes a straightforward function in the backend for learning of database issues.
- Log into Joomla 4.
- Select System on the left.
- Under “Maintenance,” select Database.
- If Joomla hasn’t detected any problems, you’ll see “No problems” in a green box.

Any issues will be listed at the top for you to handle.
Learn about how to manage your CWP or CWPpro server.
