In this guide, we will show you how to set your MX records for SpamExperts. This will allow you to protect your email from being inundated by spam messages. We will also show you how to access the SpamPanel in cPanel, and disable (or bypass) the spam filter if you do not want to use it.
Note: You’ll need to contact our live support to enable SpamExperts before continuing below. However, the below is only needed for inbound emails. Outbound emails already use the below by default.
- What MX Records do I use?
- How to Set your MX Records in cPanel
- Remove Other MX Entries
- How to Disable SpamExperts in cPanel
What MX Records Do I Use?
The following are the correct MX Records to use for SpamExperts filtering service. Keep in mind Shared plans, and Reseller Hosting accounts have different MX settings.
Business/Shared Accounts:
- mx1.inmotionhosting.com (10)
- mx2.inmotionhosting.com (20)
Reseller Accounts
- mx1.servconfig.com (10)
- mx2.servconfig.com (20)
How to Set Your MX Records in cPanel
- Log into your cPanel.
- Click the Email Routing button in the Email section.

- If you have multiple domains, select the one you want to modify from the drop-down menu. If you do not have multiple domains, skip to the next step.
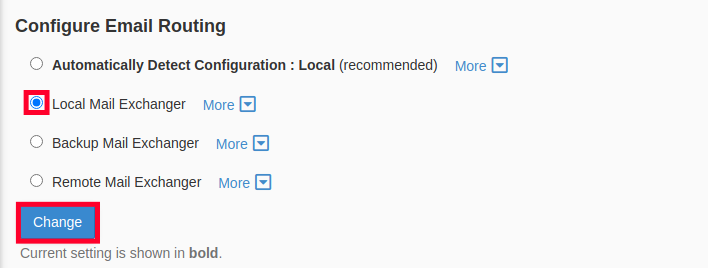
- Ensure the Local Mail Exchanger option in the Email Routing section is checked. Click the Change button if necessary.

- Click the cPanel button on the top of the page the page to return to the main menu.

- Select Zone Editor in the Domains section.

- Click the MX Record button next to the domain you want to setup.

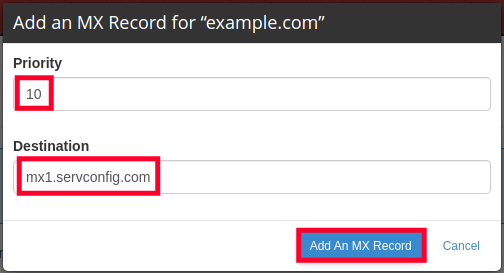
- Under Add New Record enter 10 in the Priority section, and mx1.inmotionhosting.com in the Destination section (or “mx1.servconfig.com” if you are a Reseller). Then, click the Add An MX Record button.

- Click the MX Record button next to your domain again.
- Enter 20 in the Priority section, and mx2.inmotionhosting.com in the Destination section (or “mx2.servconfig.com” if you are a Reseller). Then, click the Add An MX Record button.
Remove Other MX Entries
Now that you have added the two new MX entries above, you can delete any other existing records.
- Click Manage next to your domain.
- Select the MX option and you can then delete any other MX Records you see listed, by clicking the Delete link next to it.

- A confirmation message will pop-up, click Continue.

- Repeat steps 2 and 3 above for any old records.
How to Disable SpamExperts in cPanel
If you do not want to use this service, you can disable the SpamExperts filter by pointing your MX records elsewhere. For example, you can point them to example.com, or mail.example.com. This will allow you to continue hosting your mail on our server, but bypass the SpamExperts filter. Be sure to set your Email Routing to Local.


MX Records does not appear on the email section of my cPanel. Can you please help me troubleshoot this problem?
First, ensure your domain is pointed to our nameservers, since MX records will not work if you are not hosting DNS here. Then, you can just create the MX records in cPanel if they are not there.
Thank you,
John-Paul