Table of Contents
When you think about menus on a website you begin to understand their importance for your viewers. Menus provide the necessary navigation interface for the content of your site. Without menus, your visitors would be unable to get to your content unless they know the specific link to find what they’re looking for.
Joomla 4.0 menus are affected by the theme being used by the Joomla site. This means that the location and appearance of the menus will be determined by the theme that you have selected. However, the content and make-up of the menus can be easily managed through the menu interface in the Joomla 4.0 administrator dashboard.
This article will take you through the general menu interface in order to familiarize you with menu features provided through Joomla 4.0. You will learn how to find the menu options in the administrator dashboard, the difference between
- The Joomla Menu Interface
- Understanding the Difference between Site and Menu
- Menu Actions and Filtering Toolbars
Need a secure and reliable home for your new Joomla 4.0 site? Check out InMotion’s Managed Linux VPS hosting solutions! You’ll find servers tailored for your budget needs.
The Joomla Menu Interface
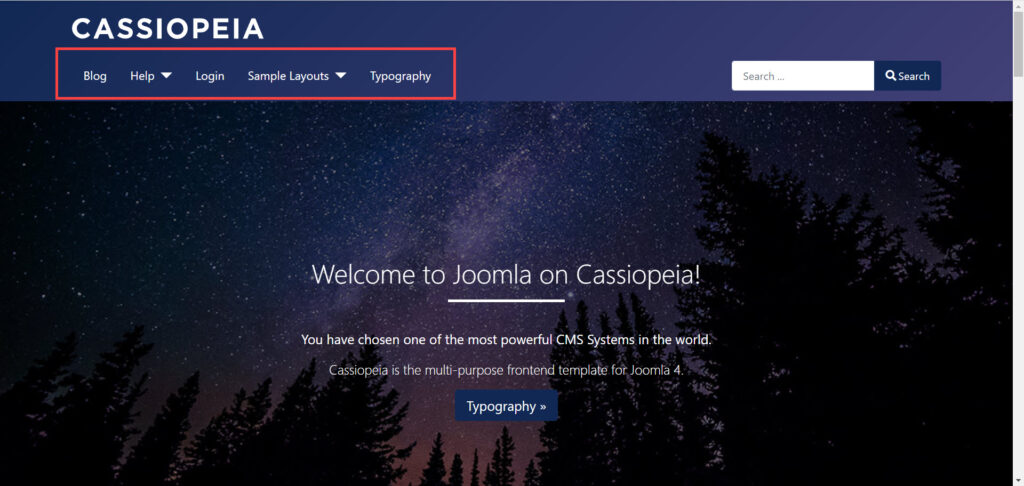
The menu in a Joomla site can be accessed in two different ways: the front end and the backend. The front end is generally where website visitors can interact with the menu items that you have added to the site. The appearance and position of a menu are determined by the Joomla theme that you have selected for the site. The default theme that comes with Joomla 4.0 is Cassiopeia. You can see the menu at the top of the home page when you access the site in a web browser.
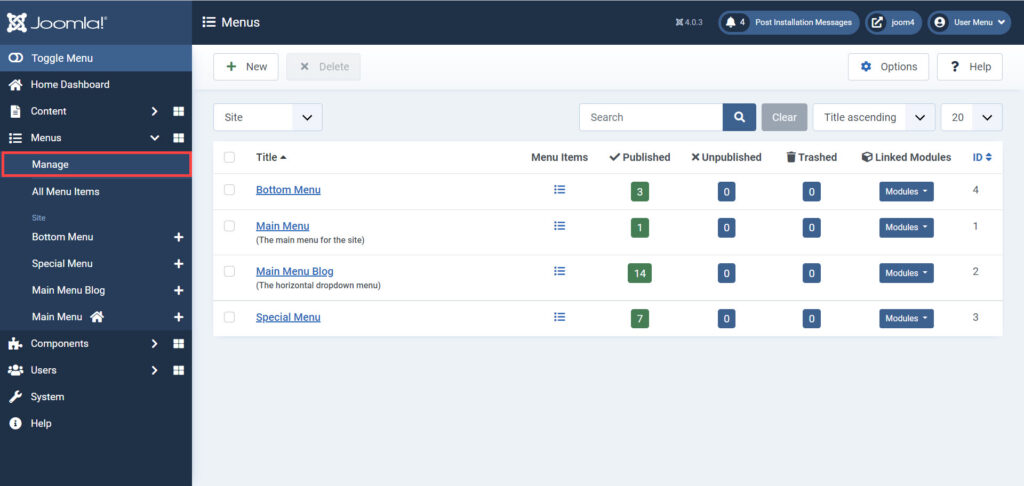
The backend is where you would manage the menu created in your Joomla site. You can access the menu through the Joomla Administrator Dashboard. Here are the steps to access the menu in the dashboard:
- Log in to the Joomla Administrator
- In the main menu at left click on Menus.

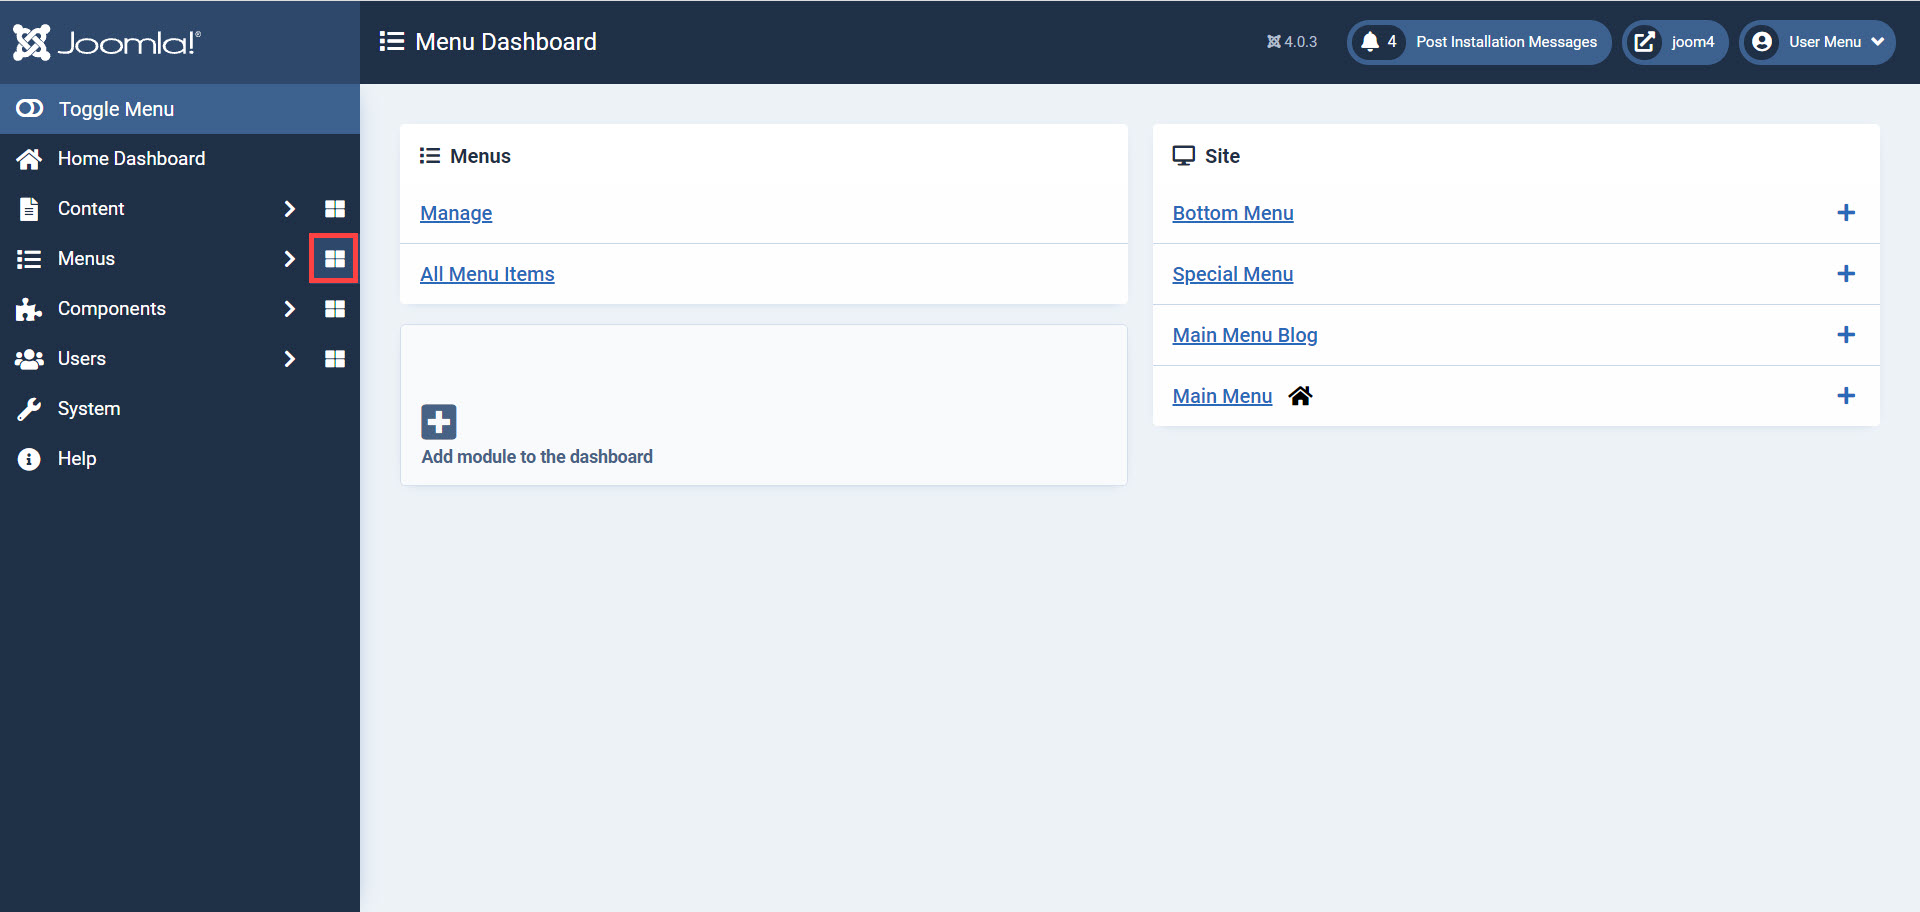
- Here you can see the main options for working with menus in Joomla. Click on the square icon next to the Menus item in order to get to the Menu Dashboard page. You can see the icon highlighted in the screenshot below:

The Menu Dashboard will give you the menu items using a view organized by Menus and Site.
Understanding the Difference between Site and Menus
Like any website, Joomla websites are composed of pages. Individual Joomla pages are referred to as sites. Content created within each site is known as an article. The menu section allows you to add sites to your website. Each site can have its own menu.
In the example above you can see 4 sites: Main Menu (home), Main Menu Blog, Special Menu, and Bottom Menu. If you think of each of these sites as pages in a website, then it becomes easier to understand.
A site (or page) can have featured content and a separate or similar menu. For example, you might create a site called About Us and include several articles that describe your company and/or employees. That site may also have the same menu as what’s on your home page, or no options at all depending on what you want to show. There would normally be a home button to return to the home page.
In our screenshots, the Main Menu (home) with the home icon next to it is the home page for the Joomla site. This menu item is normally used as the return option that brings you back to the home page. So, if a user goes to a different page on your website then wants to go back to the home page, you would provide that menu item so that they can click on it to return.
In this theme, there is also something called Main Menu Blog. This can be confusing, but you can see this menu described when Manage is selected in the Menu dashboard. You will see the following:
Here you can see a description under the Main Menu blog that says “The horizontal dropdown menu”. This menu is what you see on the front end of the website:

In order to manage these menu items, we clicked on Main Menu Blog in the menu list. This will display a table listing of all the menu and submenu items in the horizontal drop-down menu. The list will also include the submenus that are not shown in the screenshot. Note that if you click on the menu item on the right side, then it will only display the properties of the individual menu item. This is where you can give the item a unique name and description.
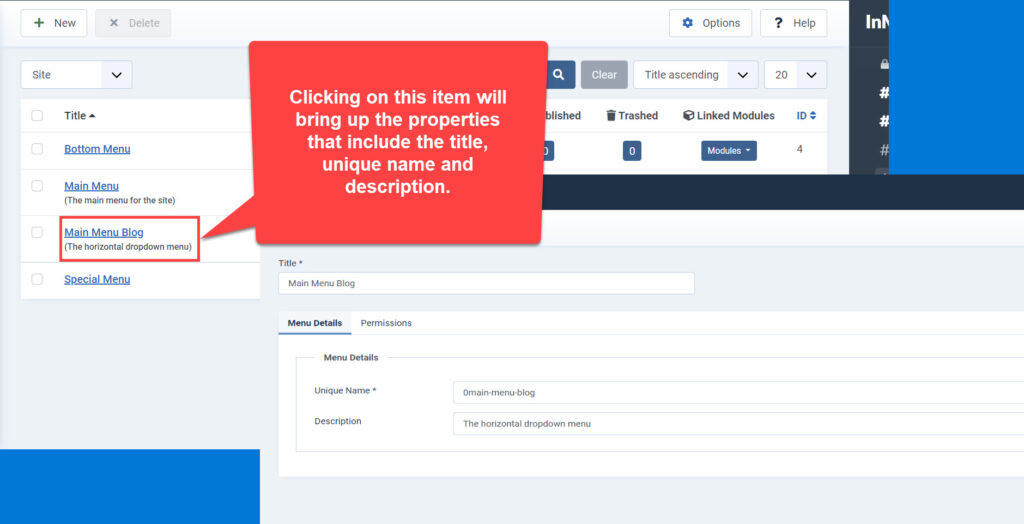
Clicking on the menu item in the menu column will bring up the menu list as shown in the horizontal menu. When you compare the menu items in the list you can see that they match the horizontal menu as previously shown.
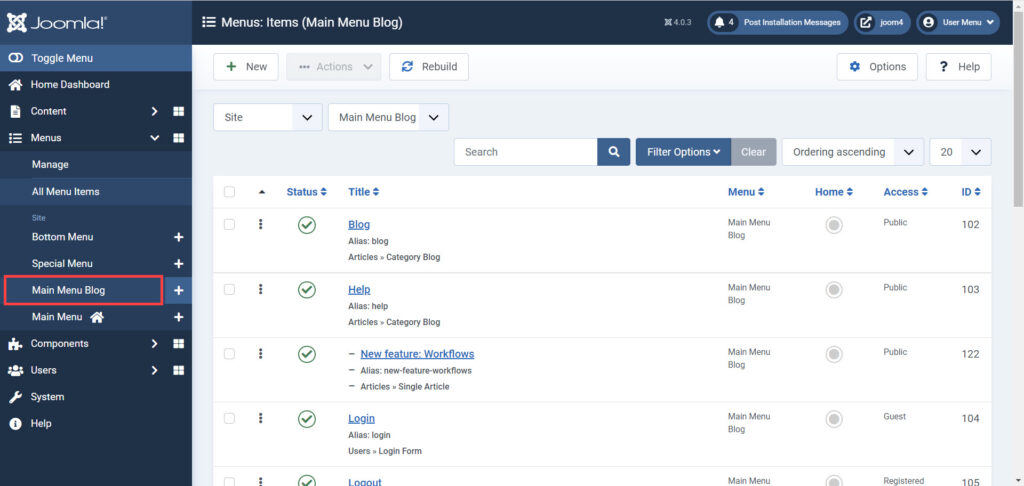
Let’s take a closer look at each column in the table:
- Status – lets you know if the menu item is published or not
- Title – the title of that menu item. Clicking on this item will give you properties for that menu item
- Menu – this is location of the menu item in the menu structure
- Home – identifies the home page
- Access – identifies the access to that menu item
- ID – internallly generated number ID
Menu Actions and Filtering Toolbars
When you look at the menu items, you will see options at the top that include New, Actions, and Rebuild. We describe each of the options in the list below.

- New – allow the creation of a new menu item
- Rebuild – rebuild the menu table in the even that the table becomes corrupt; normally not required
Actions drop-down menu
- Publish – menu item will be available to website visitors
- Unpublish – removes the menu item from public website visitors
- Check-in – checks the select menu item(s) in to help manage menu items being edited
- Home – sets the home page (this can only be one site page)
- Trash – marks menu items as trashed (not permanently deleted)
- Batch – batch processes a change that would apply to multiple selected menu items
Directly beneath the top three buttons of New, Actions, Rebuild are the filtering options. The filtering options allow you to separate and display only the items that you have opted to show. There are multiple filtering options that you can choose from as per this screenshot:

- Site – this drop-down menu allows you select either Site or Administrator. This identifies where the menu would be used
- Select Menu (Main menu Blog selected in the screenshot above) – you can choose the existing menu to filter
- Search – type in term you wish to use to isolate menu items
- Filter options
- Select Status – select items that published, unpublished, trashed or all (show all items regardless of status)
- Select Access – shows items based on user access type (public, guest, registered, special, super users)
- Select Max Levels – shows items based on hierarchy (1 – no parent items, 2-10 levels – only shows items that fall into that hierarchy order
- Select Parent Menu – show only items items in a parent menu item
- Order – show results in ascending or descending order
- # (currently showing 20 in screenshot) – number of results to show at one time
This concludes our overview of the menu interface in both the front and backend of your Joomla 4.0 website. To learn more using the menu, please our article on Adding and Removing Menu Items in Joomla 4.0.
Enjoy high-performance, lightning-fast servers with increased security and maximum up-time with our Secure VPS Hosting!
Linux VPS
cPanel or Control Web Panel
Scalable
Website Migration Assistance


Trying to find out why Joomla 4 menus don’t show their classes in the body tag
I couldn’t find an updated guide specific to Joomla 4 but the official documentation on Using Class Suffixes discusses editing your template.css file to affect all menu items that use the CSS classes.