Table of Contents
When developing courses in Moodle, you can add features to improve accessibility, security, and other aspects of the user experience (UX) with the Moodle Plugins Directory. These custom plugins allow you to customize your online learning center for the needs of your teachers. For example, a teacher could add a completion progress bar to provide a visual graph of students progress throughout a course.
Remember that most of these Moodle plugins are developed by third party developers and not associated with the Moodle project. Ensure the plugin is compatible with your Moodle version. Check the reviews, download count, and provided stats to ensure you make the best secure decision on what plugins to upload to your website. Finally, before making major changes, create a backup.
Below we’ll cover:
- How to install Moodle plugins
- Completing Moodle plugin installation
Secure your e-learning center with our Managed VPS Hosting.
Install Moodle Plugins Directly from the Plugins Directory
Compared to the manual method, this option negates the need to download the ZIP file to your local workstation and upload it to your website. However, you do need to have a Moodle.org account.
- Log into Moodle as an administrator.
- On the left, select Site administration.
- Select Plugins, then Install plugins.
- Select Install plugins from the Moodle plugins directory.
- Log into your Moodle.org account.
- Select a plugin.
- Select Install now.
- In the information for your site name, version, and URL is correct, select Install now. Otherwise, select the gear icon to modify the settings before continuing.
- Select Continue to confirm downloading the Moodle plugin.
- Continue to Complete the Moodle plugin installation.
Manually Install Moodle Plugins from ZIP File
This method requires downloading the ZIP file to your local computer, but you don’t need to create a Moodle.org account.
- Log into Moodle as an administrator.
- On the left, select Site administration.
- Select Plugins, then Install plugins.
- Open the Moodle plugins directory in a new tab.
- Select a plugin.
- Select Download which downloads the latest version of the plugin to your local machine.
Before downloading a plugin, it is best to select Versions to ensure the plugin has been updated recently first. If the plugin hasn’t been updated in months or longer, you should consider searching for a more recently updated Moodle plugin to suit your needs.
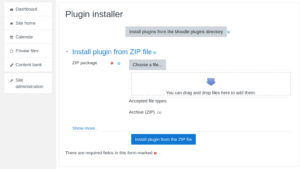
- In your Moodle Plugin Installer, drag and drop the downloaded plugin ZIP file to the box under Choose a file…. Then skip to step 12. If the uploaded file exceeds the upload_max_filesize directive in php.ini, select OK. Then select Choose a file…
If you wish to fix this error to use that feature in the future, you’ll need to edit your php.ini file.
- In the File picker, Upload a file should already be highlighted. At the top, select Browse…
- Find and open the downloaded Moodle plugin from your computer.
- (Optional) Edit the Author and Choose licence options.
- Scroll down and select Upload this file. If the loading icon shows for longer than 1 minute, exit the File picker window as it likely has finished uploading.
- Select Show more…, then Plugin type from the drop-down.
- Select Install plugin from the ZIP file.
- Continue to Complete the Moodle plugin installation.
Complete the Moodle Plugin Installation
- Once you’ve completed the initial plugin installation steps, the next page should state plugin validation was successful. Continue.
- The next page displays results from Moodle and server checks.
See our related article if you need to update your Moodle configuration file for MariaDB.
- Resolve all issues. Then scroll to the bottom to Continue.
- On the next page, Plugins check, select Check for available updates. Your new plugin should be listed with the status To be installed. Upgrade Moodle database now.
- The next page should state Success. Continue.
- You’ll be redirected to the configuration page for the newly installed plugin. Once finished, Save Changes to be redirected to your site administration notifications.
Looking for worthy Moodle plugins to improve your remote learning platform? Check out the mod_jitsi video conference plugin.

