Table of Contents
When working with users in your phpBB board site, you may wish to segregate users into different groups. Default groups such as Moderators, Admin, Users, Guest, etc. already exist. However, you may want to create your own groups, possibly so that they can have access to specific areas or have special permissions on certain forums. In the instructions below, we will show you how to create user groups in your phpBB 3.0.
Creating user groups in phpBB 3.0
- Log into your phpBB admin dashboard.
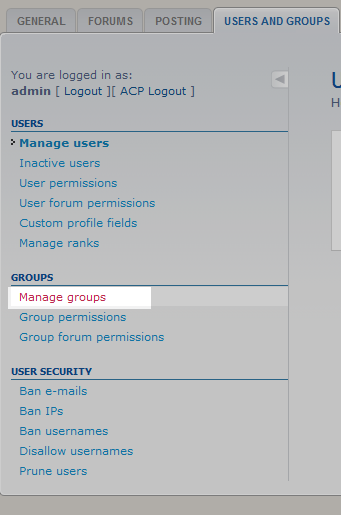
- From there, click on the Users and Groups tab.
- On the Users and Groups admin page, look to the left hand sidebar and locate the Groups category. From there, click on the Manage Groups link to continue on to the group management page.

- On the Manage Groups screen, there are two sections. The first is the User Defined Groups section where you will create your new groups. The lower section is the Pre-Defined Section where all the default groups are listed. You will enter your new group name at the Create New Group located at the lower right corner of the User Defined Groups section. After entering the name, click on the Submit button.

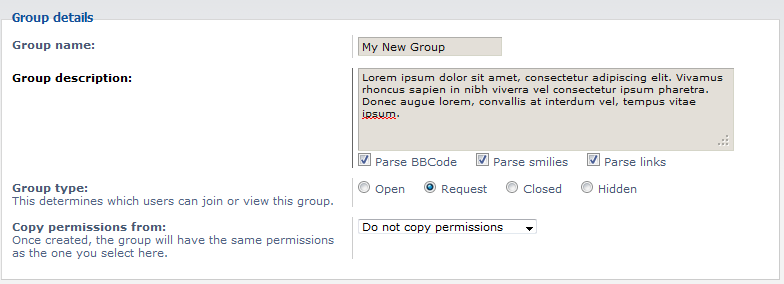
- This brings us to the group settings page where we define all the individual settings for your new group. This page is divided into several sections. The first section we encounter is entitled Group Details.

Group Name The name of your new group. Group Description A description of your group’s purpose. Group Type Selection for which users can join the group. Open means everyone, Request means they must be approved, Closed means no new members, and Hidden means this group is not visible. Copy Permissions From Determines where the group’s permissions are copied from. If you select Do Not Copy Permissions you will need to customize your own permissions. - The second section is entitled Group Wide Options.

Founders Manage Only Option to restrict the management to founders only. Exempt Group Leader From Permissions Option to disable the group leader from inheriting the group permissions. Display Group in Legend Option to display the group in legend. Group Able to Receive Private Message Option for non-hidden groups to be able to receive private messages. - Our third section is named Group Wide Settings.

Group private message limit per folder An override for the per-user message limit, so it can be higher or lower. Setting this value to 0 means it will use the default limit. Maximum number of allowed recipients per private message Sets the number of recipients for each private message. Setting it to 0 mean it will use the default board value. Group colour Select the display color for group users. You may click on the Web-safe colour swatch to select one. Group Rank Select the rank for the group. Default settings are User Default and Site Admin. - The final section is the Group Avatar section, where we set the configuration for the group’s avatar.

Current Image The current image in use for the group, if any. Upload FromYour Machine Used to upload an avatar from your local computer. Upload From a URL Used to download the image from a web site. Link Off-site Used to link to an off-site location, does not download the image. Avater Dimension Set the height and width to override the true dimensions. Leave blank to use the real dimensions. - Once you have finished tailoring your group’s settings, click on the Submit button at the bottom of the page to save your new group. Your new group will now appear in the User Defined Groups list.


