Table of Contents
In this article we’re going to review how you can import multiple users into phpList to save you time from having to create them one at a time.
If you already have a large list of users that you’ve been mailing with another application, you might like to start sending messages to those users from phpList. It’s much easier to simply import them all at once instead of relying on adding them yourself one at a time.
WARNING! Per our Terms of Service, you can only send mailing lists out to opt-in email addresses. This means that each user on your list needs to confirm their continued interest in receiving your mailings before you mail them on a regular basis.
Import users with attributes
Following the steps below, you’ll be able to take a formatted tab delimited text file or CSV (Comma Seperated Value) file of users, and add them into phpList.
If you’ve been following along in this phpList education channel, our example lists are using the attributes FirstName, LastName, and Interests. So we’ll want the text file that we’re importing to match up to what phpList is going to be expecting for users.
In this example, we’re going to be using a Tab delimited list. This means that a Tab separates our fields of data. The example text file we’ll be importing looks like this:
We’ve got our fields in this text file set to email, First, Last, and Likes. These will match up nicely to the attributes we already have defined in phpList.
- Login to your phpList admin dashboard.

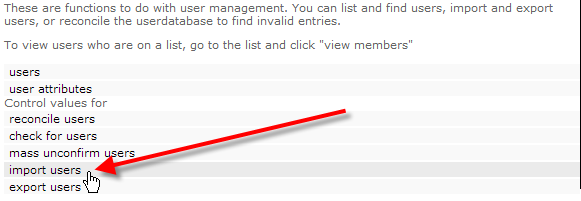
From the menu on the right, click on manage users.

Under Control values for, click on import users.
- Click on the first option of import emails with different values for attributes.
This will allow each of our imported users to have their own unique attributes, we want this since the text file we’re importing already has unique information for each of them.

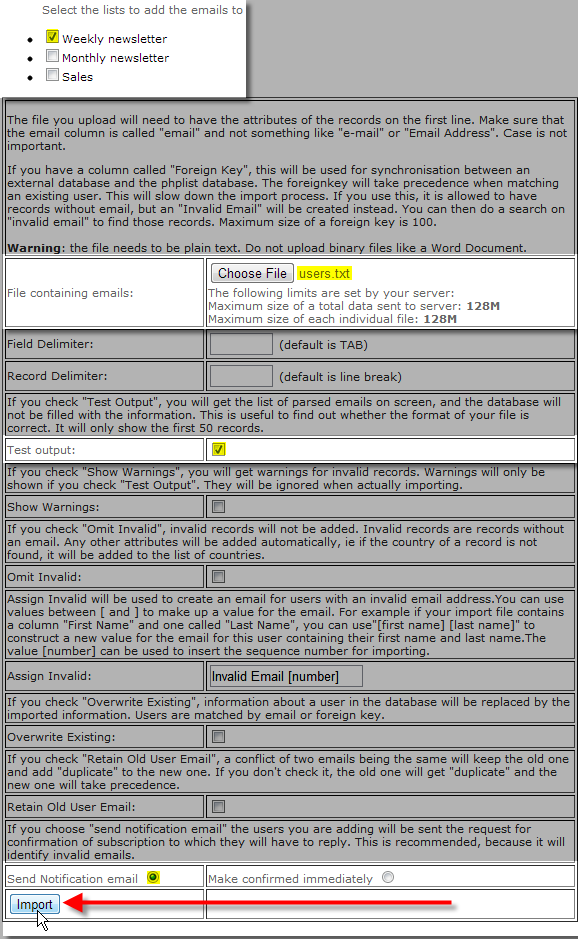
Underneath Select the lists to add the emails to, select the mailing lists you’d like the users you’re about to import added to. In our case we chose Weekly newsletter.
Beside File containing emails, click on Choose file, then navigate on your local computer to the location of your text file of users.
For our example you’ll want to leave both Field Delimiter, and Record Delimiter blank. If you were using a CSV file, you’d want to set a comma , as the Field Delimiter.
Then you’ll want to place a check-mark beside Test output, this will ensure the columns of data we’re importing line up with our phpList attributes we’ve already created.
The other options aren’t really going to apply if this is your first time importing users into phpList, each one should be self-explanatory as to what they do.
Finally scroll to the bottom of the page and ensure that you select Send Notification email to comply with our TOS, then click on Import.

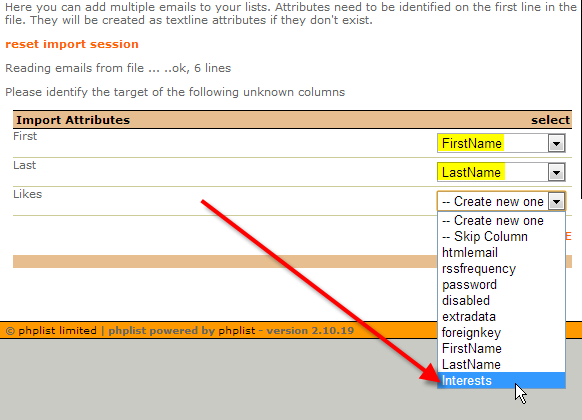
You should now be on the Import Attributes page, this is where you’ll want to assign the values for the columns from your text file to match up with your attributes. This is accomplished by selecting the attribute you’d like to assign a certain column to, from the — Create a new one drop-down.
These are how we lined up ours:
First FirstName Last LastName Likes Interests After selecting all of your attributes, click on Continue.

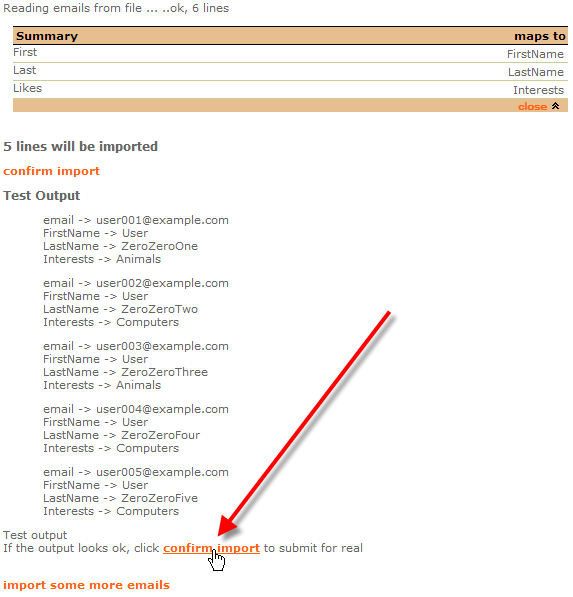
On the next page you should see the Test Output from your import. If everything looks like it matches up without any issues, click on confirm import.
If for some reason things didn’t line up, click on reset import session at the top of the page and start over.
- You should now see that your users were successfully imported with a confirmation message along the lines of:
Reading emails from file ...
..ok, 6 lines 5 emails successfully imported to the database and added to 1 lists.
5 emails subscribed to the lists
0 users were matched by foreign key, 5 by email
To see the users that you’ve just imported, from the menu on the right, click on users.
You should now have successfully imported a list of users into phpList saving yourself a lot of time!


