Table of Contents
When you’re on a company’s website and decide that you want to contact them directly, you’ll likely look for contact information and social media links. You’ll usually find an email address, phone number, and/or contact form. Contact forms are a popular method for feedback and customer service requests for many reasons:
- Hide your contact email address from web crawling robots that may later use it for business email compromise (BEC) and other phishing attacks.
- Force users to provide required information with a specific format and alphanumeric character limits. For example, ensure users provide you a phone number with an area and country code.
- Easily manage user contacts with integrated customer relationship management (CRM) solutions.
- Secure email inquiries with CAPTCHA and other anti-spam methods to reduce social engineering attacks.
You can’t do all of that by providing an email address on your website. Companies using WordPress and other content management systems (CMSs) can do this more easily with plugins or modules instead of developing a basic PHP mail() contact form.
Contact Form 7 is one of many options for WordPress forms, but it is among the most popular. If you look at the WordPress.org plugin page, there are over 5 million active installations of the plugin. Contact Form 7’s biggest advantage over weForms, WPForms, and others is the list of free customization and input validation options available to those willing to code it.
Below we’ll cover:
- Installing Contact Form 7
- How to Create a Form using Contact Form 7
- Adding Contact Form 7
- Redirecting Users
- Securing Contact Form 7 forms
Improve the performance and security of your WordPress website with our Managed WordPress VPS Hosting plans.
Web Application Firewalls
Free SSL Certificates
Advanced Server Caching
Installing the Contact Form 7 Plugin
Install from the Dashboard
- Log in to your WordPress dashboard.
- Install the Contact Form 7 plugin and activate it.
- On the left, select Contact to manage contact forms and integrations.
Install via WP-CLI
- Log into SSH.
- Install and activate Contact Form 7 using the following command:
Install Manually
- To install the plugin manually, download the plugin zip file from WordPress.org/plugins.
- Upload the zip file and extract the folder to the website’s
wp-content/pluginsfolder. - Log into your WordPress site or use the WP-CLI command to activate the plugin:
How to Create a Form using Contact Form 7
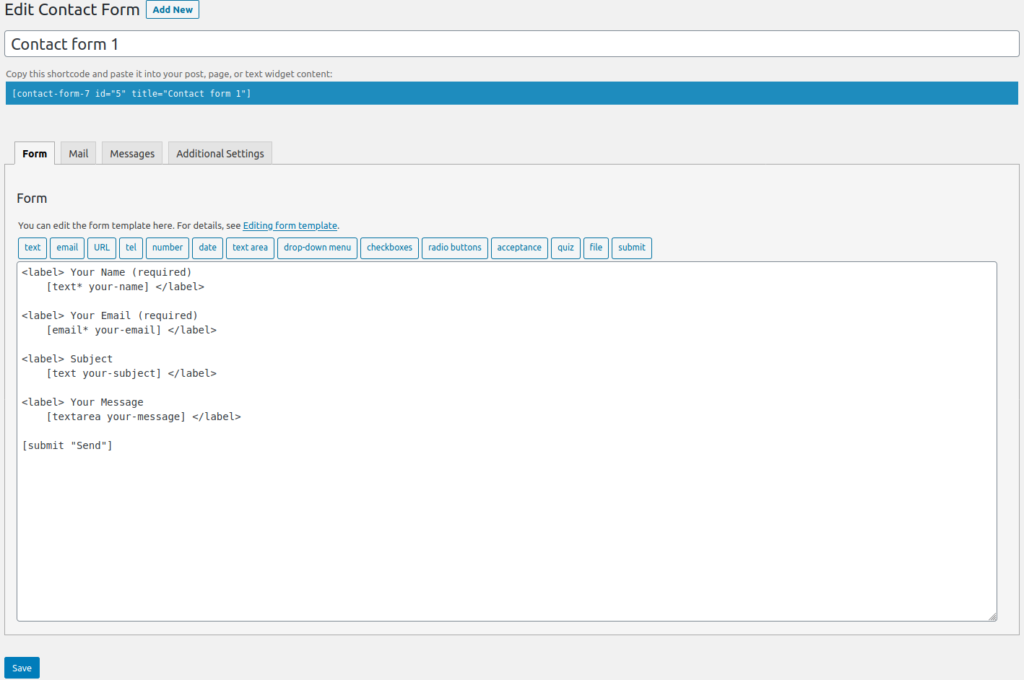
- In the WordPress administration dashboard, select Contact on the left. You’ll be redirected to your list of contact forms.
- You can click on the default contact form to edit it. Alternatively, you can click Add New at the top to create a new one. You can view Contact Form 7 documentation to use the form.
- Change the name at the top of the Edit Contact Form page to one you’ll easily understand if listed among others in the contact forms list. This title isn’t public facing.
- Edit the form to meet your needs. To add a new form field, or form-tag, click where in the form you want to add the new field. Then, select the appropriate button (text, email, URL, etc.) and make changes as needed before selecting Insert Tag.
- To add label text with a mail-tag, ensure you wrap them within a
<label>tag. - Save changes at the bottom.
- Select the Mail tab to configure how the email is sent.
- Change the email address for the recipient of completed forms in the To field.
- In the From field, set the sender address for submissions from this form. You can set it to use a dedicated sender email address to make email filtering easier (e.g.
My Blog Contact Form <noreply@example.com>) or the email address provided in the submitted form via the mail tag (e.g.[your-email]). - Set the Subject field for contact form submissions. Similar to the From field, you can use a preset subject or dynamic subject that uses form-tags from the contact form.
- You can add other email headers in the Additional headers section including CC, BCC, message-ID, content-type, organization, etc.
- Edit the Message body to a format that allows you to easily intake the form submission. Ensure you use all mail-tags listed above the To field.
- Save your changes. If a mail-tag listed above the To field is highlighted in bold, that means it is used in the form but not added in the Mail tab anywhere. Add it somewhere and save again before continuing.
- Select the Messages tab.
- Here, you can change the form notification for multiple situations including successful submission or when a field is filled in incorrectly.
- Save changes once done.
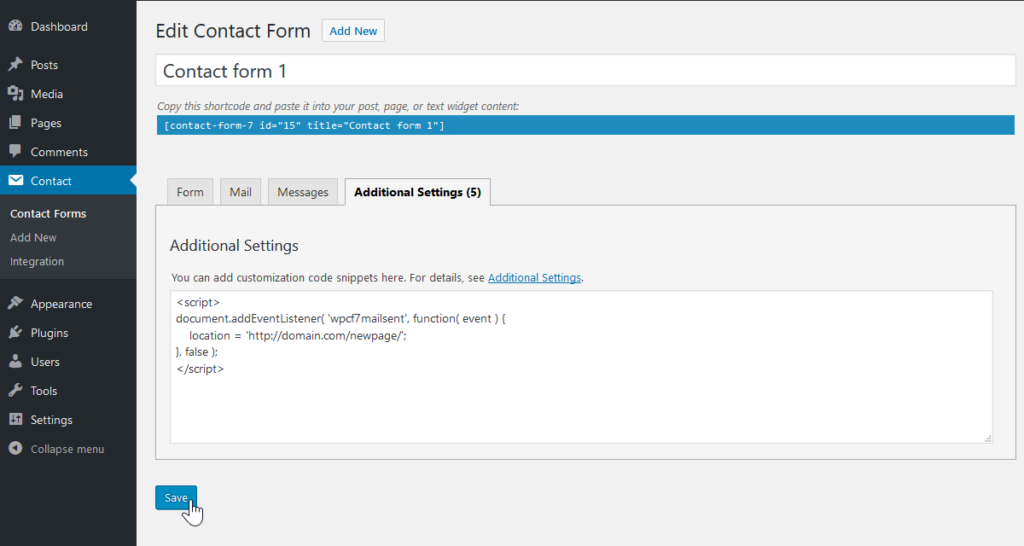
- Select the Additional Settings tab to add other code that affects how the contact form behaves such as redirecting to another page afterwards.
- Save changes.

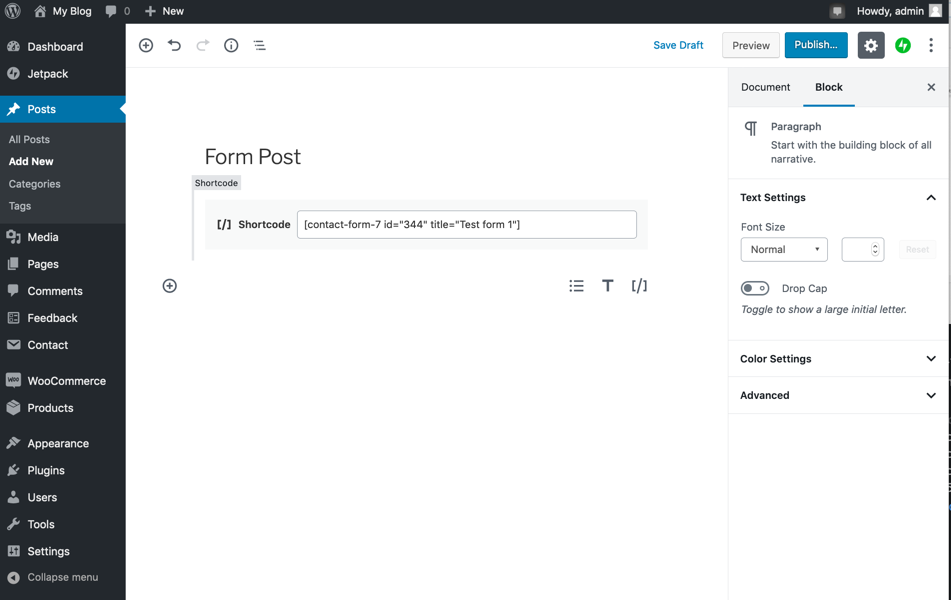
You can add the shortcode at the top of the page anywhere that will convert it correctly – posts, pages, text widgets, etc. The shortcode will resemble [contact-form-7 id="5" title="Contact Form Title"].
How to Add a Contact Form
There are two main ways to add a contact form to your website:
- Create or edit a post or page to add the Contact Form 7 shortcode to a shortcode block.
- Install the Gutenberg plugin to add contact forms in text widgets.

Redirect Users After Submission
One of the additional settings you can add to a contact form will redirect users to specific webpage after completing a contact form.
- Edit a contact form.
- Select the Additional Settings tab.
- Type the following, replacing
yourdomain.comwith your preferred redirect URL: - Press Save. The number beside Additional Settings matches the number of lines below.

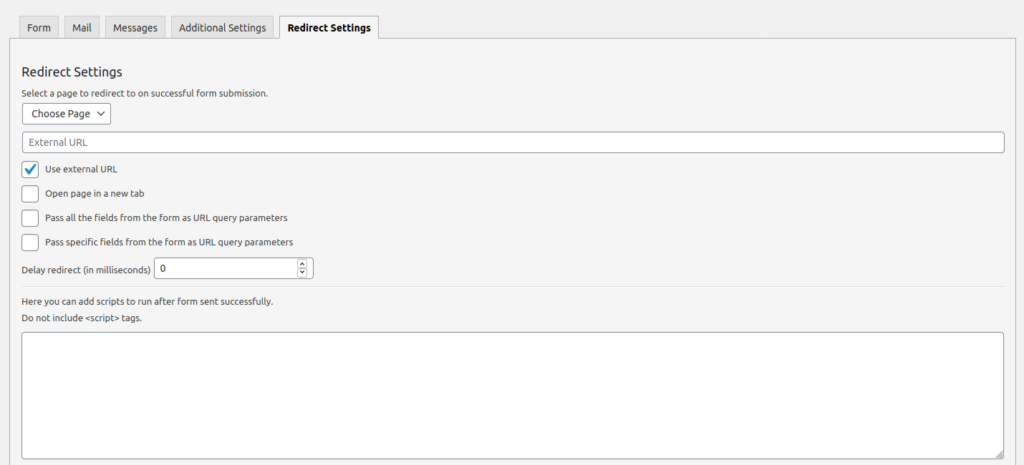
If the contact form doesn’t redirect properly, you may need to troubleshoot what theme or plugin(s) are affecting your JavaScript settings. Otherwise, you can install Redirection for Contact Form 7, by a different developer, which adds another tab for managing contact forms.

How to Secure Contact Forms
As mentioned in our PHP contact form article, contact forms with a plugin are usually a more secure option when using a CMS. To further benefit from that WordPress security, here are some ways to better secure form submissions with data validation.
Data Input Validation
Text input fields should have character limits to prevent cross-site scripting (XSS) and similar cyber attacks:
- Text sections use maxlength:# – e.g.
[text* your-message maxlength:50]. - Number sections use max:# – e.g.
[number* your-number max:99]. - File upload sections use
limit:#mb,limit:#kb, orlimit:#(bytes) and restrict file types with filetypes:##|## – e.g.[file your-file filetypes:pdf|txt limit:5mb]. - Set anti-spam plugin Akismet to scan fields for spam by selecting the Akismet checkbox in a form-tag generator.
Use reCAPTCHA
Contact Form 7 officially supports reCAPTCHA v3 for validation, not Really Simple CAPTCHA. Once you register your website with reCAPTCHA, hover over Contact and select Integration. Then, under reCAPTCHA, select Setup Integration.
Use the Same Domain in From Field
If the email account in the From field doesn’t match the website domain, email providers will see this and may mark it as spam. You can check this in the Mail section.
Reply-To Address
You may want email conversations continued through an email account other than what’s specified in the From field. If so, change the Reply-To email in the Additional Headers section to another email account. Alternatively, you can add a CC line which may be preferable over creating an email filter or forwarder in cPanel.
Comment Moderation
Along with using an anti-spam plugin such as Akismet, you can edit the Comment Moderation section in the WordPress dashboard that Contact Form 7 will use to moderate sent email.
- On the left, select Discussion under Settings.
- Specify comments and IP addresses to block in the Comment Moderation text box.

Email Authentication
Enabling DKIM, SPF, DMARC, and PTR ensure your emails aren’t marked as spam. For more info on how to do this in cPanel, please see our Block Spam Email in cPanel and Strengthen Email Authentication guide.
Also, consider using WP Mail SMTP which is less likely to be marked as spam than the default PHP mail.
For more information on securing your WordPress website, check out our recommended security plugins and backup solutions. You can also consider using the Sucuri web application firewall (WAF) for enhanced server security.
Learn how to make accessible WordPress contact forms or more possibilities in our WordPress Education Channel.

