Table of Contents
Creating an overlap block is not offered by default in the Gutenberg editor. However, with some CSS code from the makers of the Gutenberg Pro plugin, you can achieve an overlapping effect using a Media & Text block to create an effect like the one you see below:

- Create Overlap Blocks With CSS
- Add Additional CSS Code To Your Site
- Creating a Media & Text Block
- Apply a Custom Class
- Using a Graphics Program to Create the Overlapping Effect in an Image
Create Overlap Blocks With CSS
Here is the CSS code you will be using:
Notice that the margin values (set at -100px) are adjustable. I would recommend adjusting this value to get the exact margin you need.
Add Additional CSS Code To Your Site
Follow the steps below to add this code to your site:
- Log into the WordPress Dashboard
- Click Customize under Appearance
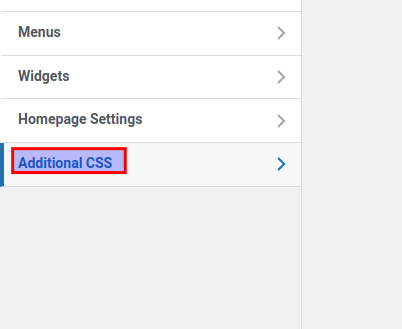
- Choose Additional CSS

- Paste the code into the CSS editor window
Creating a Media & Text Block
Now for the easy part. Below, you will learn how to add a Media & Text block to your site. A Media & Text block is simply a type of block that pairs media (like images) with some text.
- Select a post to edit or create a new post
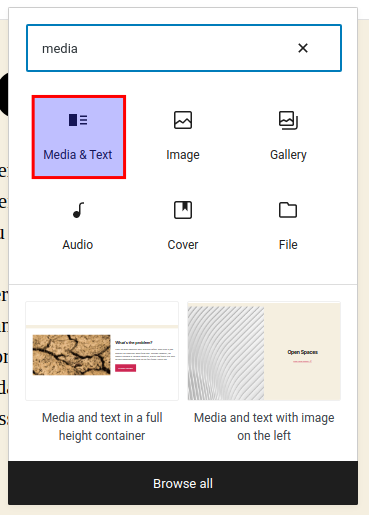
- Create a new block and select Media & Text

- Fill in your content
When done, save the post and view, and you will see your overlapping blocks. Changes will not appear right away in the editing window. This is because the CSS changes made do not affect the design elements in the editor window, only the final appearance once the page is viewed live. However, if you want to see changes take effect right away, open the Customize window while viewing the post or page. This way, you will be able to see your CSS changes happening in real time.
Tip: adding background color to the text content can help amplify the overlapping effect.
Using a Custom Class
In the above example, the changes made to the CSS will affect all posts and pages. But what if you want to limit this effect only to certain pages or posts, or you simply want to have more control over where this effect takes place, you can use a custom CSS class.
Adding a custom class is easy, but you just need to pay close attention to the syntax. For the sake of simplicity, we can create a custom class called “overlap”, for overlapping blocks. You will be adding the custom class to the beginning of the same CSS code used above. Note the change (overlap.) highlighted in green below:
Now, you will just need to apply this custom class to the Media & Text block in your editor.
- Open the post or page for editing
- Highlight the Media & Text block
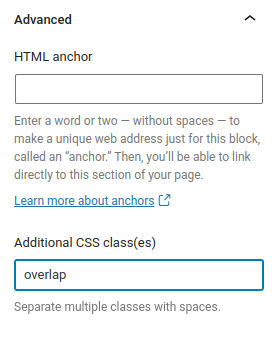
- Go to the Advanced dropdown section in the block menu on the right side of editor window
- Fill in “overlap” under Additional CSS class(es)

Using a Graphics Program to Create the Overlapping Effect in an Image
If you want complete freedom in formatting the graphic for an overlapping effect, then you should consider using an image. You can use a graphics program to create your content with the only limits being the size of the graphic and your imagination.
Images may also include text, but they must have metadata added in order to make them searchable.
Although it can also be quicker to use CSS code to add the overlapping effect between blocks, you are also limited to the shapes, text, and colors that you can use through the code.
The main advantages of using a graphics program for the overlapping effect are that you have creative freedom and you are not adding custom code to your WordPress site. You would simply be using an image block.
The disadvantages are that you need to make sure that the image metadata is added and that you may need to obtain a graphics application to create the image in addition to knowing how to use that program.
That’s it! Now, you know how to create the overlapping effect through a graphic, or by using custom CSS. Remember, you can name this class anything you want to help identify it. To get the CSS tweaking just right, you can use the customize window to edit the CSS and see the changes in real-time.
If you’re looking for tutorials like this one, check our articles on WordPress Blocks!
Looking for more guides? We have over 400 WordPress How To Articles to help you!
yes and no. i followed all the steps above for adding overlap CSS but I can’t figure out how to get them to overlap as shown in the Beagle graphic. Is there more CSS to be added to move the text around within the block?
Hello Pindoordesigns – We need a little more clarification on why you were having problems with the article instructions. Were you using the plugin? What steps did you take? Please provide more detail, and we can review the issue and try to give you a solution.