In this article, we will explore the various NGINX cache configuration options, and tips on tweaking your site to get the best performance out of the WordPress Optimized Stack. This guide covers all of the most common parameters you can tune via the Cache Manager Plugin.
- The information in this tutorial applies to our hosting plans that use NGINX Caching which includes our WordPress Hosting plans and certain VPS configurations.
- We also reference various settings pertaining to the Cache Manager Plugin for cPanel. Please see our tutorial on the Cache Manager Plugin for more information.
- For an in-depth explanation of how NGINX and the rest of the stack work together, please check out our WordPress Hosting Stack article.
For the most secure WordPress site, you need secure hosting. That’s why InMotion Hosting crafted WordPress Hosting with rigorous server-side security - so you can spend less time hardening your hosting and more time creating your website.
Configuring Cache Parameters
The default cache parameters, configured via the Cache Manager Plugin, should work for most websites. However, in some cases, these values may need tweaking. For example, they may need to be adjusted to further improve performance for high-traffic websites or to allow caching to work correctly with certain eCommerce or dynamic content. We provide general usage suggestion and outline the major options that are tuneable below.
Cache Expiration
You can set page cache time via the Default Cache Time (cache_time_default) parameter. This parameter defines how long a page will remain valid after it has been cached by the server (by default, 4 hours). Once the age of the cached page has exceeded the expiration time, the server will fetch a new page from Apache or PHP, then cache the new result. In the event of a connection error or 500 error when attempting to fetch the updated page, NGINX will instead show the user the expired page from the cache. This allows your site to appear online, even if the back end is temporarily down or having problems.

Bypass URLs
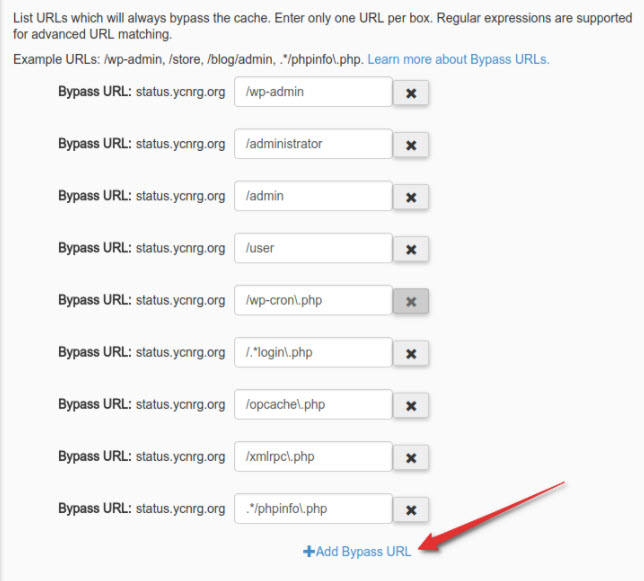
Most websites have certain pages that should never be cached, such as login pages or checkout pages. You can exclude pages or URI patterns from caching under the Bypass URLs section (cache_bypass_paths) in the Cache Manager Plugin. The default configuration already contains some common patterns and will exclude wp-login.php, wp-admin as well as a few others. If you find a page is being cached, but should not be, then adding it to this list should solve the problem.
Static Content
Static content— such as images, Javascript, and stylesheets— typically do not change very often. Because of this, NGINX can quickly serve them when requested by visitors browsing your website. In the default configuration, NGINX will directly serve all static assets, rather than forwarding the request to Apache. This helps accelerate the requests, and prevents needlessly caching already static data. You can configure this setting via the Accelerate Static Content option (accel_static_content).
Specific static content paths can also be defined from within the Cache Manager interface. This is typically not required, as NGINX will serve static content based on the file extension (such as png, jpg, js, etc.). This option is provided primarily to allow serving additional static assets or downloads that use an uncommon file extension or in combination with complex passthru rules. You can configure this setting via the Static Content Path option (static_content_paths).

Force Passthru
The default handling of static content can potentially cause problems on websites that generate dynamic images or other files normally considered static. A telltale sign of this problem is a 404 Not Found error for dynamically generated content. In these cases, you can add the script or path to the Force Passthru list (force_passthru), found under the Advanced tab in the Cache Manager Plugin. For example, if your site generates dynamic thumbnails at https://example.com/thumbs/thumb01.png, then you would add /thumbs/ to the Force Passthru list. When a URI matches a pattern in this list, it always passes through to Apache, and normal caching rules still apply. If you need to bypass the cache for a particular page, you should use the Bypass URLs setting instead.
Bypass Cookies
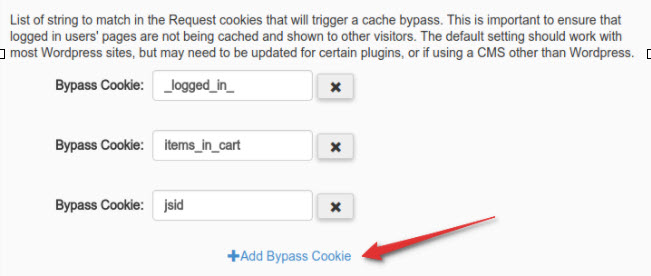
If you run a website that allows both anonymous and logged-in users to browse at the same time, you will likely still want to cache pages for anonymous users, but not for logged-in users. In most cases, you can accomplish this by using the Bypass Cookies list (bypass_cookies) in the Cache Manager Plugin. By default, the system will automatically add patterns matching the WordPress login cookie (_logged_in_) and the WooCommerce “items in cart” indicator (items_in_cart).
Cache-Control Headers
NGINX ignores cache control headers Cache-Control and Expires for the purposes of caching. This owes to the fact that most CMS’s, including WordPress, will mark the page as uncacheable and add an expiration time in the past (to prevent caching). However, in most cases, the CMS can cache these pages without any problems, provided the page does not contain dynamically generated content that updates on every page load.
If your website migrated from a platform that made effective use of these headers, you can re-enable their use by setting the cache_honor_cc and cache_honor_expires options for enabling Cache-Control and Expires headers, respectively. Please note that you cannot currently change these options from within the Cache Manager Plugin. Although this option may be added in the future, at the moment you can only change the option in the config files, located at ~/.imh/nginx. Please reach out to our Support team if you would like assistance with changing these options. However, please note that most users will want to retain the default options for these settings. On the other hand, if you plan to write a custom application or plugin to manage caching, you should use the below-described X-Accel-Expires header (or a plugin that uses this method).
X-Accel Headers
Sometimes, you may need more granular control over cache expiration times. In this case, NGINX allows the use of X-Accel headers. For this discussion, we will focus on the X-Accel-Expires header. This allows each page to return the expiration time, in seconds, with zero (0) meaning that the system should not cache the page. Some plugins, such as NGINX Cache Controller, utilize the X-Accel-Expires header to explicitly set cache times for various page types.
Cache Management and Purging
To obtain the best performance, best practices typically call for setting a long cache time (4 hours, by default), then clearing pages from the cache after they have changed. Below are some examples of how to achieve this, depending upon your needs.
Automatic Expiration
Using a plugin, such as the NGINX Helper plugin for WordPress, you can set pages to automatically expire after you make changes to the site (such as posting a new article, new comments, etc.). We recommend this plugin for all WordPress sites utilizing the WordPress Optimized Stack, as it automates cache management for most day-to-day tasks.
Purging the Entire Cache
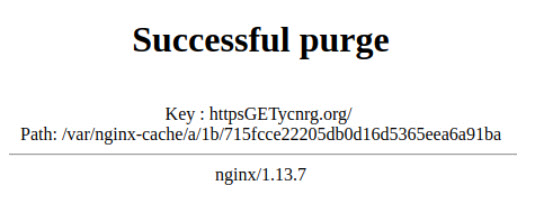
When you make major changes to your site, such as underlying code changes, or major updates, you may find it helpful to clear the entire cache to eliminate any potential problems. You can achieve this by using Purge Full Cache button in the Cache Manager Plugin.
Clearing a Single Page
If you need to diagnose a problem with a page, but do not want to purge the entire cache, you can easily purge a single page. All you have to do is either use the Purge URL feature in the Cache Manager Plugin, or prefix the URI of the page you wish to purge with /purge, (as in the below examples).

| URL | Purge URL | What is Purged? |
|---|---|---|
| https://example.com/ | https://example.com/purge/ | Purges the homepage for example.com |
| https://example.com/2017/01/cool-article | https://example.com/purge/2017/01/cool-article | Purges the page at /2017/01/cool-article |
Troubleshooting Cache Issues
Sometimes you may find it difficult to track down caching problems — especially if you have created a complex set of rules in the Cache Manager. Below, you will find a few tips on how to glean a page’s cache status by using your web browser’s built-in development tools, or by using cURL.
Using Browser Development Tools
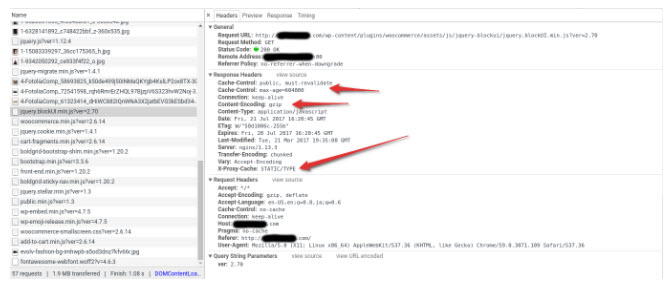
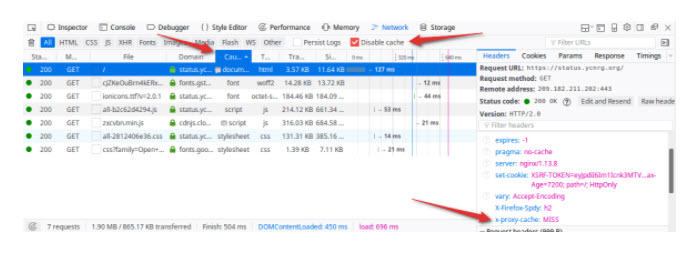
In Chrome/Chromium, Safari, Vivaldi, or Firefox, you can open the DevTools console by pressing F12. Then, click the Network tab to view a list of all requests for the current page. If nothing displays, ensure the console shows a check in the box for Disable Cache (this refers to the browser cache, not the server-side cache) then refresh the page. Once refreshed, select the first entry in the network list (be sure to sort by “Cause” in Firefox), which is typically the actual page request. Next, on the right-side panel under Response, a X-Proxy-Cache header will show you the cache status for this particular request. See the section below for an explanation of the various values.
Using cURL
If you have SSH access to your server, or a local terminal (on MacOS or Linux), you can use cURL to fetch the cache status very quickly. First, open up a terminal window or SSH session, then run the following command:
Be sure to substitute the URL in the above example with the one you would like to test. This should provide a list of the response headers, including the X-Proxy-Cache header.
Using ngxutil
(VPS/Dedicated only)
A tool that we developed in-house for use with the WordPress Optimized Stack, ngxutil performs many useful tasks. For this discussion, we will focus on its --info functionality. This function makes a request to the provided URL, then shows the current state of the cache on disk, checks whether the page was served from cache, and provides general troubleshooting tips in case you run into problems or receive errors.
This method requires root SSH access and only applies to VPS and Dedicated customers running the WordPress Optimized Stack. Please refer to our article on connecting via ssh for instructions on getting connected.
Cache Statuses
Below, you will find a table describing all possible values for the X-Proxy-Cache header. Use it along with the above techniques for checking cache status for your web pages.
| Status | Description |
|---|---|
- (Empty or no header) | No caching configured for this URI, or the page was requested via a method other than GET, HEAD, or OPTIONS. This means that POST requests will always bypass the cache |
HIT | NGINX found a matching page in the cache and returned it to the visitor. The returned page has not yet expired. |
MISS | No matching fresh page was found in the cache. NGINX made a request to the origin (Apache, PHP-FPM), then cached the resulting page for subsequent requests. |
EXPIRED | NGINX tried to retrieve an updated page from the origin (Apache, PHP-FPM), but encountered an error, so instead, it served an expired page from the cache. |
UPDATING | NGINX is currently waiting for a response from Apache to update the cache (from a previous request). In the meantime, NGINX served the visitor the existing (expired) page from the cache. This behavior can be controlled via the cache_lock_enable option (enabled by default; this option is not available via the Cache Manager Plugin interface, as it should remain enabled in most cases). |
BYPASS | This page was passed directly to/from Apache without caching due to matching a pattern in the Bypass URLs list. Other options, such as Bypass Cookies, also influence whether or not the request bypassed the cache. |
STATIC/TYPE | This asset was served directly by NGINX due to matching the file extension of the request URL with a predefined list in the server template. This is enabled or disabled via the Accelerate Static Content option. A URL can forcibly bypass this by being added to the Force Passthru list. |
STATIC/PATH | This asset was served directly by NGINX due to matching a path in the Static Content Paths list. |
NGINX and the various cache options provided by the WordPress Optimized Stack make for powerful tools you can use to tune your website for optimal performance. With this guide, you should be able to start making changes to help optimize your website for the best performance!
Learn more from our WordPress Hosting Product Guide.
