Table of Contents
In this article, we walk through the process of tuning your VPS or Dedicated Server for the best performance on our WordPress Optimized or PHP-FPM stack. On our Managed WordPress Hosting platform, the server is managed by our system administrators and tuned out-of-the-box for optimal performance for most users. However, some users or resellers may need the additional flexibility afforded by the VPS and Dedicated platforms.
How to Optimize WordPress
How do I optimize my WordPress site? That’s what this article is about.
- This article covers the WordPress Stack, which is available pre-installed on certain VPS packages, but can be installed on any VPS or Dedicated server.
- For an in-depth explanation of how NGINX and the rest of the stack work together, please check out our WordPress Hosting Stack article.
VPS and Dedicated platforms offer full root access — this allows the user to make any changes or specific optimizations, as required. With the WordPress Website Hosting platform, we manage the Apache, PHP-FPM, and NGINX configuration for all customers, with certain parameters, such as max workers and total I/O throughput is dependent on the plan chosen. While the default configuration should suit many, customers with a large number of sites or users may require additional configuration changes to achieve the best performance.
Other factors in optimizing WordPress can involve the use of a CDN for static media assets, caching, the WordPress theme used for the site, and the geographic location of the server.
Apache
In the WordPress Stack, Apache plays the role of the “origin server” — it handles requests for pages, dynamic content, and sometimes static content, depending on the caching configuration.
Server/Worker Parameters
Checking Current Utilization
For optimal performance, we need to ensure that there is always a worker available to service incoming requests from NGINX. If you notice that there is a long delay before images and other content on your pages start loading, this could be due to Apache being busy, and we have to wait for available workers to service the requests.
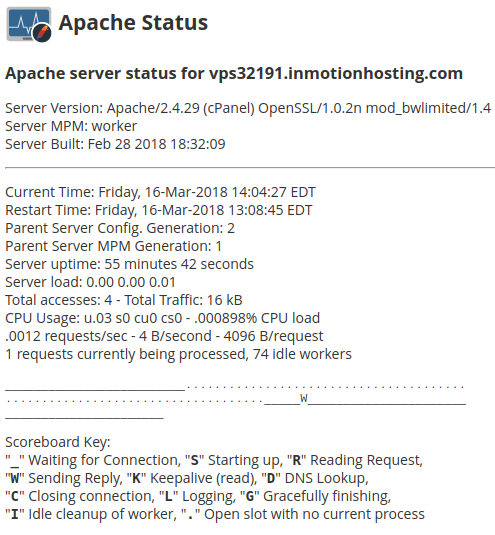
To determine if your Apache settings are adequate, login to WHM, then navigate to the Apache Status page. This page will display the status of all workers — idle or available workers are displayed with an underscore or full stop (_ or .). Other letters indicate that the worker is currently active servicing a request. If this “scoreboard” has little to no available workers, then consider tweaking the parameters to prevent pages from loading slowly o timing out. For more information, check our article on viewing Apache status in WHM.
Performing Adjustments
After logging into WHM as root, navigate to the Apache Configuration section, then click on the Global Configuration subsection. This page sets the worker and server parameters for Apache, which ultimately determines the maximum number of concurrent requests it can handle.

If you’re having problems with capacity with your current settings, try doubling the Maximum Spare Servers, Server Limit, and Max Request Workers values, then change the Timeout to 60 seconds to match the default NGINX timeout. Once the changes are made, click Save at the bottom of the page, then Rebuild Configuration and Restart Apache after confirming the settings.
After the changes have been applied, navigate back to the Apache Status page and refresh it periodically to ensure that Apache is performing optimally — ideally, you should be using less than 50% of your available workers during normal operation, with the other 50% available as headroom in case of a spike in traffic.
PHP-FPM
PHP-FPM (PHP Fast Process Manager) is a special PHP handler that uses a master process to divvy up requests to a pool of workers. Each of these workers then executes the user’s PHP scripts, then return the result back to Apache and NGINX. Because there is a persistent master process (unlike CGI or suPHP handlers), the performance can be fine-tuned for your specific needs, and also allows the use of extensions that require persistence, such as Opcache.
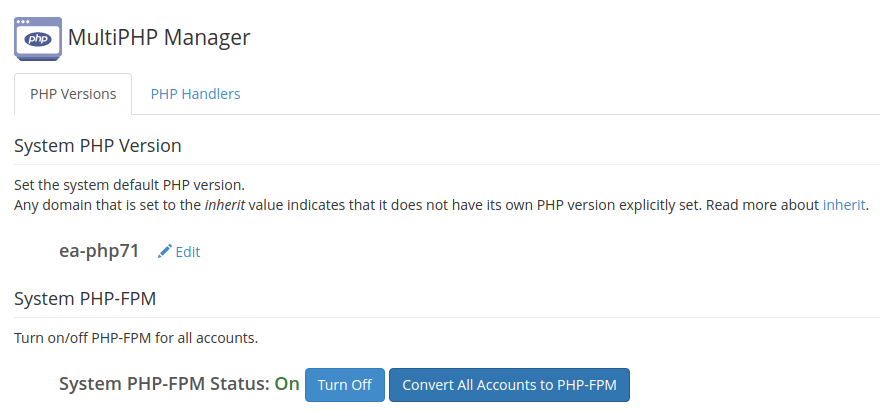
To set the default PHP version and global php.ini parameters, log in to WHM as root, then navigate to the MultiPHP Manager section. This page will allow you to choose the default version for all newly-created accounts (or change the version for accounts that haven’t specifically chosen a PHP version), as well as set the FPM parameters for each domain. If you’re converting from suPHP or another PHP handler to PHP-FPM, the Convert all accounts to PHP-FPM button will quickly allow you to switch over all domains to use FPM.
Parameter Selection
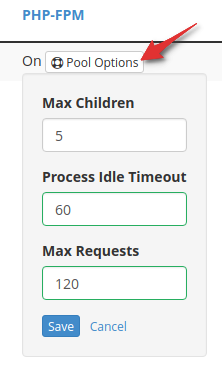
In the WHM MultiPHP Manager, a list of all domains on your server will be listed at the bottom of the page. Clicking on the Pool Options button next to each domain will allow you to tweak the PHP-FPM parameters for that domain.
List of Parameters
| Parameter | Explanation |
|---|---|
| Max Children | Sets the maximum number of workers that are available to process requests for the selected domain. This translates into the max number of PHP scripts or pages that can be requested simultaneously. Since pages served from the NGINX cache do not need to execute PHP, this number determines the max number of uncached pages that can be served at once. |
| Process Idle Timeout | Sets the amount of time (in seconds) that a worker will wait for another request before it exits. Because the number of workers for each domain can change according to demand (using the default ondemand process manager), this allows workers that may have been spawned to serve a spike in traffic to eventually exit once the traffic level decreases. This allows the pool to free up resources for the rest of the server. |
| Max Requests | The max number of times a single worker can process requests before it is respawned. On busier sites, a worker can potentially stick around indefinitely. This is primarily used to workaround bugs and memory leaks in certain 3rd party PHP modules. |
Recommended Defaults
The following table lists our recommended defaults for sites with low, medium, and high traffic. These values can be further tweaked, as needed. In general, sites that are able to achieve a higher cache hit rate can afford to use a lower number of workers.
Opcache Configuration
Opcode caching can drastically improve performance for dynamic pages, or when the NGINX cache has expired. Zend Opcache, PHP’s own opcode caching solution, works by parsing all related PHP files for a particular script, compiling it into bytecode, then saving it for future use. Once this has been done, subsequent page loads will be significantly faster, as the computationally expensive process of interpreting the PHP code has already been performed.
Due to the architecture that cPanel uses to manage PHP-FPM, all pools for a particular version of PHP will share the same master process. This means that all sites that use the same PHP version will share the same pool of memory that has been allocated for Opcache. On servers with multiple users or a large number of sites, the default values will be insufficient.
To modify settings for a particular PHP version, log in to WHM as root, then navigate to the MultiPHP INI Editor. From there, click on Editor Mode, select your PHP version, then add the new settings at the bottom of the text area. Remember, you’ll need to make changes for each PHP version that you’re using.
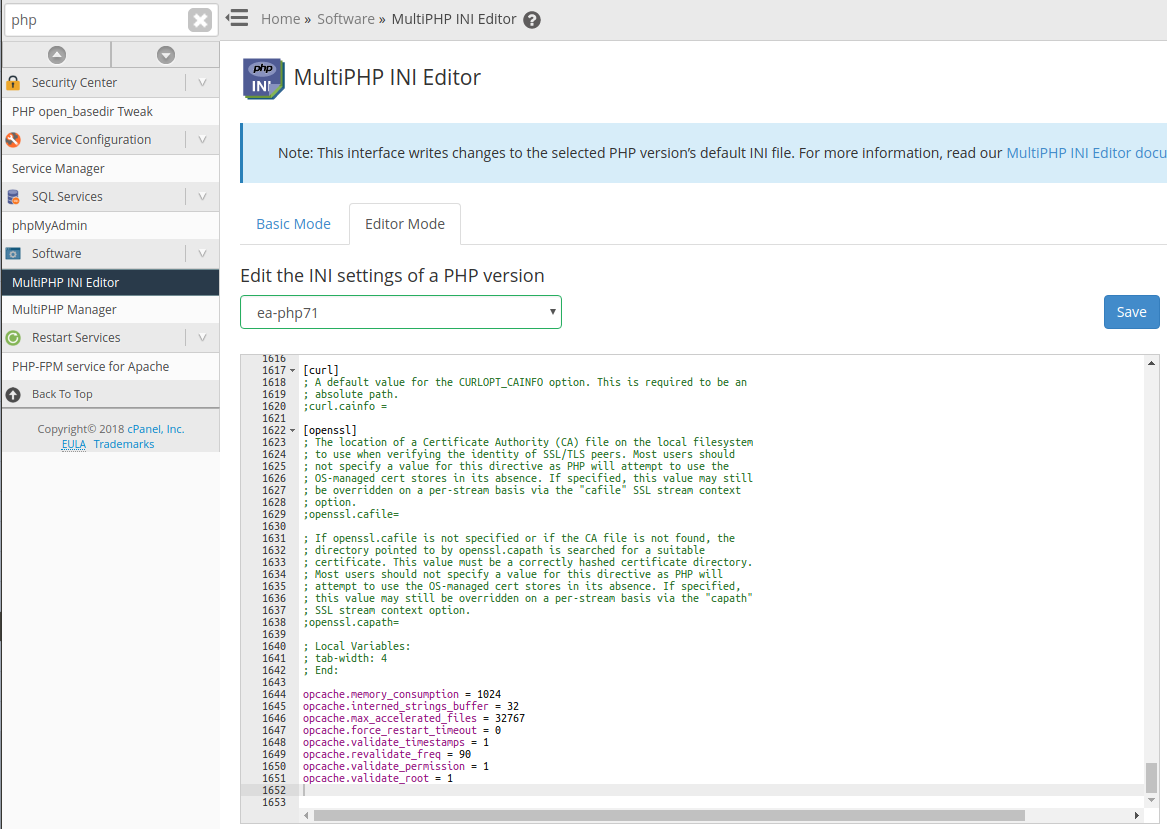
Below are our recommended settings for Opcache, for a server with between 30 and 150 websites. Please note that increasing memory_consumption too high can leave less memory for other applications, and lead to degraded performance. We recommended trying the settings below, then checking the phpinfo page (as described next) to observe the results.
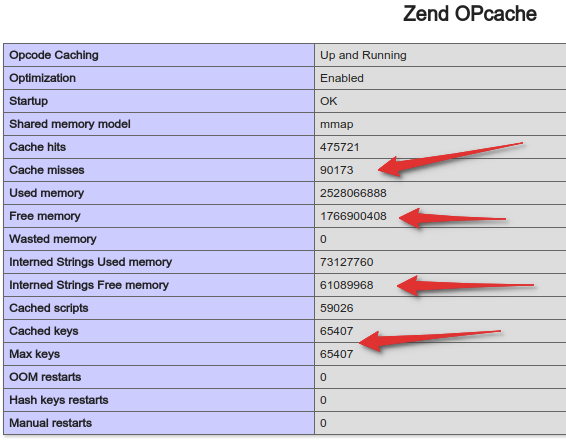
After saving your settings, PHP-FPM will be automatically restarted by WHM, and the settings will take effect. To double-check your work, view a phpinfo page on one of your sites that use the same PHP version, then scroll down to the Zend Opcache section. This page can also be visited again (after all of your sites have received a bit of traffic) to see how much memory all of your scripts are using. The image below shows the parameters to check — if the free memory is very low (or zero), or the number of cached files/keys is equal to the max, then try increasing the appropriate settings. Ideally, we want to see a very high hit to miss ratio, and having insufficient memory or available keys will inevitably cause cache misses.
NGINX
The majority of users should not have to make any changes to the global NGINX configuration. However, there are specific reasons for doing so — such as increasing the max upload file size and increasing the default timeout for batch scripts. Our configuration builder can handle most of the commonly-performed changes for PCI compliance automatically, which is covered in the Advanced section below.
The main NGINX configuration file is located at /etc/nginx/nginx.conf. This file can be edited by logging in via SSH as root, then using Vim or Nano — or by using an SFTP client.
Most global settings will need to be inside of the HTTP context in the NGINX configuration (inside of the http { } block). Below is an example of how to increase the timeout from the 60 second default, to 90 seconds:
Once your changes have been saved, test the configuration by running nginx -t, which will ensure the syntax is correct. If there is a problem, NGINX will report the line number, along with a hint on how to fix the issue. Otherwise, if all is well, proceed with reloading NGINX with service nginx reload.
Troubleshooting
5xx Errors
- 500 Server Error – Generic error. Typically indicates a problem with the PHP script, but can also indicate a syntax error in an
.htaccessfile, or a problem with Apache. Check the Apache error log (located at/usr/local/apache/logs/error_log) for more information. - 502 Bad Gateway – NGINX could not connect to Apache. Typically indicates that Apache is overloaded or not running. Ensure Apache is up and running by navigating to the Apache Status section of WHM. If not running, restart Apache by navigating to Restart Services >> HTTP Server (Apache) in WHM, or by running
service httpd restartvia SSH. Otherwise, check the NGINX error log (/var/log/nginx/error.log) for details. - 503 Service Unavailable – Typically indicates that PHP-FPM is not responsive, or Apache could not connect to PHP-FPM (however, this error code is also frequently used by WordPress “maintenance mode” plugins). Ensure PHP-FPM is running, or try restarting it via Restart Services >> PHP-FPM Service for Apache. Check the Apache error log (
/usr/local/apache/logs/error_log), or the corresponding PHP-FPM log (/opt/cpanel/ea-php*/root/usr/var/log/php-fpm/error.log) for further details. - 504 Gateway Timeout – This typically indicates a PHP script running too long, and NGINX timed out while waiting for it to finish. This can happen during a batch import process, or because of a malfunctioning plugin or database issue. Check our troubleshooting guide for more details on how to troubleshoot this issue.
Caching Problems
The WordPress Optimized Stack can be used to achieve high performance with a large number of users. Hopefully, this guide has assisted you in tuning your VPS or Dedicated server for the best performance. There are a wide variety of changes and tweaks that can be performed, depending on your website. Please be sure to check out some of our other WordPress Hosting articles for coverage on a number of different subjects.
| Parameter | Low/Medium | Medium/High | High |
|---|---|---|---|
| Max Children | 4 | 8 | 16 |
| Process Idle Timeout | 60 | 60 | 90 |
| Max Requests | 120 | 120 | 180 |
Optimizing WordPress can be a challenging task because there are many ways it can be done. InMotion Hosting strives to give you a solution that will provide the best performance.
