Table of Contents
There are times when you may be working with a WordPress post and you have content that you want to have visible at a certain time, on a specific device type, or just for some people. This can be done with a useful plugin called Block Visibility.
This plugin allows you to control content by block visibility using time, user roles, and even URL queries. This guide will take you through the installation and use of the Block Visibility plugin in WordPress.
- Installing the Block Visibility Plugin
- Configuring the Block Visibility Plugin Settings
- Using the Block Visibility in a Post

If you’re having trouble with your WordPress host, then check out InMotion’s WordPress Hosting. We provide secure, optimized servers that are priced to meet your budget needs!
Free Domain
Free SSLs
Unlimited Bandwidth
The Block Visibility plugin only works with the default editor (Gutenberg) used in WordPress 5.0+. It will not work with the Classic editor.
Installing the Block Visibility Plugin
We will install the plugin using the WordPress Administrator Dashboard. To use the steps below, please log in to the administrator.
- In the menu, click on Plugins.
- Select Add New.
- Search for “Block Visibility” in the Search Plugins field in the top right.
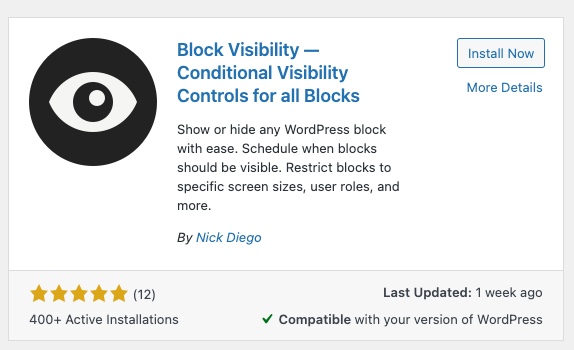
- You will then see the plugin titled, “Block Visibility – Conditional Visibility Controls for all Blocks” by Nick Diego. Click on the Install Now button.
- When the installation completes, click on the Activate button to enable the plugin for your WordPress site.
At this point, the plugin is active and installed. You will see that Block Visibility has been added to your Settings menu. Note that “Visibility” will appear in the Block portion of the Block Settings when editing a post. This is different from the Post setting for visibility where you can schedule the publication of a post.
Configuring the Block Visibility Plugin Settings
Before you start using the Block Visibility plugin, it is important to understand the settings available for its configuration. To see the settings, please go to the menu, click on Settings, then click on Block Visibility. Note that each settings section includes an informational link that will also provide a more detailed description of each setting. If you make changes to any settings in each tab, then you must click on the Update button to save your modifications.
Getting Started
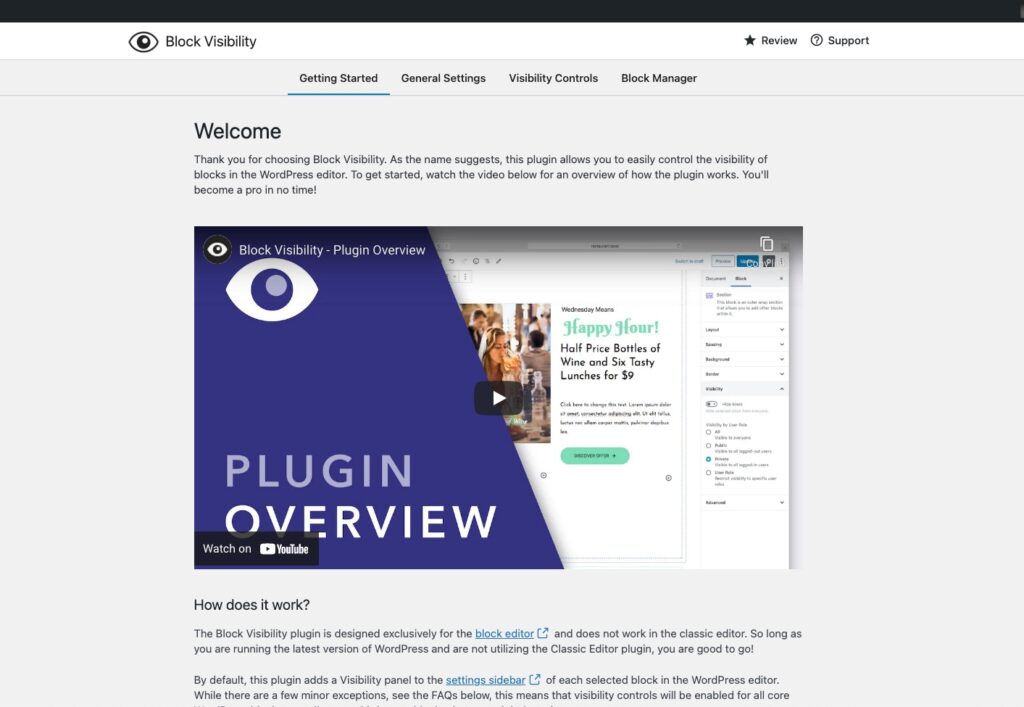
The first screen you will see is the Getting Started page. You will see a welcome and a video overview of the plugin. This is a great way to get quickly familiarized with the plugin. There is also a link for support that takes you to the WordPress support page for the plugin. And there are links to the plugin web page, GitHub, and Twitter.
General Settings
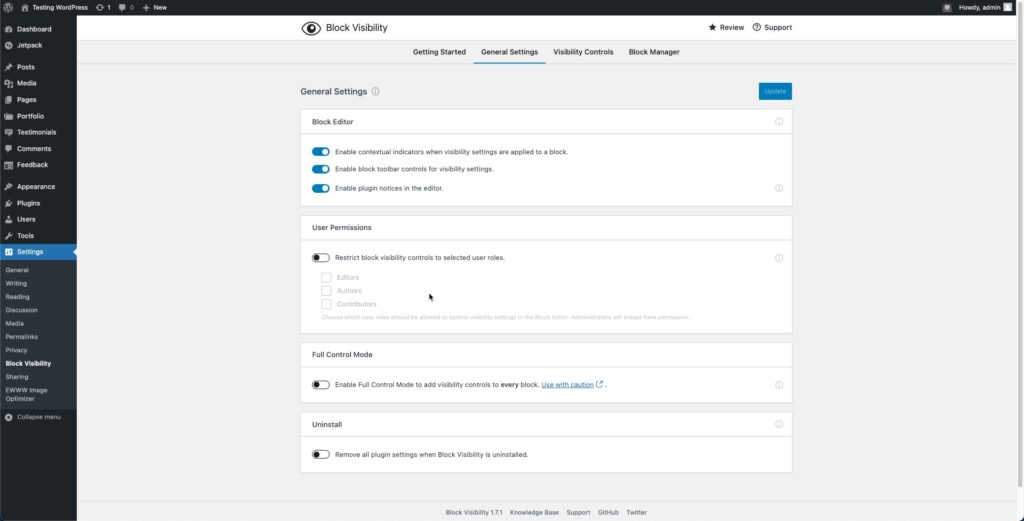
The next section is labeled General Settings. Each of the settings in this section is divided into sections. These sections are:
- Block Editor
- User Permissions
- Full Control Mode
- Uninstall
Block Editor

Here you use the sliders to enable or disable each option. The first item allows for users editing a post to see when a block visibility setting is added to it, even if they cannot edit it. This is an example of how it would look.

The block is greyed out, but there is a dotted line and an icon added at the end of it indicating that a visibility setting has been applied to the block. With no contextual indicator, there will be no hint that block settings have been applied and the block would display normally.
The next two settings are fairly self-explanatory. The option for the toolbar allows for the controls for the plugin to be visible in the editor.
The final Block Editor settings option is to enable plugin notices while using the editor.
User Permissions

If you enable this option then you will be able to restrict what user roles can use the plugin. Note that this screenshot only indicates standard WordPress roles with Editor, Author, and Contributor. The Administrator will always have access to the plugin.
Full Control Mode

This option allows you to apply visibility controls to every block. However, the developer warns against it, as some block types do not always correctly retain or release the visibility settings. The example they use is the Column block – as opposed to the COLUMNS block. They mention that if the plugin were disabled, then visibility settings on the Column block can not be controlled. In other words, as they are indicating, use with caution.
Uninstall

If you enable this option, then when you remove the plugin from your WordPress install, then the visibility settings will also be removed.
Visibility Controls
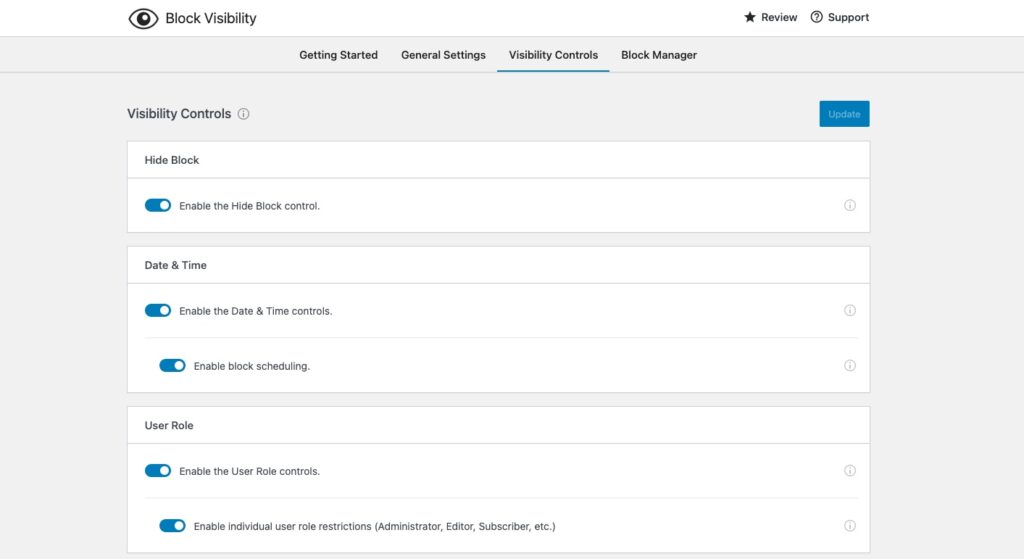
The Visibility Controls are divided into the following sections:
- Hide Block
- Date & Time
- User Role
- Screen Size
- Query String
Hide Block

When this option, you can hide blocks from the front-end of your WordPress site.
Date & Time

There are two sliders here, but they really only control the one setting -scheduling the appearance of a block using a date and time.
User Role

Allows you to determine the user role that will be able to use the Block Visibility plugin.
Screen Size
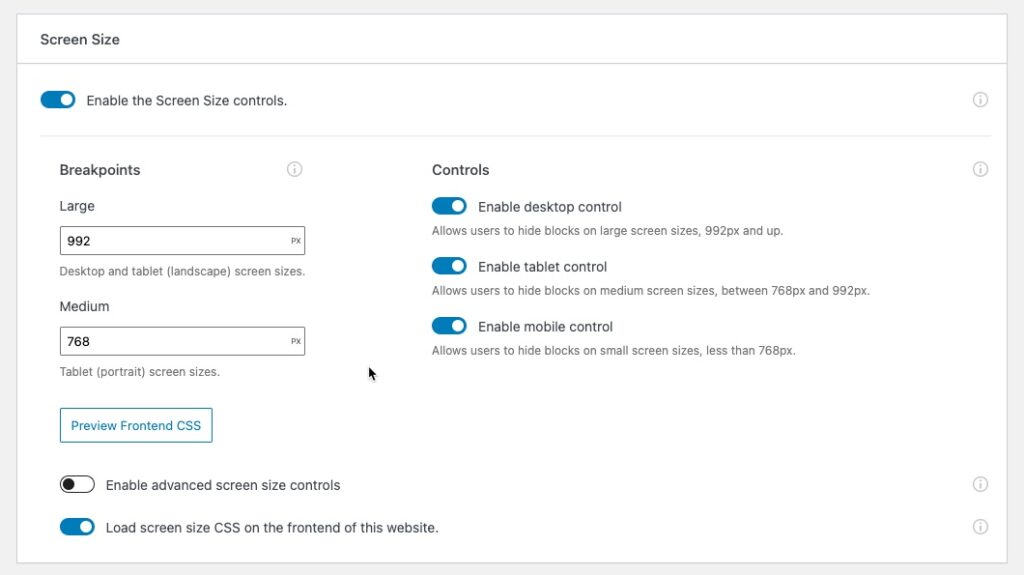
The screen size option lets you control if the block will appear depending on the screen size viewing your post. This is especially useful in allowing certain elements of your post to appear based on screen size.
Images that you know will only be properly viewed on a large screen can then be shown only on a specific device. You can even have several images to cover the varying screen types. Then using the Block Visibility plugin, you can display a specific image only for a specific screen size.
Breakpoints
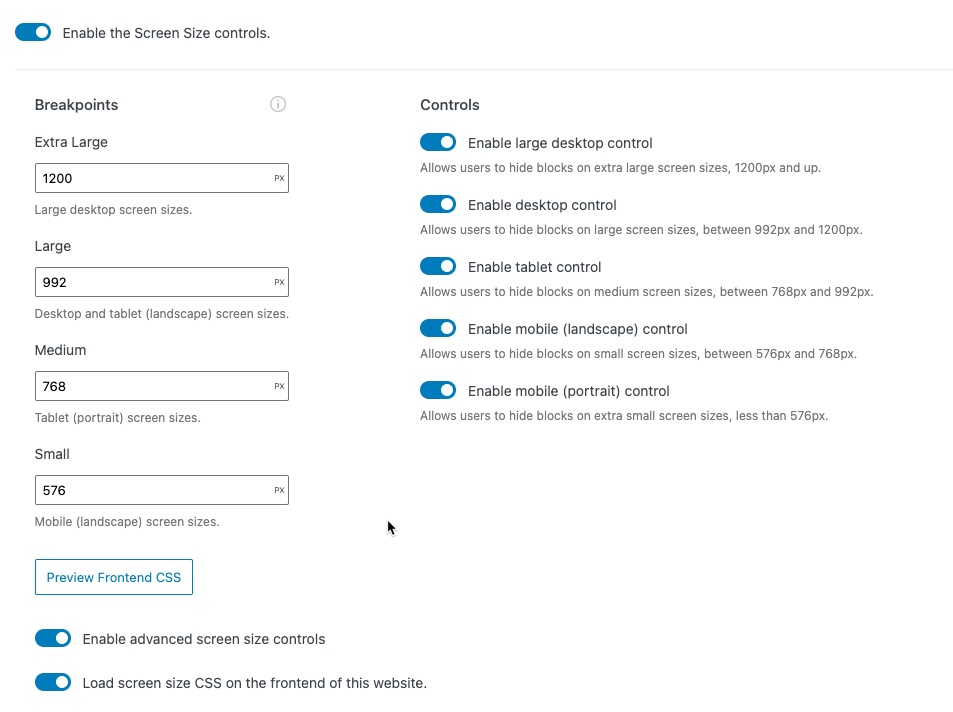
You can manually control the size (in pixels) of the large and medium size screens. Remember that if the size of the displaying screen is smaller than the indicated size, then it will go down to the next size. When you use Advanced Screen Size Controls, you will see several other screen sizes.
Enable Advanced Screen Size Controls
When this option is enabled under the Screen Size settings, then you will see more options for the screen sizes that can be affected. You can see the difference in the settings here:
You can also see the difference in the editor:
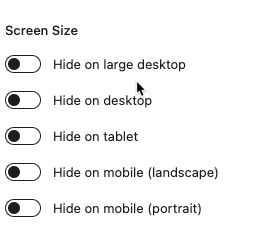
The final option in the Screen Size setting is Load Screen Size CSS on the frontend of the website. This option allows you to remove the effects of the plugin unless you manually add the CSS code into your theme. You can get the CSS code for the screen size by clicking on the button labeled Preview Frontend CSS.
Query String

The query option is the final setting in the Visibility Controls and it allows you to set query strings that can affect block visibility. When you enable the option, you would have to go into the editor to actually use it. It is not immediately visible.
To enable the option you need to go into a post, click on Visibility under the Block settings. Then click on the ellipsis next to the Controls label.
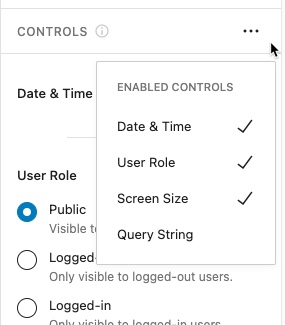
Then you need to click on Query String to enable it.
Once it’s enabled you’ll be able to select and enter the query strings in the options that appear in the menu:
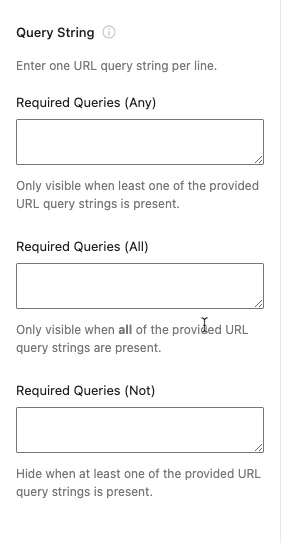
The fields for the query strings can only accept one string to work. You can use the following accepted formats:
param=value
Query parameter with a specific value.
param=*
Query parameter with a wildcard value.
param
Query parameter with no value. Operates the same as a wildcard value.
Here’s an example of a query string: https://example.com/?query_parameter
The query can have a value like this: https://example.com/?query_parameter=1
You can use the Query String setting to display content based on user input.
Block Manager
The final tab in the Settings for the Block Visibility plugin is basically a list of all the blocks currently on your site.
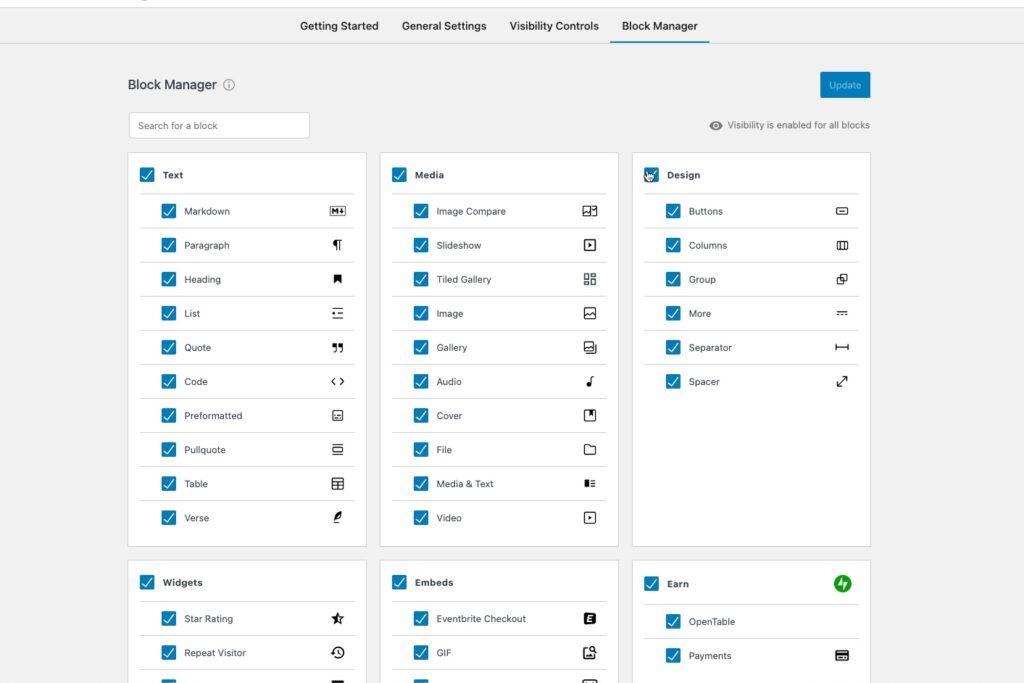
You can select the blocks that you want to be affected by the plugin. Simply, check (or uncheck) the block and then click on the Update button in the top right corner to save your changes.
Using the Block Visibility Plugin in a Post
Now that you understand the different settings, let’s step through the use of the Block Visibility plugin in a post.
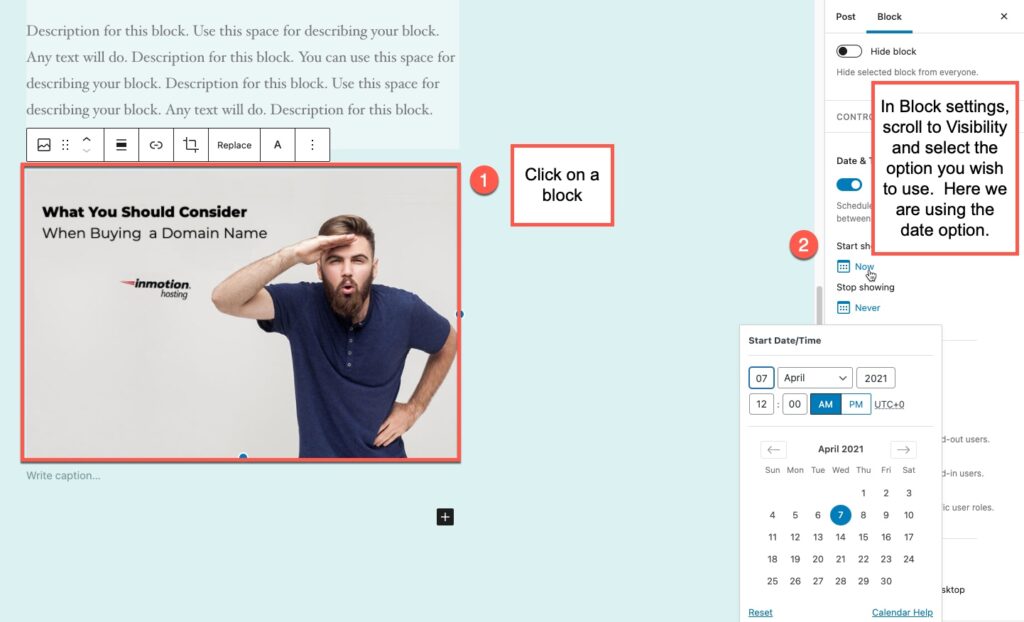
- Open a post and then click on a block. In this case, we will select an image block for this demonstration.
- In the Block settings at right, scroll down and click on Visibility.
- Select an option to use to control your block’s visibility. In this example, we are scheduling the block with a date.
- Once you have completed adding the block visibility settings, make sure to click on Save Draft, Update, or Publish in order to save your changes.
Congratulations! You now know how to use the Block Visibility plugin for WordPress. This is a great plugin to help display your content for a specific audience or schedule.
To learn more about WordPress plugins, check out our articles on WordPress plugins! You can also go to our WordPress Educational Channel for more guides, tips, and solutions!
