Table of Contents
- Create a WordPress Plugin
- Create a WordPress Plugin Script
- Creating a WordPress Function for a Plugin
- Create an Admin Menu in the WordPress Dashboard
- Add WordPress Plugin Page
- Save WordPress Plugin Settings with a Form
- Register Plugin Settings with WordPress
- Read WordPress Plugin Settings from Database
- Completed Extra Post Info WordPress Plugin

In this guide we’ll walk you through creating your very first WordPress plugin. This will just be a simple plugin that adds some extra info to all of your posts. Using these same steps you can design and implement your own WordPress plugins! Remember, this is just an instructional plugin meant to show you the basics: try this out on a staging site or a practice installation of WordPress. Do not install this on a live, important site crucial to your business; it’s just for fun!
- Create a WordPress Plugin
- Create a WordPress Plugin Script
- Creating a WordPress Function for a Plugin
- Create an Admin Menu in the WordPress Dashboard
- Add WordPress Plugin Page
- Save WordPress Plugin Settings with a Form
- Register Plugin Settings with WordPress
- Read WordPress Plugin Settings from Database
- Completed Extra Post Info WordPress Plugin
Create a WordPress Plugin
Before you begin creating a WordPress plugin, you need to figure out the purpose of your plugin, and a unique name to give your plugin. This is important if you want to release your plugin to the WordPress Plugin directory.
In this guide we’re going to create a plugin called WordPress Extra Post Info. This plugin will let users enter in extra information for WordPress posts.
Here’s a breakdown of our plugin creation workflow so you know what to expect:
- Create a Plugin Script: First we need to create a PHP script and place it in the proper location for WordPress to recognize it as a proper WordPress plugin.
- Create a WordPress Plugin Function: With your WordPress plugin script started, the next step will be to create the WordPress plugin function that actually contains the logic of what your plugin will do.
- Create a WordPress Admin Menu for Your Plugin: Once the basics for your WordPress plugin are laid out, you’ll want to create a WordPress admin menu so users can alter your plugin settings easily.
- Create the WordPress Plugin Page: Once your admin menu is made, the next thing you’ll want to do is create a WordPress plugin page.
- Save WordPress Plugin Settings with a Form: Now that you have a very basic WordPress plugin page created, the next step is to save WordPress plugin settings with a form so that your plugin can load those settings later.
- Register WordPress Plugin Settings to the Database: Now you can register WordPress plugin settings to the database, so a user’s settings are kept for later use.
- Read WordPress Plugin Settings from the Database: Finally, bring your plugin development full circle.
Create a WordPress Plugin Script
Our first step is to create a WordPress plugin script with some PHP code for WordPress to read. We’ll upload the script to your WordPress /wp-content/plugins/extra-post-info directory. Use FTP or the cPanel File Manager in order to upload or create your WordPress plugin PHP script.
Platform i users can use the File Manager tool.
If you installed WordPress in your document root, WordPress plugins would go here:
/home/userna5/public_html/wp-content/plugins
Create WordPress Plugin Directory
You’ll want to create a new folder for your plugin first. This folder can simply be named the same as your plugin name. In my case I’ve created a folder called /extra-post-info, so my full path to my plugin is now:
/home/userna5/public_html/wp-content/plugins/extra-post-info
Now that you’ve created a folder for your WordPress plugin PHP script to go into, you want to create the PHP script that will control your WordPress plugin, and place it in the folder you created.
Create WordPress Plugin PHP Script
I’ve simply uploaded a PHP file to my newly created plugin directory, and called it extra-post-info.php
/home/userna5/public_html/wp-content/plugins/extra-post-info/extra-post-info.php
In the extra-post-info.php script, I’ve placed the WordPress plugin File Header info for the plugin I’ll be creating:
Accessing WordPress Plugin Script via WordPress Dashboard
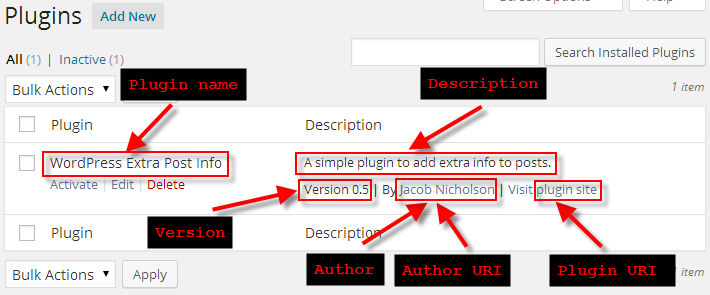
Now you have a PHP script with WordPress File Headers inside of your WordPress plugin directory. Next, login to the WordPress dashboard and click on Plugins to see your newly created plugin:
Creating a WordPress Function for a Plugin
Check to Ensure Function Name is Unique
You’ll want to wrap your entire plugin function inside of a if( !function_exists ) statement. That way, we only run our plugin’s function if a function of that same name hasn’t already been created by another WordPress plugin:
Create our Plugin’s Main Function
Now that we know our plugin name is unique, we want to actually start with the logic for our plugin. Our plugin will simply add some extra info to a post, so we’ll start off very simply by just manually defining what info we want added.
We start by declaring function extra_post_info($content) which creates the function called extra_post_info. This function pulls in the default WordPress $content variable, which as you might guess is the content of the post we want to add extra info too.
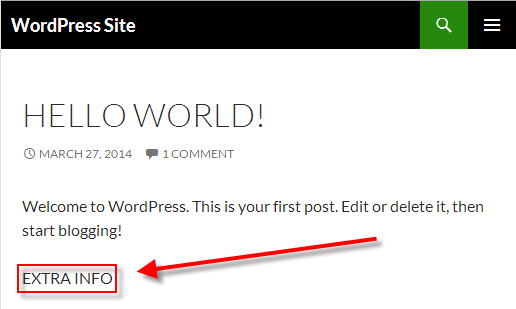
Within the newly created function, we setup a variable called $extra_info which simply stores the extra text we’d like to add to our post, in this case EXTRA INFO.
Finally before closing our function, we run return $content . $extra_info which returns the original content of the post to WordPress, but with our added text appended to the end:
Use add_filter to Make WordPress Display Update
Now in order for our newly created extra_post_info function to actually update the content of a WordPress post, we need to use the WordPress add_filter(‘the_content’, ‘extra_post_info’) hook.
This hook lets WordPress know we want to filter our content before displaying. The second argument of extra_post_info sets the function we want to filter our content through.
Full WordPress Function Results
If you followed along above, the full WordPress plugin function so far should look like this:
Plugin Results when Activated
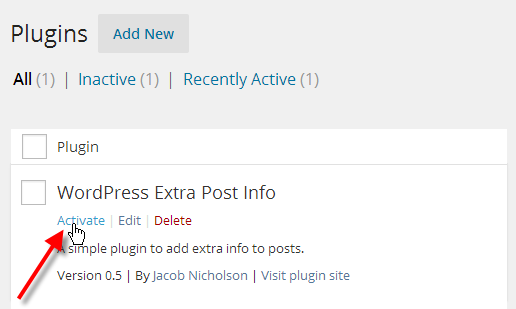
Now you can login to WordPress, click on Plugins then activate the plugin by clicking on Activate.
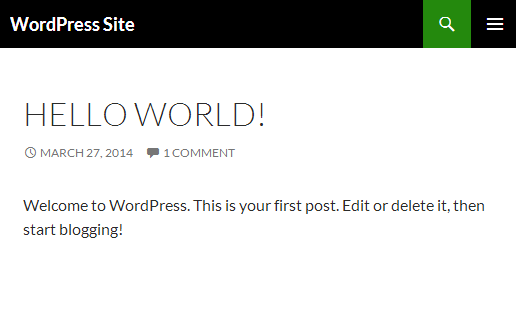

Now as you can see our plugin successfully added the text EXTRA INFO into our WordPress post.
Create an Admin Menu in the WordPress Dashboard
To allow users to customize your plugin to fit their needs, you can create a WordPress admin menu. This creates a icon in the WordPress dashboard that a user can click on to view plugin settings.
You define things like the $page_title to set how your plugin menu looks. You also define the $function which WordPress should use to create your plugin page that contains your settings.
Then you use the add_menu_page hook to actually create the menu and make it show up in the WordPress dashboard.
Use the WordPress function add_action along with admin_menu to let WordPress know we’re building an admin menu. Then pass the function name of your menu extra_post_info_menu that sets up your menu item.
At this point in your WordPress plugin development, you’ve already started to use the WordPress plugin function to control what your plugin does.
| Variable/Function Name | Description |
| $page_title | The title shown in the web-browser when viewing your plugin page |
| $menu_title | The title for the menu button shown in the WordPress dashboard |
| $capability | manage_options allows only Super Admin and Administrator to view plugin |
| $menu_slug | URL to access plugin such as: /wp-admin/admin.php?page=extra-post-info |
| $function | The function that contains the code for what to actually display on your plugin page |
| $icon_url | Icon used in dashboard. You can use WordPress dash icons, or direct images like: $icon_url = plugins_url( ‘extra-post-info/icon.png’ ); |
| $position | Icon position in dashboard |
| add_menu_page | The WordPress function that hooks in and builds our plugin menu in the dashboard |
If you need a new home for your WordPress site, look no further than InMotion’s WordPress Hosting solutions for secure, optimized, budget-friendly servers.
Fast & Easy Transfers
Free SSLs
Hack Protection
Affordable
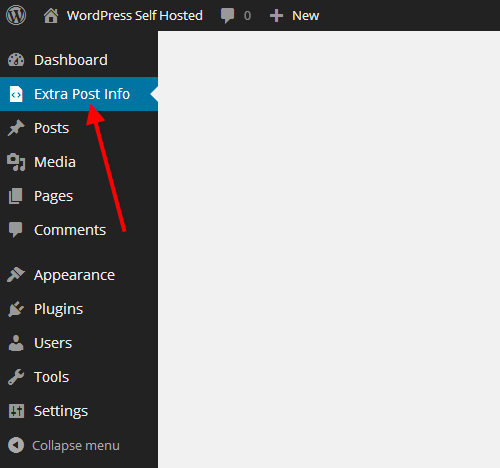
Blank Plugin Page Accessed from Dashboard Menu
At this point you should be able to see your WordPress plugin menu in the dashboard. If you click on it, you’re just going to get a blank page as you haven’t told WordPress what to put here yet. We’ll be creating the Plugin Page next!
Add WordPress Plugin Page
Your WordPress plugin page can just provide info to a user, or allow them to adjust the settings for how your plugin functions with their site.
When you created a WordPress admin menu, one of the add_menu_page options is $function.
This defines the function WordPress will use when displaying your menu page for the plugin.
In this example I named mine extra_post_info_page. I can start by just setting a heading on my page.
The results of our code so far just displays some text on our plugin page.

Save WordPress Plugin Settings with a Form
Now you can save WordPress plugin settings with a form so a user’s settings are kept for later use. You want to take information typed into your plugin page and add it to the WordPress database so your plugin can read it. This allows your plugin users to alter settings for your WordPress plugin and customize it to fit their needs.
You can use the built-in WordPress options page to gather info from the user, and then save it in our WordPress database in the wp_options table. That way we can pull this info later to change what our plugin does on our site.
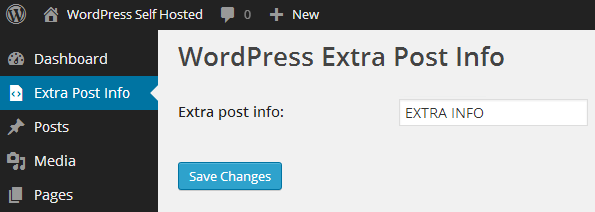
In my example with the Extra Post Info plugin, I want to allow users to type in the extra info for their posts. Then store that information in the WordPress database so we save what they typed in.
Code Break-Down
We create a form and tell it to POST to the WordPress options.php script, so WordPress can save our data.
We use the settings_fields function, and pass extra-post-info-settings as the group name we’d like.
We use the do_settings_sections function, and pass the same group name to display our settings.
We create a table and in the table header, we use Extra post info: for the label of our field.
We create a text input with the name set to extra_post_info, and then we use get_option( ‘extra_post_info’ ) to display what’s already been set in the database.
We use the WordPress submit_button() function to create a button to save our data.
Plugin Page with Non-Functional Form
We now have enough logic in our plugin page to display a form, but it doesn’t do anything yet.

Register Plugin Settings with WordPress
When you create a WordPress plugin, and you’re already saving WordPress plugin settings with a form. You want to register those settings and store them in the database with WordPress, so it can change your site. To do this we need to register our setting changes with WordPress so it can store this information in the wp_options table.
Add add_action Hook to Register Settings
When you create a WordPress admin menu you can add an add_action function after the add_menu_page function. This call another function update_extra_post_info to save info to the database from our form.
Register Settings with register_setting Function
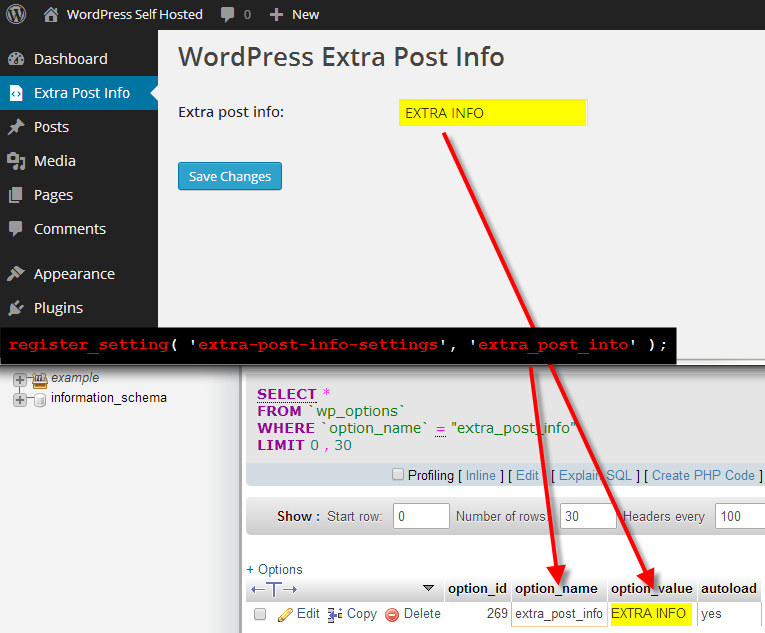
Creating a function called update_extra_post_info you can use the WordPress register_setting function to store info from our form into the database. The value will be stored next to extra_post_info in the wp_options table.
Plugin Settings are Now Saved to the WordPress Database
When you view your plugin page, you can see that when EXTRA INFO is entered into our settings, it ends up in the WordPress database beside extra_post_info. When this info is updated, so is the database entry.
Read WordPress Plugin Settings from Database
The final step to create your first WordPress plugin is to take the info that we registered with the WordPress database, and pull that into our plugin to change how it affects the site.
Change Static Settings to be Database Driven
When we decided to create the main WordPress plugin function, we told WordPress what our extra post info should be. We hard-coded EXTRA INFO, and to change it we’d have to alter the plugin script manually each time.
Use WordPress get_option Function to Pull Info from Database
To allow our plugin users to change the info from the dashboard, and then have that info reflected across all our posts, we want to use the get_option function to pull in the extra_post_info data we stored.
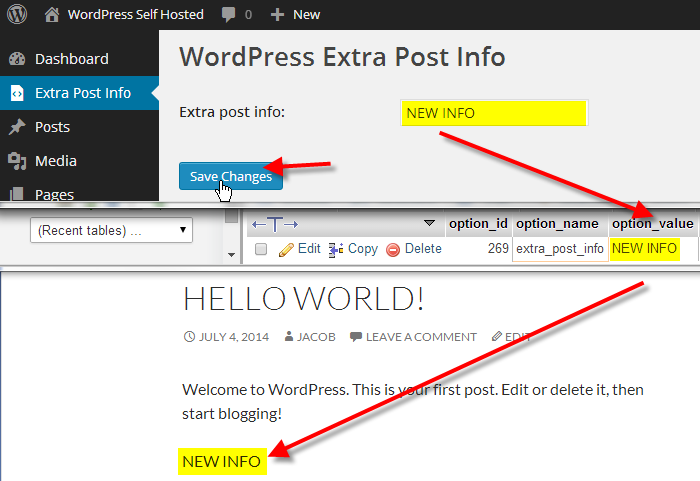
Now when a plugin user types in NEW INFO into our plugin page, and clicks Save. The info is stored in the WordPress database, and then that new info is pulled into our posts.
Completed Extra Post Info WordPress Plugin
With the WordPress plugin we’ve created, a user can update the info they want displayed on all posts from the dashboard. This is a very simple plugin, and just scratches the surface of the power of WordPress plugins. We hope it helped you understand how a WordPress plugin should be built.
Here is a heavily commented version of the entire plugin so you can easily tell what’s going on.
You can also grab the raw text version to review and use as a reference. Ready to design your own plugin from scratch? Take a look at our WordPress tutorials for some ideas!


Yeah, this article was helpful, but still need some help please.
What type of help do your need? Please be specific so we can better assist you.
Nice article! Make more like these about PHP!
Thank you for your suggestions, we will take this into consideration when creating future content.
Very nice article. I am grateful. It helped me a lot
Very helpful article. Thanks!
Nice Article.