Table of Contents
One way to ensure that all of your WordPress posts meet your editorial workflow requirements is by creating checklists that contain all of the necessary criteria. These checklists can be referred to during the content production process or just before you publish as a final step in the review process.
While it is possible to use a simple text document for checklist creation, the Pre-Publish Checklist WordPress plugin allows you to integrate checklists directly into your WordPress website, streamlining the content creation process and maintaining your editorial standards. In this article we will discuss the key features of the Pre-Publish Checklist plugin and provide some basic instructions for using the plugin on your WordPress website.
Topics Include
- Key Features of Pre-Publish Checklist
- Setting Up Pre-Publish Checklists
- Modifying Checklist Settings
Key Features of Pre-Publish Checklist
Create and Manage Checklists
The Pre-Publish Checklist WordPress plugin allows WordPress site administrators to create checklists that users will see before they publish a page or post. For example, you may want to remind users of basic formatting requirements before the page goes live. By creating custom checklists you can ensure that all users are aware of editorial standards and pre-publication requirements.
Since the pre-publication checklists are displayed directly in the WordPress editor menus, you don’t need to worry about distributing separate text documents to all of your various WordPress contributors. This not only reduces confusion and saves time, but it also enhances communication by centralizing all editorial pre-publication requirements and making the information highly visible within the WordPress interface.
Checklist Overview
Another feature of the plugin is a general overview of checklist progress for WordPress pages and posts. This allows site administrators and team members to easily see how well drafts and published articles adhere to the checklist criteria.
Instead of needing to click through each page and post individually, you can see checklist progress from the Pages and Posts tabs in the WordPress dashboard. The information will be displayed in a new column of these pages, indicating if a checklist is completed or how many items remain unchecked. This screen will also identify which pages and posts do not have an assigned checklist.
Setting Up Pre-Publish Checklists
While the Pre-Publish Checklist plugin comes pre-installed with a default checklist that can be used right away, you may have your own checklist you wish to implement. For example, you may want to add new entries in the checklist for things such as “Check Spelling and Grammar in Article” or “Review Post Formatting” or “Include 3 Links in the Article”. By adding these items to the checklist you can ensure that the requirements are visible directly in the WordPress editor. The following instructions will allow you to customize your Pre-Publish Checklists:
- First, log into your WordPress dashboard.
- Once logged in, use the left-hand navigation menu to go to Settings > Pre-Publish Checklist.
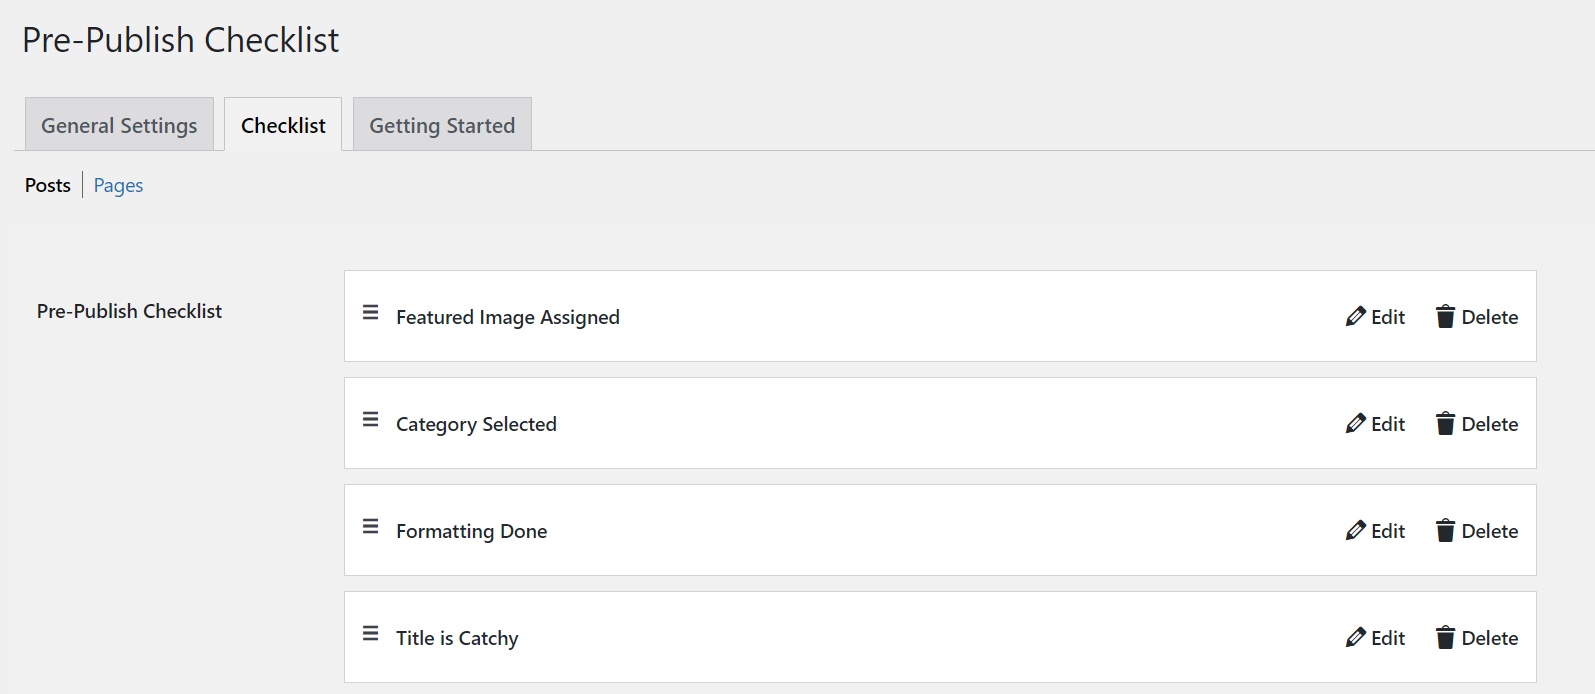
- On the next page, you will see three tabs: General Settings, Checklist, and Getting Started. Select the Checklist tab.
- A default checklist will be displayed, review this checklist and modify it as necessary using the Edit and Delete buttons on each entry.
- If you want to switch between customizing pages and posts, use the options at the top of the checklist labeled Page and Post.
- At the bottom of the checklist is a field to enter a new custom checklist entry. After entering the checklist item, click Add to List.

After customizing your checklists, they will automatically appear on newly created posts and pages, underneath page attributes within the right-hand menu while using the WordPress page editor. As items are completed, click the checkboxes to mark the item as completed. Once all items are marked as finished, the page can be published. Depending on your settings, if you attempt to publish the page even though all boxes are not checked, you will be prompted to either go back and complete the checklist or publish anyway. If you want to modify your checklist settings, please continue to the next section.
Modifying Checklist Settings
If you decide to change the default settings of Pre-Publish Checklist, you can easily do so in the WordPress dashboard. From this menu you can configure the behavior of the checklist plugin and designate which types of content use your created checklists.
- After navigating to Settings > Pre-Publish Checklist in the WordPress dashboard, select the General Settings tab.
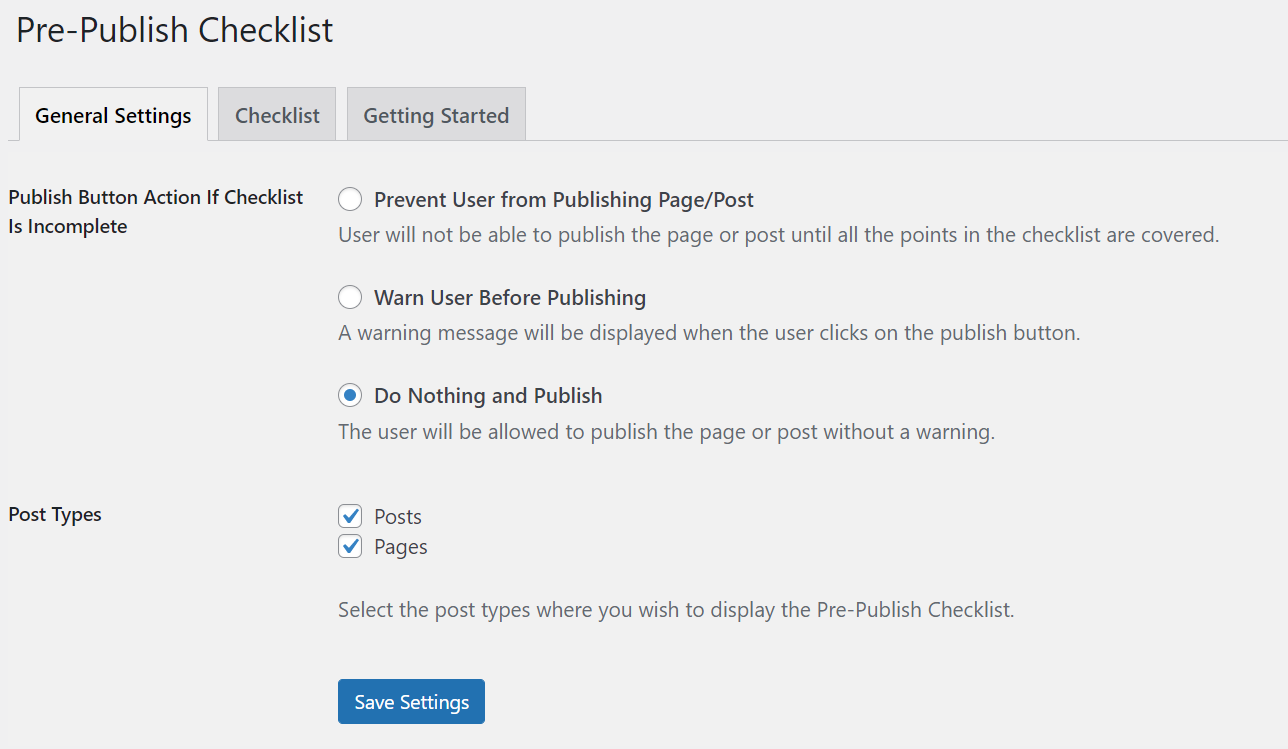
- The first setting determines the behavior of the checklist in the event that not all items on the checklist are completed prior to publication. You can choose from the following options:
Prevent – Prevents publishing of the article entirely.
Warn – Warns the author before the publishing of incomplete checklist items.
Do Nothing – Does not warn or prevent the publication of articles. - The next setting determines the types of posts the checklist will apply to. Click the checkbox for all post types you prefer:
Posts
Pages
Custom Post Types
Courses - Once done, click Save Settings to preserve your changes.
Congratulations, you now know how to modify your Pre-Publish Checklist settings! This is useful for fine-tuning how content is produced, since you can prevent the publication of articles that have not completed the checklist. This ensures that all content meets your predetermined standards prior to publication, helping you maintain a consistent output of quality content.
Next Steps
After setting up your Pre-Publish Checklists, you may find yourself in need of additional ways to integrate editorial workflow resources directly into your WordPress website. To round out your editorial toolkit, consider installing the PublishPress and Oasis Workflow plugins to complement Pre-Publish Checklist.
PublishPress will provide you with a highly visible editorial calendar for content planning and coordination, while Oasis Workflow provides you with a means to create visual workflow designs that illustrate the steps in your editorial process. By combining these plugins you can keep team members aligned with project goals, article deadlines, and review processes.
Managing a large team of writers working out of the same WordPress site can be tricky, but with the right tools it can be a highly productive experience. Instead of relying on multiple 3rd party applications and documents for your editorial process, installing editorial workflow WordPress plugins streamlines your content pipeline and keeps team members engaged while producing quality content.
Say goodbye to slow loading times and hello to high-performance websites with our new WordPress VPS Hosting plans. Experience 40x faster WordPress page load speeds on purpose-built servers that guarantee 99.99% uptime.
High-Performance VPS
Fully-Managed Support
Free SSL & Dedicated IP
Advanced Server Caching


