Table of Contents

Working with email can be a demanding task for an administrator. In the task of managing email, an admin may have to create email users, change settings, and troubleshoot email issues. However, without access to the mail server itself, it’s not easy for WordPress users to get information or determine what’s happening with email being sent from WordPress. This is where the WP Mail Logging plugin becomes essential.
The WP Mail Logging plugin logs the following WordPress email events:
- password reset emails
- new account email notification emails
- new comment email notification
- WordPress version updates notification
A WordPress admin will have access to the user accounts to add, remove, or change settings. The plugin enables the administrator to know about email events that are typically automated. This will allow them to determine if an email notification was actually sent, and get an overview of the emails being sent out. This can help an admin to make decisions on the notifications being sent from the WordPress installation.
This guide will walk you through the installation process, configuring the settings, viewing the logs, and deleting the logs generated by the plugin.
Looking for a new home for your WordPress site? Check out InMotion’s WordPress Hosting solutions!
Install WP Mail Logging
Installing the WP Mail Logging for WordPress is quick and easy like many other WordPress plugins. When you have it installed you will be able to view your mail logs right in the Dashboard and import/export your settings.
- Log into your WordPress Dashboard.
- Click Plugins then Add New.
- In the search field type ‘wp mail logging’ without the quotation marks.
- You will see WP Mail Logging by MailPoet listed, click the Install Now button.
- Once it has been installed click the Activate button. You are finished when you see a “Plugin activated” message.
You have completed our guide on how to install the WP Mail Logging plugin! You’ll find information on the settings in the next section.
WP Mail Logging Settings
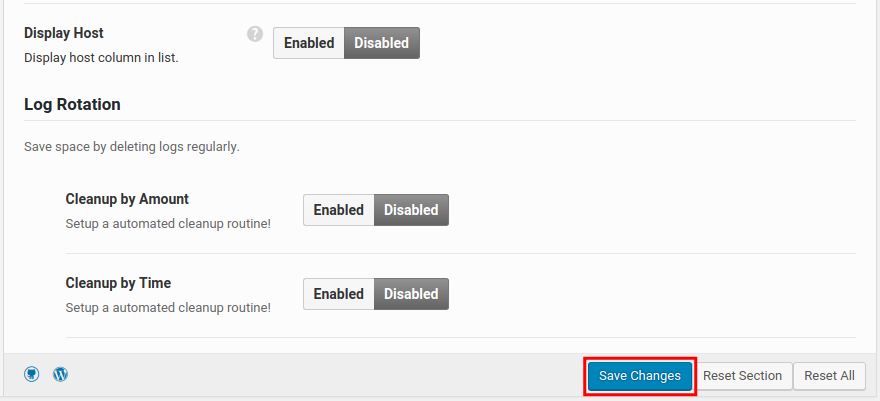
Now that you’ve installed WP Mail Logging you have several options for cleaning up logs which can be useful when trying to minimize the amount of disk space you are using. You can also adjust the date and message format on this page. Note: For additional troubleshooting steps see our full WordPress Troubleshooting guide.
General Settings
- Log into your WordPress Dashboard.
- Click WP Mail Log then Settings in the navigation menu.
- Click the General Settings link to make sure you are on the right page.
- You can then choose your WP Mail Logging settings as needed. Below is a summary of the available options.
| WP Mail Logging General Settings Cleanup | If you enable this option, it will delete your logs and settings when you deactivate the plugin. |
| Can See Submission Data | Here you can select which roles can see the mail logs. |
| WordPress Date Time Format | Set if you want the mail logs to use the default WordPress date and time. |
| Default Format for Message | Choose if you want the default message format to be HTML, raw, or JSON. |
| Display Host | Choose if you want to include the IP address of your WordPress site in the log. |
| Log Rotation Cleanup by Amount | Enable this option to set the maximum amount of emails you want to keep logged at one time. |
| Cleanup by Time | Enable this option to set how many days you want to keep email logs. You also have the ability to reset the settings in this section or reset all WP Mail Logging settings. |
- Click the Save Changes button after choosing your settings.

Congratulations, you are now familiar with the WP Mail Logging Settings! Next, we will show you how to view your WordPress mail logs using the WP Mail Logging plugin.
How to View Your WordPress Mail logs
Are you missing emails from your WordPress site? As we continue our series on the WP Mail Logging plugin, we will now show you how to view your WordPress Mail logs. This is an important step when troubleshooting email problems in WordPress. For example, you may not be receiving messages from the contact form or password reset email.
View Mail Logs
- Log into your WordPress Dashboard.
- Click the WP Mail Log link in the navigation menu.
- You will then see a list of emails sent from your WordPress site. Click the View button next to the email you want to check.
- You can then view the contents of the email that was sent. Click the message format options to change between HTML, raw, and JSON.
- Click the Close button to return to the mail log list.
Congratulations, now you know how to view your WordPress Mail logs! In the next section, we will show you how to delete WordPress email logs generated by the plugin.
How to Delete WordPress email logs
There may be a time when you want to remove all emails from your mail logs. For example, you may want to remove outdated emails to clear the logs. Follow the steps below to learn how to delete email logs in the WP Mail Logging plugin.
Delete Email Log
- Log into your WordPress Dashboard.
- Click the WP Mail Log link in the navigation menu.
- You will then see a list of emails sent from your WordPress site. Check the box next to the email you want to resend.
- You can also check the box on top to select all emails listed.
- Click the Bulk Actions drop-down box and select the Delete option. The email(s) you selected will then be deleted. In this example, I deleted all emails in the log.
Congratulations! You have completed our guide on how to delete email logs in WordPress using the WP Mail Logging plugin.
Using the WP Mail Logging plugin, you can find out about the emails being sent from your WordPress installation. It helps you to gain a clear picture of the notification emails that are being sent automatically from your website.
Knowing this information can help you determine what notification emails need to be limited or expanded. This information is especially helpful if you have a high traffic volume site with many users. The email notification process can consume precious resources that may impact your WordPress site’s performance.
To learn more WordPress tips and tricks, check out our WordPress Educational Channel.
Become a master of WordPress plugins! Protect, optimize, secure, and expand the functionality of your website easily with the help of WordPress plugins!
