Table of Contents
In this article:
Do you ever see an image slowly loading when looking at a website with your mobile device? This is often a sign that bandwidth is limited creating an unfavorable environment for viewing your website. Jetpack provides a way to reduce this type of latency by using something called Lazy Images. It works by keeping images from loading when they are not being viewed. This improves the performance of your website, especially for conditions when there is limited bandwidth to load your media. The following tutorial shows you how to enable this performance feature within Jetpack.
If you need a secure, optimized server for your WordPress site, then make sure to check out InMotion’s WordPress Hosting solutions.
How to Enable Lazy Images in Jetpack
In order to make changes to the Jetpack settings, you will need to be logged into the WordPress Administrator Dashboard.
- Click on Jetpack, then click on Settings
- You will see a menu at the top of the Jetpack Settings screen. Click on Performance.
- Scroll down where you see “Enable Lazy Loading for images.” Click on the switch to enable it.
Once you have enabled the feature, it will immediately affect the images loading on your WordPress site.
Example of Lazy Images
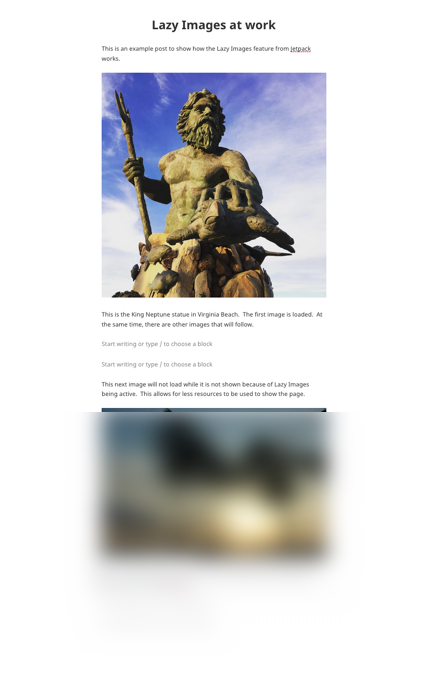
To further demonstrate how the lazy images feature works, we have provided a screenshot of a WordPress page with multiple images. Normally, you would only see one image at a time, but the screenshot has been zoomed out in order to show the second image.
The images are not actually blurred when the lazy images feature is working. When a page is typically loaded, all images start to be processed by the browser. However, with the lazy images feature enabled, the upcoming images that cannot be seen are not loaded until they come into view.
Congratulations! You can now enable lazy images in Jetpack to improve the performance of your WordPress website. In order to learn more, check out the Jetpack Search Engine Optimization article.

