Table of Contents
In this article, you will learn how you can use email encryption in your hosted email accounts. With email encryption, your messages will be unreadable by anyone except the intended recipient. This is valuable when using a shared hosting account for which email is controlled from one cPanel. Anyone with access to the cPanel can see the content of the email messages. Follow along with the steps in this article to learn more about email encryption with Thunderbird.
Email encryption is great for exchanging private business plans, organizing surprise parties, or virtually hundreds of other applications that may require secret messages. Even if you have nothing to hide, encryption is a fun, free, easy way to learn about cryptography and establish your own “web of trust” with friends and coworkers.
Basics of email encryption with Thunderbird
In order to start using email encryption, it is recommended that you use a free, non-proprietary email client that you can modify. We recommend using Mozilla Thunderbird, because it is popular, well supported, and allows us to modify it. Also, this process requires a sender and receiver both using public and private keys (or, “keypairs”) to encrypt and decrypt messages.
For our encryption, we’re going to be using GnuPG. This program sets up a secure pair of keys we will use to encrypt and decrypt messages. A good analogy of how the whole system works is a safe belonging your email recipient. Imagine the recipient of your message has a safe that you can put messages into, and only the recipient has the key to open the safe and see your message. To complete the picture, the safe would be your recipient’s “public key” and they will use their “private key” to decrypt the message.
Installing GnuPG
If you use a GNU/Linux operating system, it is most likely that GnuPG is already installed in your system, in which case you can skip down to the steps below to install the Enigmail plugin in Thunderbird.
For mac users, you can install GnuPG via GPGTools. If you use Windows, you will just need to download Gpg4win. Once you have completed this installation, proceed to the steps below.
Adding Email Account and Installing the Enigmail Addon
Using GnuPG takes some reading and a lot of practice. But since we are only concerned with email encryption in this article, we can use a plugin called Enigmail to set up a secure keypair without having to leave Thunderbird.
We will also be adding an email account to Thunderbird. If you already have an active email account in Thunderbird, you can skip the first two steps.
- Find your email account settings
- Add your email account to Thunderbird
- Under Tools select Addons
- Search for the Enigmail addon and Install it
Now that we have Enigmail installed, we will just need to follow a few simple procedures to create our public key and private key and begin sending encrypted emails.
Using Enigmail in Thunderbird
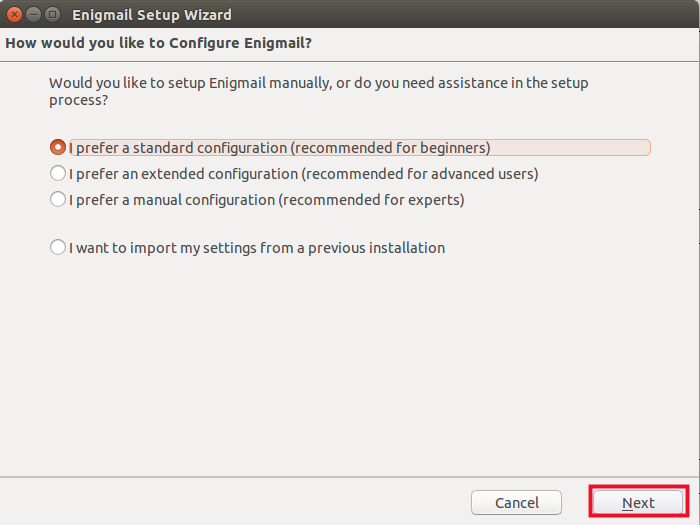
After installing Enigmail, you will prompted to go through the setup wizard. If you are not prompted, click Enigmail from the toolbar, and choose Setup Wizard.
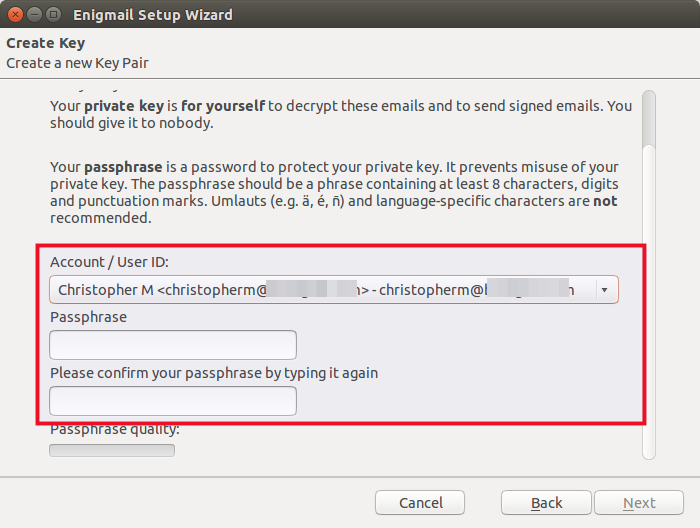
Over the course of the keypair setup, you will be asked to provide a secure passphrase. It is best to take some time now to determine this passphrase. It should be highly unique and highly secure. If you have any trouble creating a super secure password you can remember, use a Diceware passphrase.
- Choose the beginner options, unless you are an expert, and then click Next

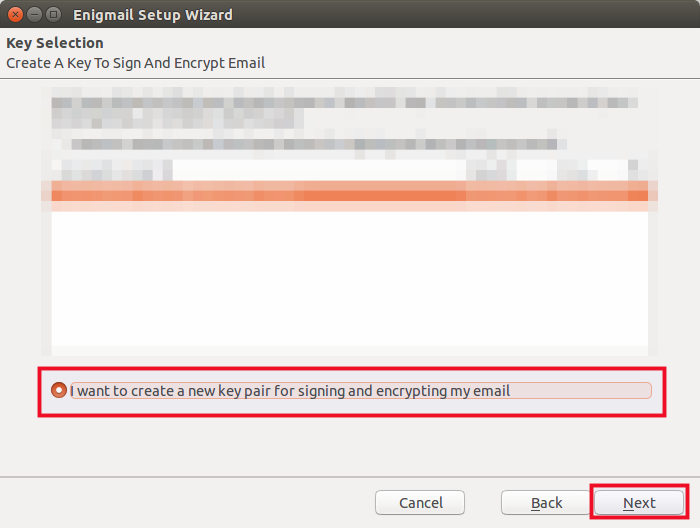
- On the key selection screen, indicate you want to create a new key and click Next

- Select the account you want to use and provide you secure passphrase:

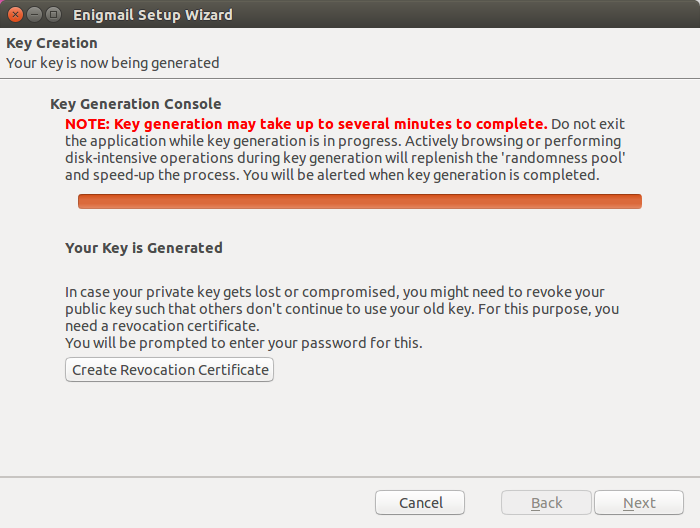
- Be patient, it will take a while to generate a secure keypair

- After the key generation is complete, save your “Revocation Certificate” to a secure location; you will be prompted to do this; further explanation follows
- Click Next to proceed and Finish
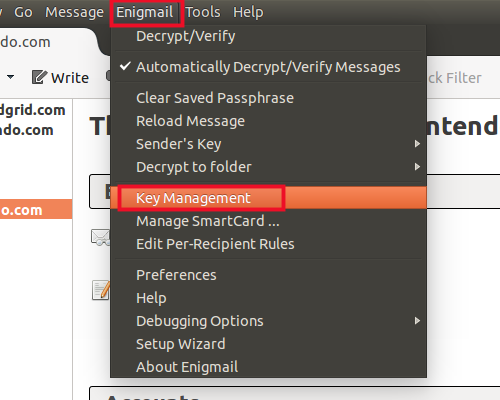
- To upload your public key to a keyserver, choose Enigmail from the toolbar and Key Management

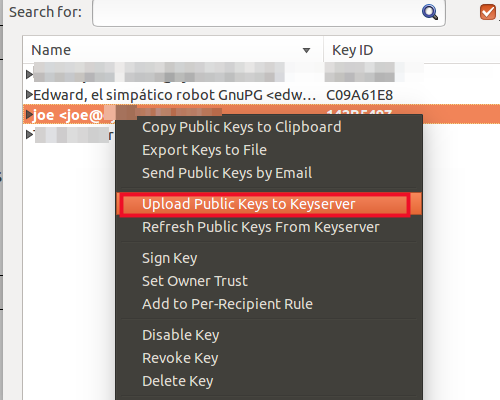
- Right-click your key and choose upload public keys to keyserver

Enigmail has a list of available keyservers already loaded and will automatically submit your key. Allowing your public key to be hosted on a public keyserver allows other to easily find your key to send you encrypted messages.
Even though your public key is registered with a keyserver, this does not mean that strangers will sign your key without taking special care to make sure it is legitimate. Likewise, you should only trust and sign keys from users you trust.
Testing Out Your Encryption
You must be excited to start sending encrypted messages now. But wait, you may not have anyone in your address book who is using encryption. In order for the process to work correctly, you have a recipient who is also using encryption. You will need a public key from your recipient in order to send an encrypted message that they can decrypt with their private key.
The Free Software Foundation has a bot named Edward whom you can communicate with to test your keys. Enigmail lets you draft an email with your public key included. This means Edward will have your public key and will reply with an encrypted message.
- Under Enigmail choose Key Management
- Right-click your key and select Send Public Keys by Email; this will draft a new message
- Address your message to
edward-en@fsf.org - After a few moments, you will receive an encrypted reply from Edward
- You may be prompted for your passphrase to decrypt it, otherwise, the message should come through clear
Now that your keys have been tested and are working correctly, you can always send an encrypted test message to Edward, and, in a few moments, he will reply. You can also practice signing Edward’s key and view it under Enigmail -> Key Management.
Using the Revocation Certificate
You may remember, earlier in the key generation process, you were asked to save a “revocation certificate”. If you saved the file to your computer earlier, it would be to wise to move it to a secure place. This key can be used to revoke and nullify your keypair. It should be used if you decide to longer use your current keypair or if you believe your private key has been compromised. Suggestions for a safe hiding place include an encrypted drive or a thumb drive in a locked vault. You may use your own discretion in choosing a safe place for this key.
How to use the revocation certificate in order to nullify your key is not covered in this article.
Important Points to Remember
As you are enjoying sending encrypted messages to friends, there are a few things you must remember to keep up best security practices.
- Subject headers and recipients are never encrypted; so the subject and who you are communicating with is totally visible
- Never share your passphrase with anyone
- Never share your private key with anyone
- Your private key is on your computer; keep it safe the same way you protect other precious files: lock your computer, keep backups, and save your revocation certificate somewhere safe
