Table of Contents

MailChannels Inbound Filtering is a cloud-based email delivery service that reduces spam and ensures only legitimate emails reach your inbox. If you manage your domain’s email and want access to detailed inbound logs and controls, you must become the MailChannels Domain Admin.
Follow the steps below to get started.
Step 1: Create a MailChannels Account
To manage your domain’s email delivery and monitor sending behavior, you’ll need an account with MailChannels.

- Visit the MailChannels account creation page: Create an Account
- Enter the email address and password of the account you want to manage.
- Click Sign Up.
- Confirm your email address by following the verification link sent to your inbox.
Once your account is active, proceed to request domain admin access.
Step 2: Request Domain Administrator Access
After setting up your account, request access to manage your domain within MailChannels:
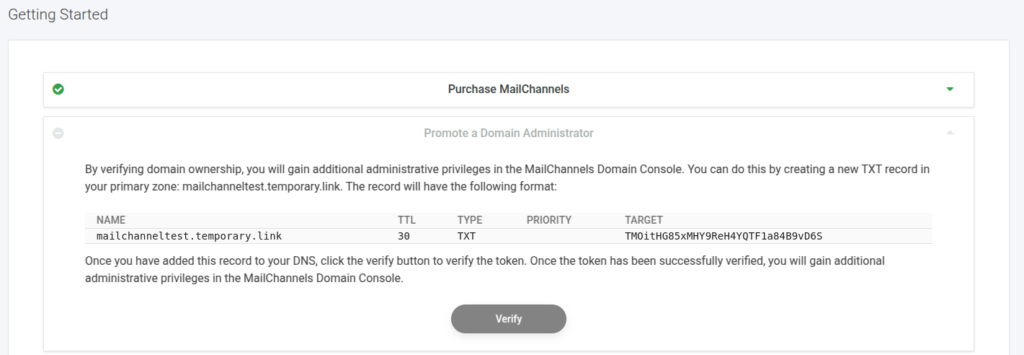
- Go to the Getting Started page within your MailChannels dashboard.
- Click on the Promote Domain Administrator panel.
- Add the TXT record shown in the panel for your domain.
- Click the Verify button to verify that the TXT record has been added and complete the promotion process.
Note: The DNS changes may take several minutes to propagate. Please be patient if the verification process doesn’t succeed immediately.
Step 3: Verify MailChannels MX Records Are Configured
Your domain’s MX (Mail Exchange) records must be configured properly to ensure MailChannels functions correctly with your domain.
Refer to our guide for MailChannels setup:
How to update MX records in cPanel:
- Log into your cPanel account.
- Navigate to Zone Editor under the Domains section.
- Locate your domain and click Manage.
- Remove existing MX records if necessary.
- Click Add Record and enter the MailChannels MX record details.
- Save changes.
**It may take up to 24 hours for DNS changes to propagate globally.
By following these steps, you’ll be able to fully manage your email delivery experience and ensure optimal performance using MailChannels as the Domain Administrator.
For more help, visit our MailChannels guides or contact our support team anytime.