One of the most important parts of being a community admin is managing your users. The users make up the bulk of the community, contribute content, and interact with each other. However, as an admin, you must understand how to properly manage users, privilege levels, and in general help to make sure your users are enjoying their experience. This article will help you understand how to easily manage your users in your Pleroma community.
There are many user configurations that you may find helpful over time as you continue to manage your community. This article does not provide an exhaustive list of all features, but some of the most important you will want to know as you just starting out.
Pleroma User Management Basics
For an admin, there are a few different places you can manage users. If you enabled the admin user interface to make database changes during the installation process, then you can log in and make changes through your browser. For many users, this is likely the easiest and most direct way to make important changes. But you can also accomplish many of the same tasks on the command line. For some users, the latter can provide greater security.
From The Admin Back End
In order to access the Admin FE interface:
- Log into your Pleroma site as the admin user
- Click the speedometer button on the top right

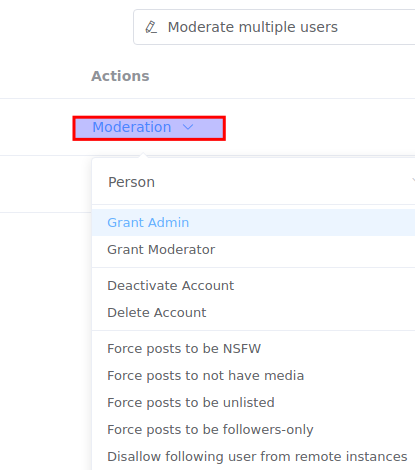
This will bring you into Admin FE, the administrative interface. By default, you will be dropped into the user dashboard. Here you will be able to view all of your active users and make changes by clicking the dropdown menu (see below).
From the Command Line
If you choose to manage the community from the command line (and, remember you can do both command line and browser interface) you will just need to log in as the pleroma Linux user you created during the installation process and run commands using the Pleroma binary. The commands will look similar to this command, which creates a new user:
./bin/pleroma_ctl user new <nickname> <email> [option ...]
Granting Privileges
When a new user has registered on your site, whether they are approved automatically or manually, you have choices to make regarding what level of privilege this user will enjoy as a member of the community.
There are three distinct user privilege levels that will affect the day to day usage of the site for any given user.
- Regular user
- Moderator
- Admin
A regular user can create posts, direct message, chat, and enjoy all of the standard communication and interaction features of the community.
A moderator has additional privilege to edit the content of other users. They can even delete posts.
An admin has ultimate power over the site. This includes the ability to grant or revoke privileges to other users and to edit the installation itself through the administrative back end.
Admin FE
To change a user’s privilege level in the Admin FE, following these steps:
- Log into the Admin FE interface (steps above)
- Click the Moderation dropdown under Actions

- Select Grant Admin or Grant Moderator depending on which level you are granting
Remember, an admin has complete control over the management of the site, so exercise caution when granting this level of privilege.
Command Line
To grant privileges on the command line, you can run the following commands.
For granting admin:
./bin/pleroma_ctl user set <nickname> --admin
For granting moderator:
./bin/pleroma_ctl user set <nickname> --moderator
And remember you can also revoke privileges by using the --no-admin and --no-moderator options instead of the ones provided above.
Resetting Passwords
At some point or another, a user may misplace a password, or you might want to prompt a user to reset their password for other reasons. The easiest way to do this is to have the user update the password themselves or send them a reset link or require them to reset password on next login attempt:
Password Reset in Admin FE
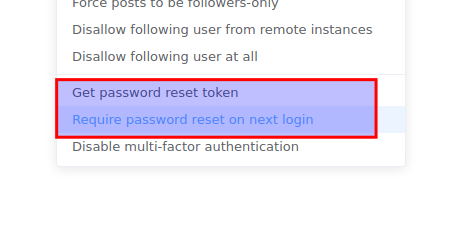
To create a password reset link in Admin FE:
- Log into the Admin FE interface
- Select the desired option (reset link or prompt)

Updating Password Via Command Line
The prompt option (above) is not available on command line, however, you can generate a password reset link with the following command:
./bin/pleroma_ctl user reset_password <nickname>
Well done! You now know how to update user settings with both the Admin FE interface and command line variations. Be sure to leave a comment below if you have any questions about these options.


