Creating tickets is a form of contact in HubSpot. It allows you to record interactions that require further action in the form of support, negotiations, or decision-making. Tickets are often associated with support problems, but they can be used for any interaction between you and the client. This benefits your business by providing accurately tracked and recorded issues that help provide timely solutions for your clients.
This tutorial will show you how to create and edit tickets through the HubSpot interface on your WordPress site.
How to Create Tickets in the HubSpot
Tickets are organized using categories called Pipelines. By default, any ticket you enter will be part of the Support Pipeline. The creation of different pipelines requires an upgraded HubSpot account.
NOTE: To follow these steps, log into the WordPress Administrator Dashboard.
- Click on HubSpot in the main menu of the WordPress Dashboard.
- Click on Contacts.
- Clicking on Contacts opens the drop-down menu. Click on Tickets in the menu.
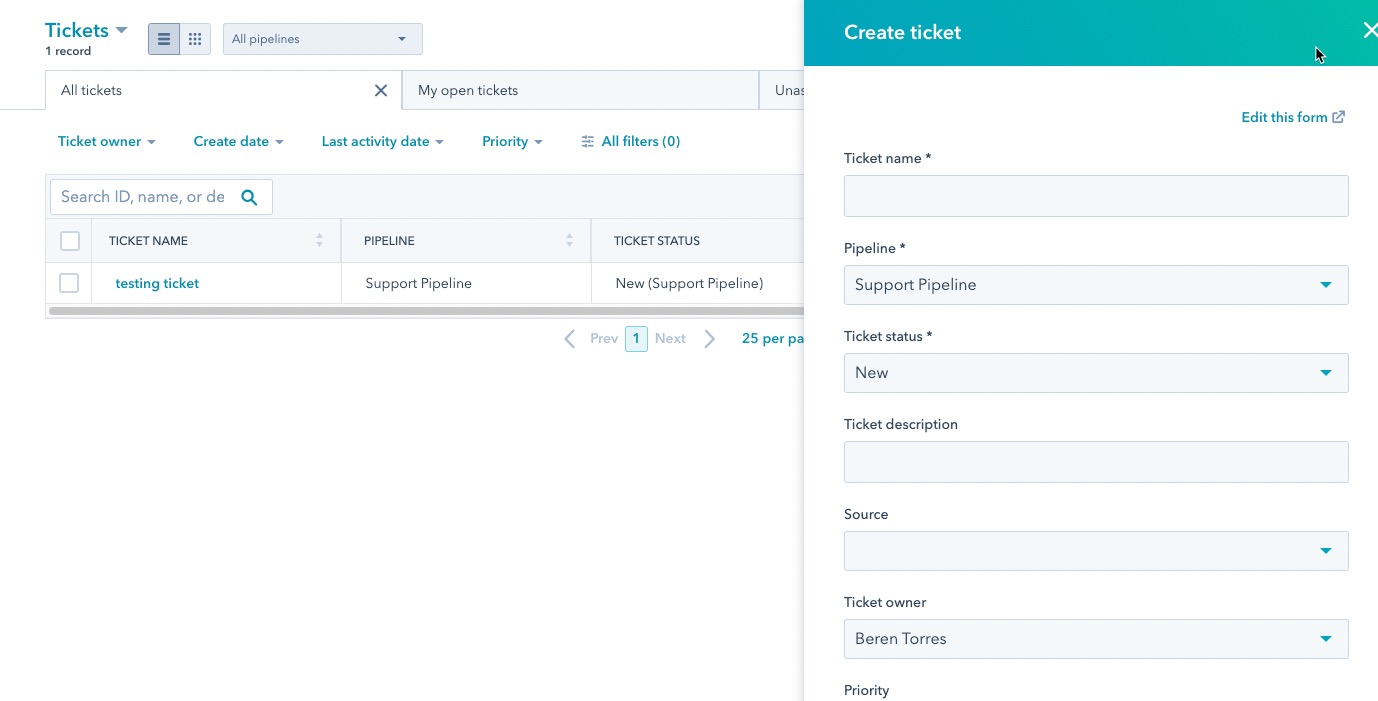
- Click on Create ticket in the top right corner.

- Fill in the Ticket name.
- Click on Ticket status and select a status from the drop-down menu.

- Enter a description of the issue.
- Select a Source of the ticket contact from the drop-down menu.
- Click on the drop-down menu to pick a Ticket owner.
- Select a Priority: Low, Medium, or High.
- Set the Create date.
- Select the Contact associated with the ticket.
- Click the checkbox to add the timeline activity with this contact.
- Select the Company associated with the ticket.
- Click the checkbox to add the timeline activity with this company.
- Click on Create or Create and add another to save your ticket entries.
How to Edit a Ticket
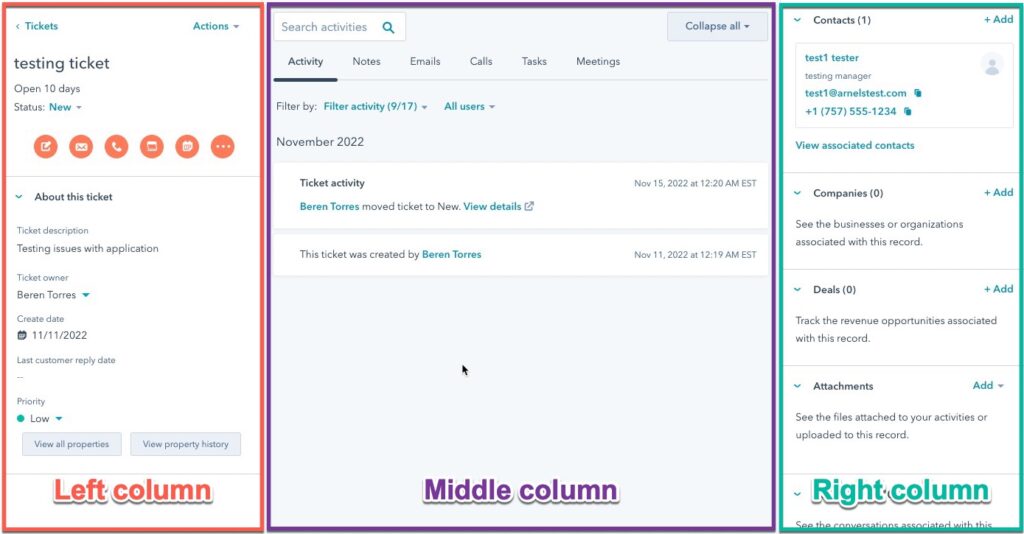
Tickets are often time-sensitive, so it is important to know how to edit a ticket to keep it properly updated. The ticket is organized into three columns. For this tutorial, we use left, middle, and right columns to describe them.
- Left column – ticket properties and recording options as tracked by HubSpot CRM
- Middle column – overview and interactions sorted by communication type
- Right column – contact information, including associated contacts, documents, and related conversations or playbooks

To edit a ticket:
- Click on HubSpot.
- Click on Contacts.
- Click on Contacts drop-down menu in the top left corner of the screen.
- Scroll down the menu and click on Tickets. This will open a table listing the existing tickets.
- Click on the name of the ticket that you want to edit.
- Update the ticket by recording any new interaction involving the ticket issue. The options directly linked with the HubSpot app have icon shortcuts in the left column. Hover and click on the options on the ticket page to make changes or add information.
You may log interactions that are not directly associated with HubSpot using the 3-dot icon. For example, you might communicate with a client through a written letter. You would use the option to log postal mail to record the interaction.![]()
Tickets are an important communication tool when interfacing with your customers. They provide the interface to record information about issues that the customer may be experiencing and track the interactions that occur to resolve these problems.
HubSpot allows you to record these transactions and use the history to help provide timely solutions that can be used to help prevent future issues.

