Table of Contents
Brand Indicators for Message Identification (BIMI), governed by BIMI Group, is a new method to authenticate email and protect users against business email compromise (BEC) attacks. In summary, BIMI uses a TXT record to display your SVG Tiny 1.2 optimized image with your email address in supported email clients, provided your emails are authenticated with Sender Policy Framework (SPF) and Domain-based Message Authentication Reporting and Conformance (DMARC).
Learn more about BIMI history and SVG Tiny 1.2 specification from our article on adding BIMI in cPanel.
Below, we cover how to add a BIMI record to your Linux cloud server or bare metal server.
To implement BIMI, cloud server hosting customers must have valid MX records for internal or external email hosting.
- Test for SVG Tiny 1.2 compliance
- Add BIMI record in Account Management Panel (AMP)
- Test BIMI record with fully qualified domain name (FQDN)
Upload SVG Tiny File
- Review our cPanel BIMI guide for SVG Tiny 1.2 spec guidance.
- Upload the SVG Tiny 1.2 file to your server using SCP, FTP (e.g. FileZilla), or your installed server management software (e.g. Webmin or Vesta Control Panel).
- Ensure you move (mv) the SVG file to a public-facing directory (e.g. var/www/html/media/).
- Open the BIMIgroup.org BIMI Generator in your browser to inspect your SVG file. We’ll use this tool after publishing the BIMI record as well.
- In the BIMI generator tool, enter your domain and the URL to the SVG file. Press Get BIMI record.
- Fix all issues before you continue. Alternatively, you can continue without meeting all listed requirements but your BIMI logo will be less likely to display alongside emails. Remember, only Yahoo and Google have limited BIMI support as of June 2020.
Add a BIMI DNS Record

- Log into your AMP Zone Editor.
- Beside your domain, select Edit.
- Create an Sender Policy Framework (SPF) record. You can use third party tools including MXToolbox.com or SPFwizard.net for assistance if needed. For example:
- Create a Domain Key Identified Mail (DKIM) record. You can use third party tools including easyDMARC.com or Tools.SocketLabs.com if needed.
- Ensure Domain-based Message Authentication Reporting and Conformance (DMARC) is set as strict as possible.
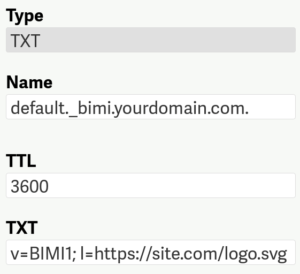
- In the AMP Zone Editor under Add Record, select TXT.
- Under Name, add the following:
- The default time-to-live (TTL) is normally between 3660 seconds (1 hour) and 14400 seconds (4 hours). It may be helpful to start with a lower TTL (e.g. 60) in case you have to address any issues reported by the BIMI SVG Tiny test (covered below).
- Under TXT, type the following but change the domain and file path to your public-facing file:
- To save changes, Submit Record.
Find other ways to improve your email authentication records with Mail-Tester.com.
Test the BIMI Record
After you add your BIMI DNS record, you should test your DNS records with the BIMI testers at BIMIgroup.org and Mailkit.com using your domain. It may take up to 48 hours for propagation before BIMI DNS record testers can see your new DNS records. If you need an SSL certificate, consider using Certbot to auto-update Let’s Encrypt SSLs. Organizations looking to get the most out of BIMI can contact EntrustDataCard for a verified Mark Certificate (VMC).
Learn more from our Cloud Server Hosting Product Guide.
Experience full control over your server environment and deploy the best operating and management systems that fit your needs with our reliable Cloud VPS Hosting!
