Brand Indicators for Message Identification (BIMI) is one of the latest solutions proposed to help mitigate business email compromise (BEC) attacks. Below we’ll cover everything you need to know about how to create a BIMI record in Control Web Panel (CWP), formerly CentOS Web Panel.
What is BIMI?
BIMI is an email authentication method that displays your logo alongside your email address in mailboxes to indicate that your email is legitimate.
The BIMI email authentication process is simple.
- You send an email to someone with an email provider that supports BIMI (e.g. Yahoo or AOL).

Gmail supports BIMI,
Source: BIMIgroup.org - The receiving email server authenticates the email with your Sender Policy Framework (SPF) and Domain-based Message Authentication Reporting and Conformance (DMARC) DNS records. DMARC forces email services to reject emails that didn’t originate from a server IP listed in your SPF record.
- If the email originates from a server IP in your SPF record and passes spam filtering, the BIMI TXT record pushes your logo to display in the receiver’s inbox for their reassurance and, from a marketing standpoint, to make you stand out from competitors.
Here’s a BIMI DNS record example:
default._bimi.example.com 3600 IN TXT “v=BIMI1; l=https://example.com/brand-name-logo.svg; a=;”
Create a BIMI Logo File
The first step to creating an image that meets the BIMI standard is to find an application that can export to SVG Tiny 1.2 specification. The most popular ones today are Adobe Illustrator and Inkscape. There are some free conversion tools available as well. The BIMI Group, which develops the standard, released conversion tools for Windows and macOS named SVG P/S Converter on GitHub in 2020. Here are some basic guidelines:
- No embedded images (png, jpeg, etc.)
- Have a background color (no transparency)
- Square dimensions (e.g. 15x15px or 200x200px)
- No rasterized data
- No prohibited references
- Proper color variance
- No multimedia elements
- No Base64 encoded data
Read BIMI Group’s blogs to learn more about meeting the BIMI email standard.
Upload the File to CWP
After converting your logo to a tiny SVG file, upload it to your CWP server. You can use FTP or CWP, covered below, to upload the file.
- Log into CWP.
- Select FileManager at the top of the screen.
- Use the left-hand sidebar and navigate to the root directory for your website. Use the List Domains section to review the website root directory if necessary.
- Upload the SVG file.

- Select the file name and rename it to something concise (e.g. brand-name-logo.svg). The file name will be publicly accessible and part of the TXT record you create later.
- Open the URL in your browser to ensure the image is publicly accessible. If you uploaded the image to your website root directory, the URL should resemble “yourdomain.com/brand-name-logo.svg.”
- Close the CWP file manager.
How to Create a BIMI Record
After confirming the BIMI image URL works, it’s time to create the BIMI DNS record.
- Back in CWP, select List DNS Zones from the sidebar.
- Select Edit Records for the email domain receiving the BIMI DNS record.
- Scroll to the bottom of the page. Ensure there are DNS records for SPF and Domain Key Identified Mail (DKIM). DKIM is optional but works with SPF to tell other email servers when mail marked as from your domain is legitimate or a spoofing attempt. The SPF record value will start with “v=spf1” while the DKIM begins with “v=DKIM1.”
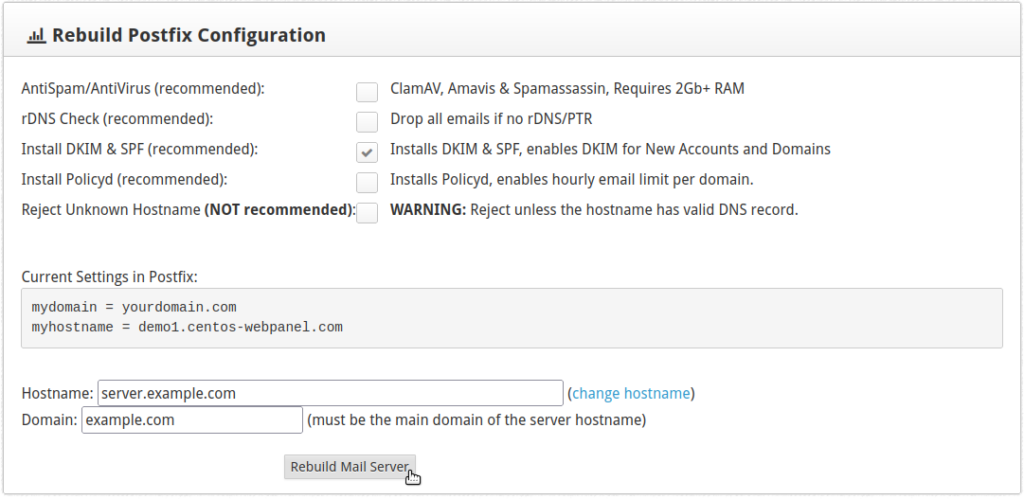
- If the SPF or DKIM records are missing, open the MailServer Manager from the sidebar in a new browser tab.
- Check the box for Install DKIM & SPF (recommended) and select Rebuild Mail Server. Reload the DNS zone editor page. If a DKIM record still does not exist, you may need to troubleshoot the OpenDKIM package. Or you can continue without it for now.

- Ensure a DMARC record is present. It will include “v=DMARC1” in the value.
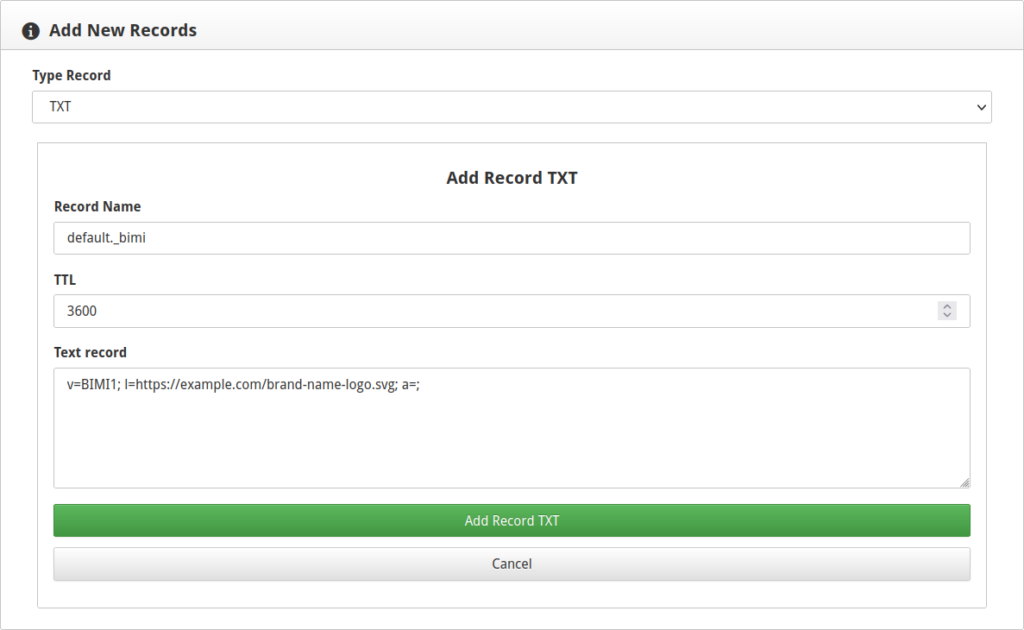
- Scroll up to the “Add New Records” section and select “TXT” from the “Record Type” drop-down menu.
- Type “default._bimi” for the record name. We recommend using “3600” for the TTL. Then add the BIMI record value, replacing the image URL as necessary:
"v=BIMI1; l=https://example.com/brand-name-logo.svg; a=;"

- Select Add Record TXT.
When the list refreshed during our testing, only “v=BIMI1;” showed in the value column. To confirm the BIMI record was present, check List DNS Zones > Edit File. This opens the raw DNS zone file for the domain. The bottom line should resemble the following:
default._bimi 3600 IN TXT “v=BIMI1; l=https://example.com/brand-name-logo.svg; a=;”
Test Your BIMI Record
There are many BIMI record checkers available. Stick to the most reputable inspection sites to ensure your SVG file meets current BIMI standards:
- https://bimigroup.org/bimi-generator/
- https://www.mailkit.com/resources/bimi-inspector/
If you make any changes to your BIMI logo file on your PC, don’t forget to upload the latest version to your server with the same name for faster testing.
Let us know if you have any questions about CWP or how to create BIMI records.
Upgrade to VPS Hosting for Peak Performance
Upgrade to InMotion VPS Hosting today for top-notch performance, security, and flexibility, and save up to $2,412 – a faster, stronger hosting solution is just a click away!
SSD Storage
High-Availability
Ironclad Security
Premium Support


