Table of Contents
We get it. Any time you modify a website it can be a real nightmare. Software updates or coding changes can cause incompatibilities. CSS or design elements can look different when trying them on the live site. Fear not! The new Softaculous Staging tool is here to take the headaches out of website changes.
The staging tool allows you to quickly make a copy of your site without touching your live website. When you are finished, you can push the Staging site to another location or even replace your live site. Follow along and learn how to make an exact copy of your website using this news Softaculous Staging tool.
Make a Copy of your Site
Do you want to protect your live website from issues that could occur when you make changes? You can now make a copy of your site using the Staging feature in Softaculous. This cloned version can be stored in any folder location on your server. Keep it active for future tests if you want to reuse it.
Create a Staging Site
- Log into cPanel.
- Click the Softaculous Apps Installer link in the Software section.
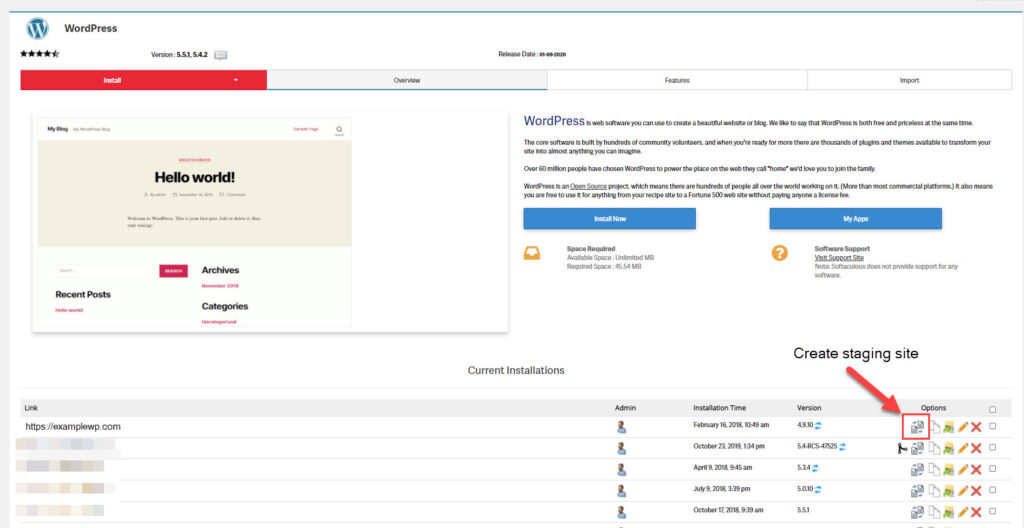
 On the top-right of the screen, click the file folder so you can view all Softaculous managed sites.
 You will see every site that is in Softaculous. Click the Create Staging button next to the site you want to use.
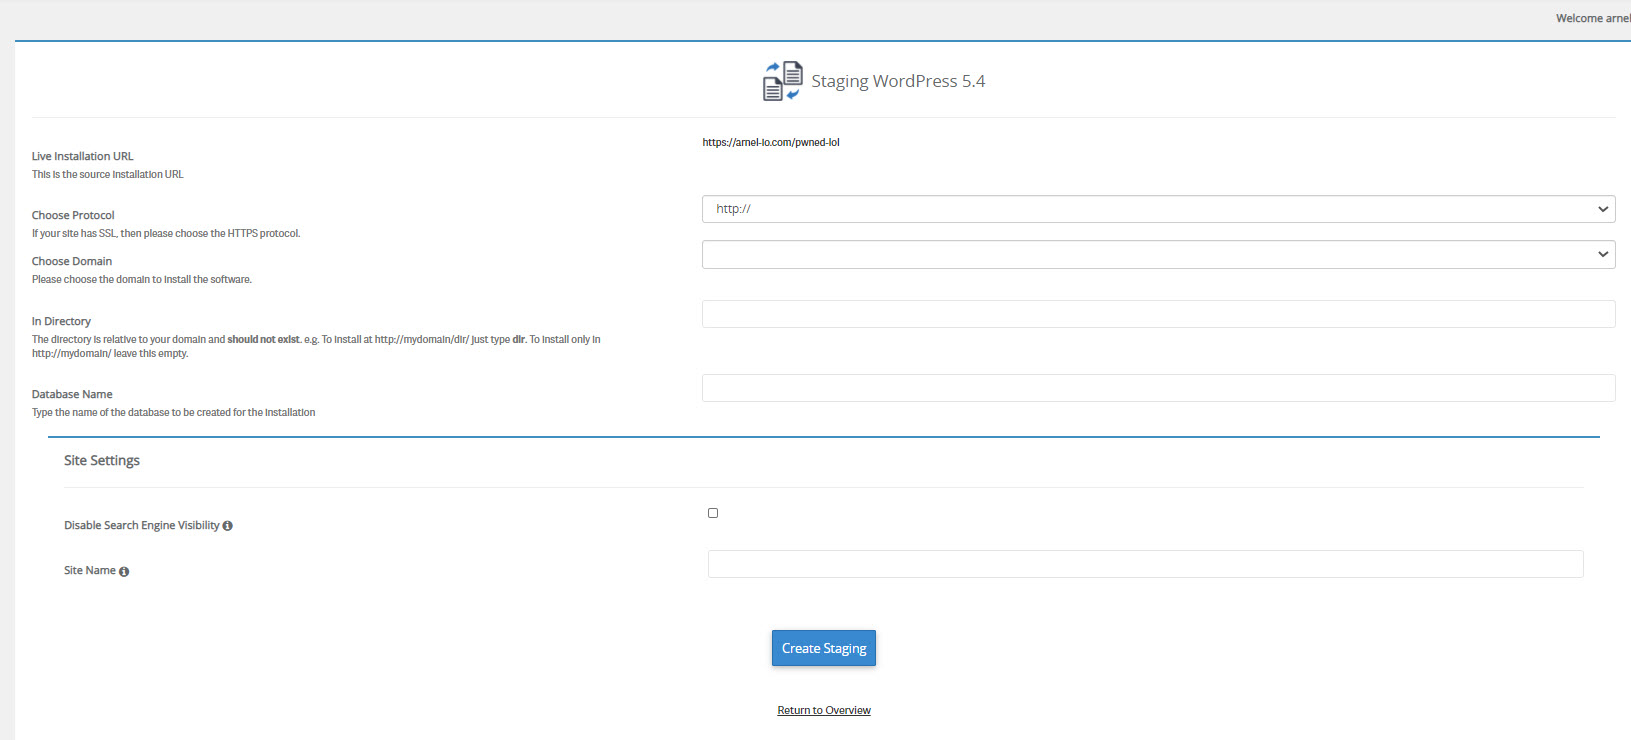
- On the Staging WordPress page choose your site protocol. Options are https://, https://www, https://, and https://www
Note: Since all InMotion Hosting plans include free SSL’s we recommend using one of the https options.
- Choose the domain you want to set up the staging site on from the drop-down menu.
- If you want to install the staging site in a directory, enter it in the available field. For example, if you enter ‘test’ in the field you would have to navigate to ‘example.com/test’ to visit the site.
- If you want to set the name of the testing site’s database, enter it in the available field.

- Click the Create Staging button. You are finished when you see a message stating “Congratulations, the staging was created successfully.”
Test a Staging Site
After making a copy of your live site, you can freely perform any tests without fear. Try a new software upgrade, test a 3rd party plugin or CSS changes. No one will see it until you’re ready to go live. Simply delete the staged site after testing or replace your live site.
Replace a Live Site
Now that you have completed your tests on the “Staged” site, you can push it live and replace your active website with just a couple clicks. You can even keep your staging site in case you want to perform more tests in the future. This makes the Staging tool in Softaculous a great way to safeguard your live site from any problems that might occur from a modification. Now, we’re going walk you through, so you’ll know how to replace your live site with a staging site.
- Log into cPanel.
- Click the Softaculous Apps Installer link in the Software section.
 On the top-right of the screen, click the file folder so you can view all Softaculous managed sites.
 Next to your staged site click the Push to live link.
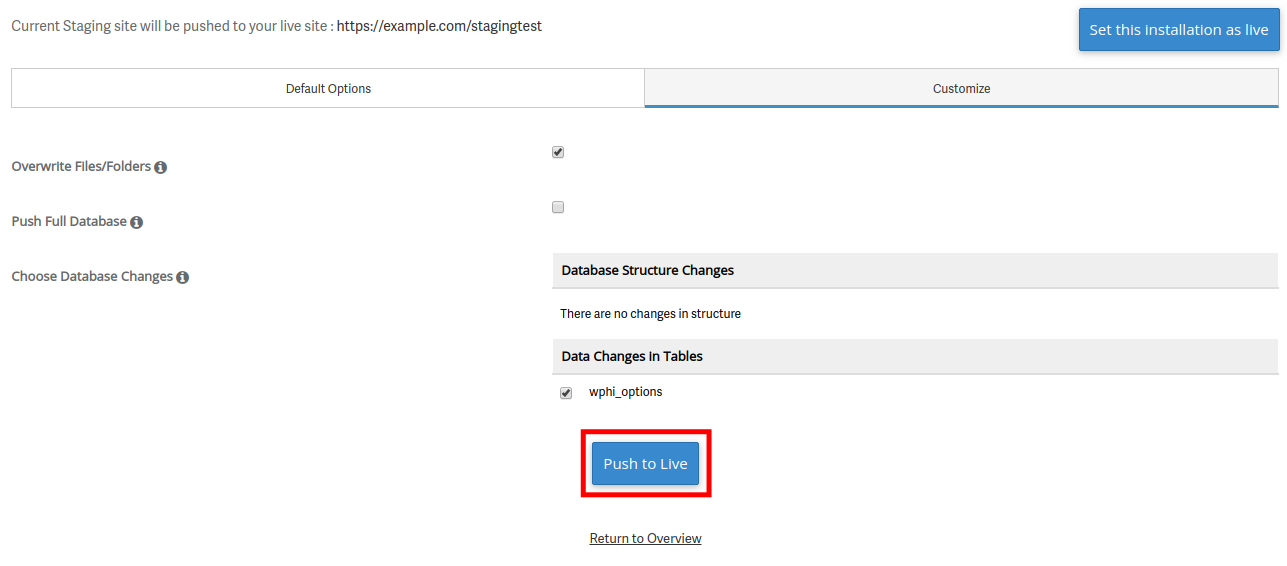
- Click the Customize tab so you can choose your options.
- Select if you want to Overwrite Files/Folders, Push Full Database, or Choose Database Changes.
- Click the Push to Live button. Your live site will then be replaced with your staging site, allow several minutes for this to complete.

- You are finished when you see a messages stating “Congratulations, the site was successfully pushed to live.”
Now, you know how to replace your live site with a staging site using the new Softaculous tool. Go forth, and modify your website without fear.


I am a little confused about this. Please do a video like you did with boldgrid but with a regular wp site. This would be very useful for those of us that have not a clue about wp and want to dip into it without touching the real template and site. Thank you
Thank you for the suggestions, we will consider this when making new videos. In the meantime, I recommend visiting our WordPress Education Channel for hundreds of WordPress walk-through guides from beginner to advanced.
Is this still available? I cannot find Apps Installer in Software.
Hi Paul,
Thank you for your question. Depending on your hosting plan, Softaculous may not be installed by default. If you have a VPS, Reseller, or dedicated hosting plan, Softaculous is not installed by default. Softaculous can still be purchased and installed by contacting our Support team.
Best Regards,
Alyssa K.
Initially helpful, but you left me hanging after I received the congratulatory staging message mentioned at #9 – clicking on the links generated Internal Server 500 error messages. Now I’m holding with tech support forever.
Hi dgdevil,
Thank you for your question, we are sorry to hear about the 500 error. Unfortunately, due to the nature of 500 errors, it is difficult for me to determine the exact cause. It is possible that there was a temporary issue that has since been resolved. I recommend trying again to see if the problem persists.
Best Regards,
Alyssa K
Is the active site inaccessible by the public during the “push to live” process? If not, what will happen if, let says, a user posts a comment before the pushing finish.
Hello and thanks for asking. It will swap the websites. If you’re unsure about the process, you can create another website to test the process.
” No one will see it until you’re ready to go live”
Can you expand on that? I want to make sure this won’t impact SEO.
It won’t be publically viewable by visitors or crawl bots.
Links are still going to the rebranding article. Please fix this, I can’t even find the correct articles on Google.
Thank you for bringing this to our attention. We will fix this as soon as possible.
This is still not corrected. It goes to rebranding instead of staging.
Thanks for the feedback. We’re in the process of updating this article.
The Softaculous links in this article point to the wrong place– something about branding with Softaculous.
Thanks for reporting this and I apologize for the inconvenience. We’ll update this article as soon as possible.