Table of Contents

The ClamAV antivirus application is a popular, open-source security application for various use cases. It’s great for desktop operating system security, VPS antivirus solutions, and even connecting to web applications with file sharing capabilities.
By connecting ClamAV Antivirus with Mattermost, all files are scanned for malicious signatures before being uploaded to Mattermost. You can connect to a ClamAV instance on a local or remote server. You simply need to ensure the instance accepts remote requests for virus scans.
The Antivirus Mattermost plugin is not available for Mattermost Cloud as of October 2021.
- Install the Antivirus Mattermost Plugin
- Integrating ClamAV Antivirus with Mattermost
- Prevent Malicious Mattermost Downloads
Install the Antivirus Mattermost Plugin
There are three ways to install plugins in the Mattermost app.
We recommend notifying teammates before enabling the plugin. If you enable the plugin now, users will not be able to upload media until you successfully configure ClamAV.
Mattermost Marketplace
- Visit your Mattermost domain and login. Ensure that the user you login as has Mattermost system admin privileges.
- In the upper-left corner, select your username, then Marketplace.
- Beside Antivirus, select Install.
- Beside Antivirus, select Configure.
- Leave the configuration page for the Antivirus plugin open while you configure ClamAV below.
Manual Upload with System Console
- Download the compressed plugin file from Mattermost.com/Marketplace. If you’re redirected to GitHub, select Releases on the right. Then select the antivirus-x.x.x.tar.gz file for the latest release under Assets.
- Visit your Mattermost domain and login. Ensure that the user you login as has Mattermost system admin privileges.
- In the upper-left corner, select your username, then System Console.
- On the left, select Plugin Management.
- Beside Upload Plugin, select Choose File.
- Select the compressed (tar.gz) plugin file from your computer.
- Select Upload. Then you should see a notice stating “Successfully uploaded plugin [plugin name].”
- Leave the configuration page for the Antivirus plugin open while you configure ClamAV below.
Manual Upload with FTP or SSH
This method requires root FTP or Secure Shell (SSH) access to your server.
- Download the Mattermost Antivirus plugin from Mattermost.com/Marketplace.
- Upload the compressed file to your server with FileZilla (or another FTP program) or SCP (if using SSH).
- Extract the plugin to your plugins directory:To search for your plugins directory, run:
- Visit your Mattermost domain and login. Ensure that the user you login as has Mattermost system admin privileges.
- In the upper-left corner, select your username, then System Console.
- On the left, select Plugin Management.
- Leave the configuration page for the Antivirus plugin open while you configure ClamAV below.
Integrating ClamAV Antivirus with Mattermost
Carefully read the following sections as certain steps may not apply to you for connecting ClamAV Antivirus with Mattermost.
Configure ClamAV
Next, you need to configure your ClamAV installation to listen for requests from a specific port number. If you’ll be integrating ClamAV from a remote server that’s already configured to listen on a specific port, ensure you know the port number and continue to the next section: Configure Antivirus in Mattermost. If you’re not sure whether the remote server is already configured, or what the port number is, follow the steps below.
- Ensure ClamAV is installed on your server. For cPanel servers, search for ClamAV in cPanel or WebHost Manager (WHM). On dedicated baremetal cloud servers, run the following command in SSH:If it is not installed, we have guides on how to install ClamAV on cPanel servers and Ubuntu.
- Log into SSH as root. cPanel users can log into WHM Terminal instead.
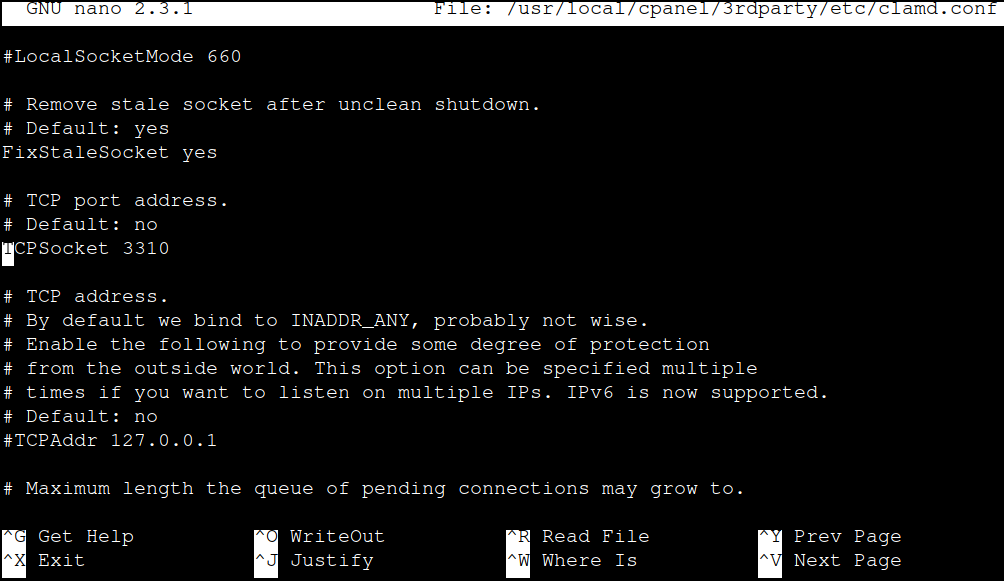
- Edit your ClamAV configuration file.
For cPanel servers:For non-cPanel servers: If the file is not located in the default locations above, search for the Clamd file with the following command: - Remove the “#” before
TCPSocket 3310to enable listening for scan requests on port 3310.
- (Optional) Change the port number to another unused port if 3310 is already in use or otherwise desired. You can test this quickly by browsing to your server hostname followed by “:3310” (or another open port number) in a web browser (e.g. example.com:3310). You may need to check with your hosting provider to learn which ports you can use. Do not use 8065 as it is the Mattermost port (unless you’ve changed it).
- Ensure port 3310 (or your chosen specified port) is permanently open in your firewall – ConfigServer Security & Firewall (CSF), Firewalld, UncomplicatedFirewall (UFW), etc.
- Restart Apache.
cPanel and CentOS servers:Debian/Ubuntu:cPanel administrators can restart Apache using WHM.
Afterwards, your remote server will be capable of executing remote scan requests.
Configure Antivirus in Mattermost
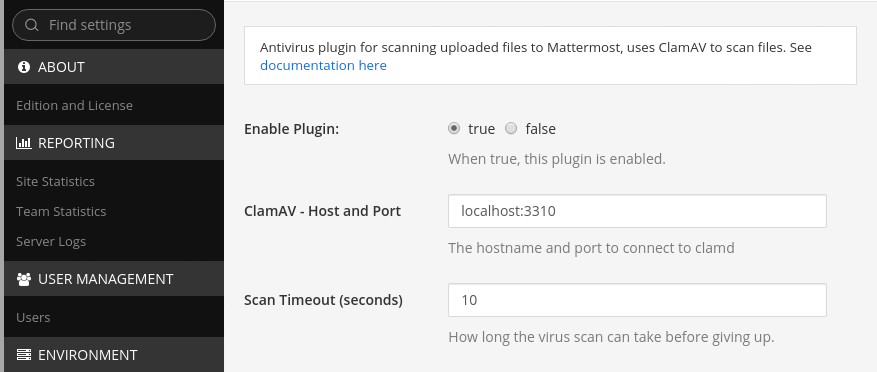
Enable and configure ClamAV Antivirus with Mattermost.
- Open your Mattermost Antivirus configuration page from the plugin installation process. Or reopen System Console, then Antivirus.
- Change Enable Plugin to true.
- Change ClamAV – Host and Port to “localhost:3310” (or your custom port) if ClamAV is on the same server. If using a remote server, replace “localhost” with the other specified ClamAV hostname and port number.
- Change the Scan Timeout (seconds) from 10 seconds if desired.
- Save changes.

Prevent Malicious Mattermost Downloads
After configuring the Mattermost plugin, you need to test your settings to ensure everything works as expected.
ClamAV Testing with the EICAR Standard Antivirus Test String
European Institute for Computer Anti-Virus Research (EICAR) is an organization dedicated to cybersecurity and trusted by some of the most popular AV solution vendors including McAfee, Kaspersky, and Trend Micro. EICAR has a test file free to use for testing antivirus software. The text string will create a false positive response (falsely states a virus is present) in the scanner but is not malicious. The text string was registered specifically for testing AV solutions.
- Create a text (.txt) file on your local computer with Notepad or a similar program.
- Visit the antivirus test website: https://www.eicar.org/?page_id=3950.
- Add the text string from the bottom of the EICAR page to the new text file. It will resemble this:

EICAR test file from August 2021. Visit eicar.org for the latest version. - Save and close the file.
- In a Mattermost channel, select the attachment icon beside the text box. Try to upload the text file.

It shouldn’t upload but prompt an error at the bottom:
“Unable to upload file [file-name].txt. Rejected by plugin: The antivirus service did not allow you to attach this file.”
Scanning Mattermost Uploads
Attempt to upload a regular file. Mattermost should scan the file, then allow you to send your message without any error. If you’re able to send a message with a regular file, congratulations integrating ClamAV Antivirus with Mattermost. If you encounter an error, check your Clamd configuration file or contact us for additional Mattermost support. Congrats on integrating ClamAV Antivirus with Mattermost.
Learn more server administration tasks from our Cloud Server Hosting Product Guide.
No matter if you're a developer, system administrator, or simply a fan of SSH and command line, InMotion's Cloud Hosting plans provide a fast, scalable environment that is budget-friendly.


