Table of Contents
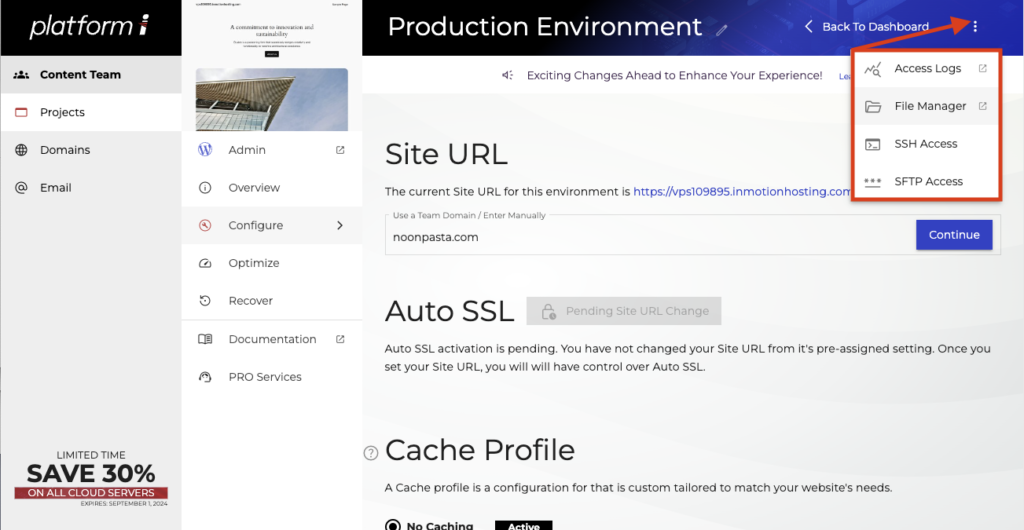
The InMotion Central File Manager allows you to manually edit the files and directories associated with your WordPress site. Access the File Manager and other tools from the Vertical Elipsis menu on any environment.
- Navigating Directories
- Upload and Download
- Copy, Paste
- View and Edit Files
- Compress and Extract
- Moving Files
- Deleting Files
Manage your WordPress sites with InMotion Central! Try it out on one of our WordPress VPS Hosting plans today!
Navigating Directories
Directories, or folders, help keep your site files organized. InMotion Central’s File Manager works like most common operating systems. On the left side, a Directory Toolbar displays the directories within a given development environment. A directory can be expanded to view other directories it contains. Click on a directory to view its contents on the right side of the screen in the Directory Contents panel.
Upload and Download
- To upload a file or directory, navigate to the directory you want to upload to using the Directory Toolbar.
- For example, if you want to upload something to your Media Library, be sure you are in the Media Library directory.
- Then, click the Upload button located on the Actions Toolbar above the file display.
- A dialogue box will appear. Use the dialogue box to choose the file or directory on your device that you want to upload.
- If you have to upload many files at once, it is likely going to be faster to first compress them into a single file, then extract them once they are uploaded.
- To download any file, right click on it and select the Download option.
If you are using a Mac and do not have right click enabled, use control-click (⌃-click) instead of right click for all relevant steps in this guide.
Copy, Paste, Duplicate
- Both Copy and Paste are available using right click.
- Select the file or directory to copy with right click, then select Copy from the right click menu.
- To paste, first navigate to the appropriate directory in the Directory Toolbar.
- Then, right click in an empty space in the Directory Contents area on the right side of the screen.
- Selecting Duplicate will immediately create a copy of a file or directory in the same place as the original.
View and Edit Files
- To view or edit the code a file contains, right click on the file and select View and Edit from the right click menu.
- This will open up the File Manager’s built in Code Editor.
- You can close the Code Editor at any time without saving by clicking the ‘X’ in the upper right hand corner.
- To save changes you have made to the code, use either the Save or Save and Exit buttons.
Compress and Extract
It is easier and faster to move or download files and directories that have been compressed.
- If you want to compress a directory, right click on the directory and select the Compress… option.
- This will open up a dialogue box that allows you to choose the Compression Format you would like to use.
- Choose a format from the drop down menu.
- You can optionally rename the directory at this point.
- When you are ready, click Compress Now and the process will begin.
- When the compression is finished, the File Manager page will automatically refresh.
You can also compress multiple directories or files at the same time. Select multiple files and/or directories, then right click on the highlighted selection. The process works the same as above, but now you have compressed everything you selected into a single file, not just the contents of one directory!
Moving Files
If you want to move a file or directory, you need to know where you are going to put it. The top left of the WordPress Central File Manager always displays the File Path of the currently selected file or directory. If you have nothing selected, the File Manager will instead display the Current Working Directory.
To move a file or directory, right click on it and select Move. This will open up a dialogue box allowing you to type in a file path. Confirm the path you would like to move the file or directory to, then press OK. If you type a directory path that does not yet exist, the necessary directories will be created for you!
Deleting Files
Deleting files is easy! Right click on the selected file or files you want to delete and select the Delete option. Be careful! While the InMotion Central File Manager does have a limited Trash section, files are only cached here for a very short time before they are permanently deleted. If you need to restore something in the Trash, click on the View Trash button, select the file or files you would like to have back and click Restore Files in the upper toolbar.
Check out more of our WordPress resources in the WordPress Education Channel!