Table of Contents

Your Platform InMotion production site will have the ability to use NGINX caching on the server, this can result in faster website performance since it does not have to generate content in real-time. You can select from pre-configured profiles that are built for specific types of websites. Then you can set your purge settings using a plugin such as NGINX Helper.
This ensures your visitors are seeing the latest version of your website and not old cached content. In this guide, we’ll go over the UltraStack Utilities that are available on your cloud WordPress server to help you manage your cache settings via SSH. Then we’ll show you how to select your caching profile and manage your cache settings using NGINX Helper.
- Cache Profile Options
- Set Caching Profile
- Managing Cache From the WordPress Dashboard
- Managing Cache With SSH
Cache Profile Options
Below is a breakdown of the available profile options that you can choose from.
| Caching Profile | Description |
|---|---|
| Profile | Description |
| No Caching | Turns caching off but you will still have static content acceleration and brute force rate-limit protection running. |
| WordPress | General-purpose profile compatible with most WordPress and WooCommerce site, but it is recommended to use a cache-control plugin such as W3 Total Cache to handle purging (clearing) the cache when content is updated. |
| WordPress Multisite | This is the same as the WordPress profile but built specifically for Multisites (Networks) but allows Apache to perform required path rewrites by disabling Accelerate Static Content. |
| WordPress Microcache | Recommended for sites where full page caching is not a good option due to the dynamic nature. This can help neutralize high increases in traffic to your site. |
| Pass All | Select this to pass all traffic to Apache in case you do not want to utilize any caching, ratelimit protection, or optimizations. We recommend using the No Caching profile instead if you want to disable caching. |
| Honor Headers | This profile Honors the Cache, Expires, and X-Accel-Expires headers set by the application. If not set, a default 60 second expiration time is used. All other values match the WordPress/Generic profile. |
Set Your Caching Profile
Set Caching Profile From Platform InMotion
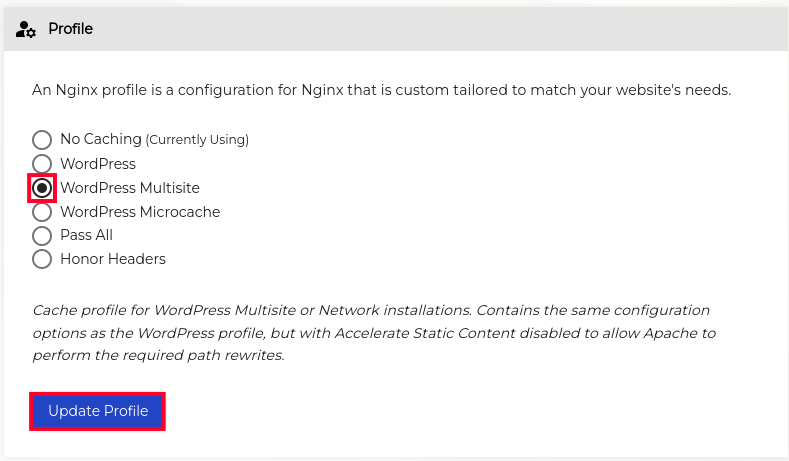
Platform InMotion includes pre-configured NGINX profiles that are custom-made for specific website needs. Here are the steps to easily select the one that best suits the type of site you are building.
- Login to Platform InMotion.
- Select the project you’d like to manage.
- Click the Manage Server link in the navigation menu.
- Click NGINX Settings.
- You will then see a list of the available NGINX profiles, for more information see the section above on Cache Profile Options. Select the one you want to use then click the Update Profile button.

- Click the Update Profile button to save your NGINX settings. The playbook will then run and setup the new NGINX profile for your server.
Managing Cache From the WordPress Dashboard
Now that you have your NGINX profile selected you can manage your cache using a WordPress plugin. NGINX Helper will be installed automatically but you can also find it on the WordPress.org Plugin Repository.
In this section, we’ll show you how to manage your cache from your WordPress Dashboard using NGINX Helper.
Using NGINX Helper
NGINX Helper will automatically be installed on your site, so you just need to access and choose your purge settings.
- Log into your WordPress Admin Dashboard
- Click Settings then NGINX Helper.
- Check the box to Enable Purge.
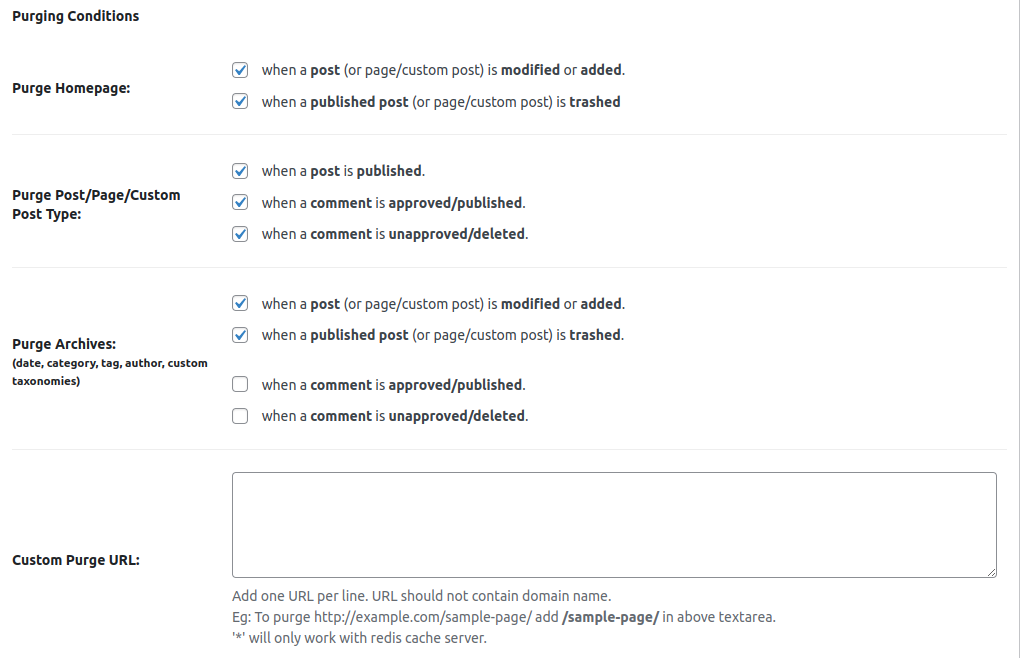
- You can then select your Purging Conditions as needed.

- Click the Save All Changes button after choosing your settings.
Managing Cache With SSH
If you prefer to use SSH instead of a plugin to manage your cache, you have the ability to clear all cached data or just a single page.
View usutil Syntax and Examples
Purge All Cached data
Purge Cache For a Specific page
Stats & Reporting
Show cache stats [default]
View Server Stats
Run the following command to view information about your server since it was last restarted.
Troubleshooting With –info
Run the following command to run a list of requests to help check the status of your cache.
The above command will perform the following checks
- Make a request to the target URL and check the response status
- Calculates the total request time
- Checks the
X-Proxy-Cacheheader - Checks for a matching cache object in the user’s cache zone. If it exists, checks the cache expiration time and validity
- Compares the target URI against the domain’s ngxconf config, then displays any matching rules
- Determines if a page is considered ‘static content’, and whether it was served from NGINX or Apache
- Displays
Locationredirects - Checks compression and content encoding
- Checks for presence of the
Varyheader - Checks for presence of any cookies, then displays them
- Displays which cache control headers are being trusted, according to the domain’s ngxconf config
- Checks for the presence of the
Upgradeheader - Checks if Apache
mod_http2is installed and in use with NGINX - Checks the status of Apache, NGINX, and the associated PHP-FPM master
- Parses and displays corresponding lines from the Apache, NGINX, and PHP-FPM error logs
Congratulations! Now you know how to select your caching profile and manage your cache settings using NGINX Helper and SSH.

