Table of Contents
This article describes how to optimize LazyLoad for WordPress. You can learn how to change the threshold for LazyLoad and how to test LazyLoad functionality using Google DevTools.
If you’re looking for a simple plugin lazy image loading, try Jetpack!
How to Change LazyLoad Threshold
LazyLoad is a very light-weight plugin that helps optimize your WordPress website’s load time. It does this by deferring the loading of images until they are visible to the user.
The viewport is the user’s visible portion of the screen. As images scroll closer to the viewport LazyLoad loads them on demand, rather than loading all the images at once. By default, LazyLoad will load the image when it is within 300 pixels of the viewport.
If you increase the threshold, then images will load sooner. If you decrease the threshold, then your images will load later. If your users are seeing placeholders for images then you can change the threshold for LazyLoad to load the images sooner. Optimize this setting to balance load time with user experience.
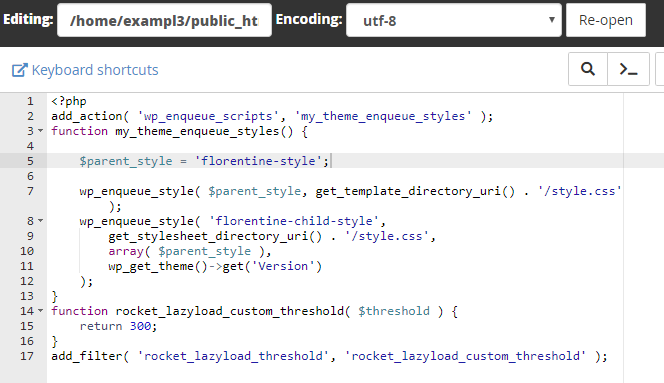
To modify this setting, you will need to add these few lines of code to your theme’s functions.php file:

IMPORTANT: When adding code to your theme, it is best practice to create a child theme. This allows the theme to retain your customization even through updates. If you do not create a child theme, when you update it, the code you entered may be overwritten by the updated code. In this case, you would need to add the code again.
To help set an effective value for the threshold you can use Google DevTools to see LazyLoad live in action. Read on to learn how you can test LazyLoad.
How to Test LazyLoad
NOTE: The following steps can be used as a general guide for most web browsers. However, they are intended for use with Google Chrome. You will need to install Google Chrome in order to follow these instructions.
- Visit the webpage you want to test LazyLoad on.
- Press the F12 key to open the Google Chrome DevTools pane.
- Click on the Network tab.
- Refresh the page.
- Once the page refreshes, you will notice that the network tab indicates some images loaded. As you scroll through the page, you will see other images load.
Congratulations! Now you know how to test LazyLoad. This testing should help you to optimize LazyLoad for WordPress. You can modify the value of the threshold and then test the user experience until you are satisfied with the performance.