Table of Contents
In this guide, we will show you how to install PostgreSQL on a VPS or Dedicated server. PostgreSQL is a free open-source object-relational database management system, and one of the most popular alternatives to MySQL.
The reasons for its popularity include a long list of features like:
- Multi-version concurrency control
- Point in time recovery
- Tablespaces
- Asynchronous replication
- Savepoints
- Nested transactions
- Query planner/optimizer
- Write ahead logging for fault tolerance
There is also support for international character sets, multibyte character encodings, and Unicode. With locale-aware sorting, case sensitivity, and formatting – Postgres is an excellent alternate to MySQL.
After it is installed, we will show you how to configure Postgres; which will add phpPgAdmin to cPanel. By using phpPgAdmin, you can easily access and modify the tables in your PostgreSQL database.
In this Guide:
Installing PostgreSQL via SSH
- SSH into your server as the root user.
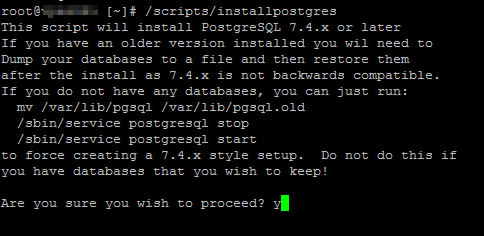
- Run the following command:
- You will then see a message similar to this:
“This script will install PostgreSQL 7.4.x or later If you have an older version installed you will need to Dump your databases to a file and then restore them after the install as 7.4.x is not backwards compatible. If you do not have any databases, you can just run: mv /var/lib/pgsql /var/lib/pgsql.old /sbin/service postgresql stop /sbin/service postgresql start to force creating a 7.4.x style setup. Do not do this if you have databases that you wish to keep! Are you sure you wish to proceed?“
- Type y then hit enter, to kick off the installation.

The process is finished when you are able to type in the command prompt again.
Submit a Ticket Request
If you need assistance installing PostgreSQL, or want to install a different version of PostgreSQL, please contact our Managed Hosting team.
Configuring Postgres
We will now show you how to configure Postgres, you will then be able to access phpPgAdmin in cPanel. This is a 2-step process.
Step 1: Get phpPgAdmin
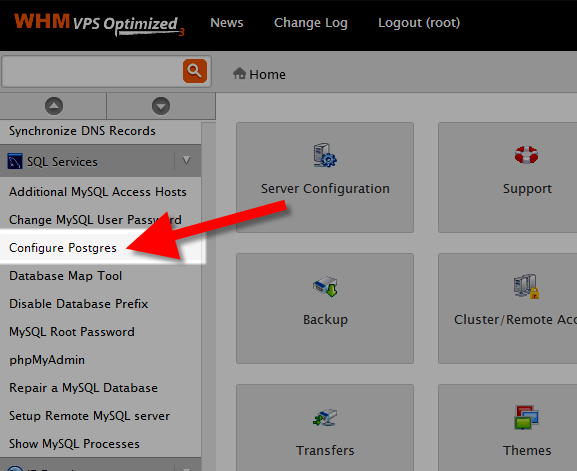
- Login to WHM as the root user.
- Click the Configure Postgres link in the SQL Services section.

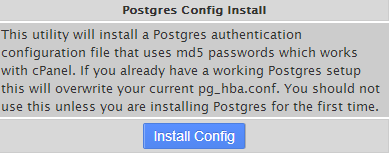
- Click the Install Config button in the Postgres Config Install section.

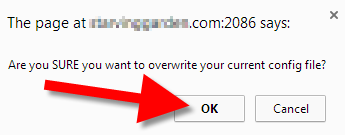
- A box will pop up and ask “Are you SURE you want to overwrite your current config file?” Click the OK button.

It is finished when you see a message stating “ALTER ROLE Configuration successfully updated“
Step 2: Creating Postgres Users
In this second step, you will now create the Postgres Users in WHM. This and all steps in this tutorial are required to allow you to use PostgreSQL in your cPanel.
- Login to WHM as root.
- Click the Configure Postgres link in the SQL Services section.

- Click the Create Users button in the Create Postgres Users section.

You are finished when you see a message stating “PostgreSQL users created“
Congratulations, now you know how to install, and configure PostgreSQL on your VPS or Dedicated server! Learn more about PostgreSQL Hosting
Get the best value on fast and customizable dedicated server hosting solutions. Choose from Managed Dedicated Servers with your choice of cPanel or Control Web Panel, or select a Bare Metal Server for complete server control via the command line.
DDoS Protection
Free Backup Storage
cPanel or Control Web Panel
Managed Server
Unmetered Bandwidth


If you’re worried about your installation my suggestion would be to run a complete site backup (through cPanel) before proceeding. Per our documentation on PostGreSQL, you can use PostGreSQL in addition to MySQL. For more information on PostgreSQL, please see our documentation on creating a PostgreSQL database.