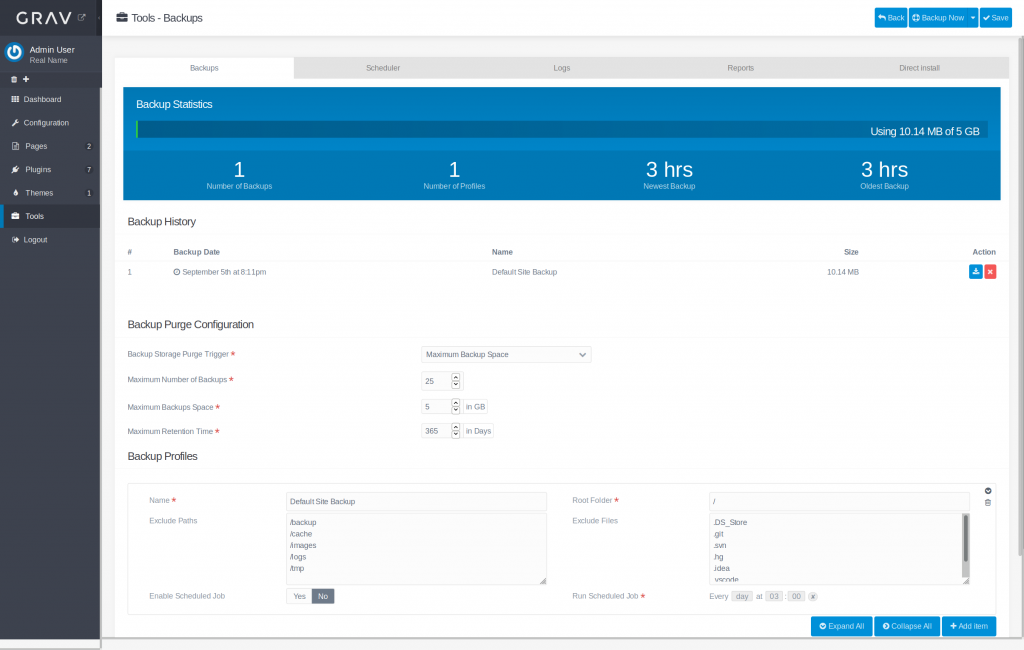
Most content management systems (CMSs) have security and backup plugins available to improve performance and security to your preferences. Grav includes these features natively within the Admin plugin.
Similar to cPanel backup scheduling in WebHost Manager (WHM) (for VPS / Dedicated Hosting only), Grav offers options to configure what’s included in backups, different backup configurations with specified schedules, and how many backups to retain at once.
Below we’ll cover how to create Grav backups with the Admin plugin and SSH.
Create a Backup with Grav Admin
Download an up-to-date Grav backup within minutes.
- Log in to your Grav Admin plugin.
- Click Tools on the left.
- At the bottom, modify the settings in the Backup Profiles section.
Name Profile name for the settings Exclude Paths Type directory paths to not backup Enable Scheduled Job Toggle to enable automatic backups Root Folder Type location for /backups directory Exclude Files Type files as needed Run Scheduled Job Set timeframe and time to auto-backup if enabled - Click Save at the top.
- Click Add item to create a new backup profile if needed.
- In the upper-right corner, click the down-arrow beside Backup Now and select your backup profile.
- Click the Download icon to the right of the backup under Backup History for local storage.
View scheduled backups as cron jobs in the Scheduler tab. Backups are noted in the Logs section with the Notice level and backup URL.

Configure Retention Settings
Grav has three retention options you can choose under Backup Purge Configuration:
| Backup Storage Purge Trigger | Choose whether to remove backups by maximum backup space, number of backups, or retention time |
| Maximum Number of Backups | Removes the oldest backup when set total is reached |
| Maximum Backups Space | Removes the oldest backup when storage limit is reached |
| Maximum Retention Time | Removes backups older than set amount of days |
Create a Backup in SSH
Users with SSH access can easily create and manage backups with some straight-forward commands. Even users uncomfortable with the command line interface (CLI) should have few issues creating a Grav backup if needed.
- Log in to SSH or cPanel Terminal.
- Navigate to the Grav directory with the
cdcommand. - Type the command
bin/grav backup. You’ll see the prompt below upon completion.
Grav Backup
===========
Archiving 5000 files [=====================] 100% 7 secs Done…
[OK] Backup Successfully Created:
/home/cpaneluser/public_html/grav-subdomain/backup/default_site_backup–20190905201159
.zip
Manage Settings in SSH
Manage backup purge configuration and backup profiles in the system/config/backups.yaml or create the user/config/backups.yaml custom configuration file. Editing backup settings in the Admin plugin will create an user/config/backups.yaml file.
Learn more about Grav CMS in our Support Center.

Yes but please point us to next steps — like how to restore a backup that was previously generated in this way
Hi Andrew, right now I can offer a link to the official documentation, but even that is a bit sparse on restoration.