Table of Contents
- Step 1 – Install WordPress
- Step 2- Create the Header Image for your Photo Website
- Step – 3 Modifying your Theme Colors
- Step – 4 Creating the Static Page for Home page of your Photo site
- Step – 5 Create the Content for your WordPress Photo Portfolio website
- Step – 6 Adding Menus and footers to your WordPress Portfolio Website
For many people, the best way to learn something is quite simple to jump in and start doing it. We’re going to show you how to create a simple Photo Portfolio website using WordPress. The instructions for all of these steps exist as separate articles in this WordPress education channel. This tutorial combines the educational channel articles and some quick instructions on how to build a basic portfolio website to display your images.
Step 1 – Install WordPress
When you install WordPress, if you are an InMotion Hosting customer, then you can use Softaculous to install WordPress. You can also Manually install the WordPress website.
Step 2- Create the Header Image for your Photo Website
Now that you have WordPress installed, you need to build the identity of your website or your business. Remember that the content and images for the header image and home page are the first pages your visitors see. “First impressions are important!” So, you want to be sure that these images are done correctly and look good. The following steps walk you through creating a header image, modifying your theme colors, and creating a static page.
When you create your header image, you will want to use an image that represents your work as it goes across the top of your website page. The header image should inform a viewer who you are and what you do. So, for example, I thought that this picture represented the work of the photographer:
When you go through the steps to create the header image, it will look like this:
Once you have the header image created, set it by using the option under Appearance > Customize. You’ll see that website now looks like this:
Step – 3 Modifying your Theme Colors
The colors for the website shown in the screenshot above were based on the colors that the customer had used in her original Facebook page. I made it simple and used one color for both the Contrast and the Background color. In order to change the colors, simply go to the Appearance menu, click on Customize and then click on the Colors option for the theme.
Step – 4 Creating the Static Page for Home page of your Photo site
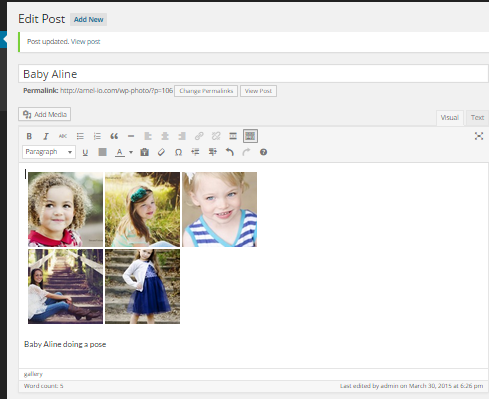
Create a static page for the front page of your site – after the header image had been created, we decided to use a static page with a gallery of pictures that showcase the pictures on the website. The static page is a simple non-interactive page that we use to present information or highlight a specific image. In this case we have created a page with a simple gallery by doing the following:
- Click on Pages in the WordPress Administrator
- Click on Add New
- Title the page as Home because it will be the first page of your website
- Add a Simple Gallery to the page
- When you have completed adding the gallery, add some text describing the pictures as needed
- When you have completed adding your descriptions or narrative, it will look like this:

- Save and Publish the static page by clicking on the Publish button
- The last step is to make sure that your theme is using the page that you just created. Click on Appearance, then click on Customize. In the Customize menus, you will see Static Front Page. Click on the radial button labeled “A static page.” Then click on the drop-down arrow for the field labeled Front page. This may not be necessary if you have only one page. Select Home.
- At the top of the menu column, click on SAVE and PUBLISH
Step – 5 Create the Content for your WordPress Photo Portfolio website
After you have identified yourself through a header and title page, you will need to think about the content that will fill your website. If you are a photographer, and you need to show a client pictures, you can quickly build pages with galleries. If you want to tell a story around a single picture, you can create posts and add text to narrate your image. You can also configure pages to allow or disallow feedback from viewers.
Create a post or page for your WordPress Portfolio site
WordPress allows you to create posts that can be used to highlight a single picture. Follow these instruction to create a quick post.
- Login to the WordPress Administrator Dashboard, if you have not already done so

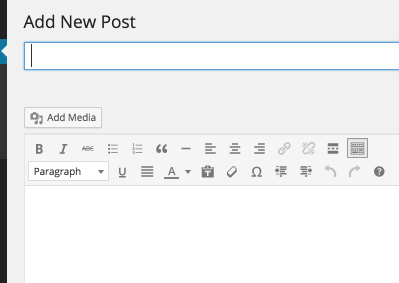
In the menu at left, click on Posts, then click on Add New. For this example, let’s also make sure that we set the image that is added to this post uses the Featured Image option.

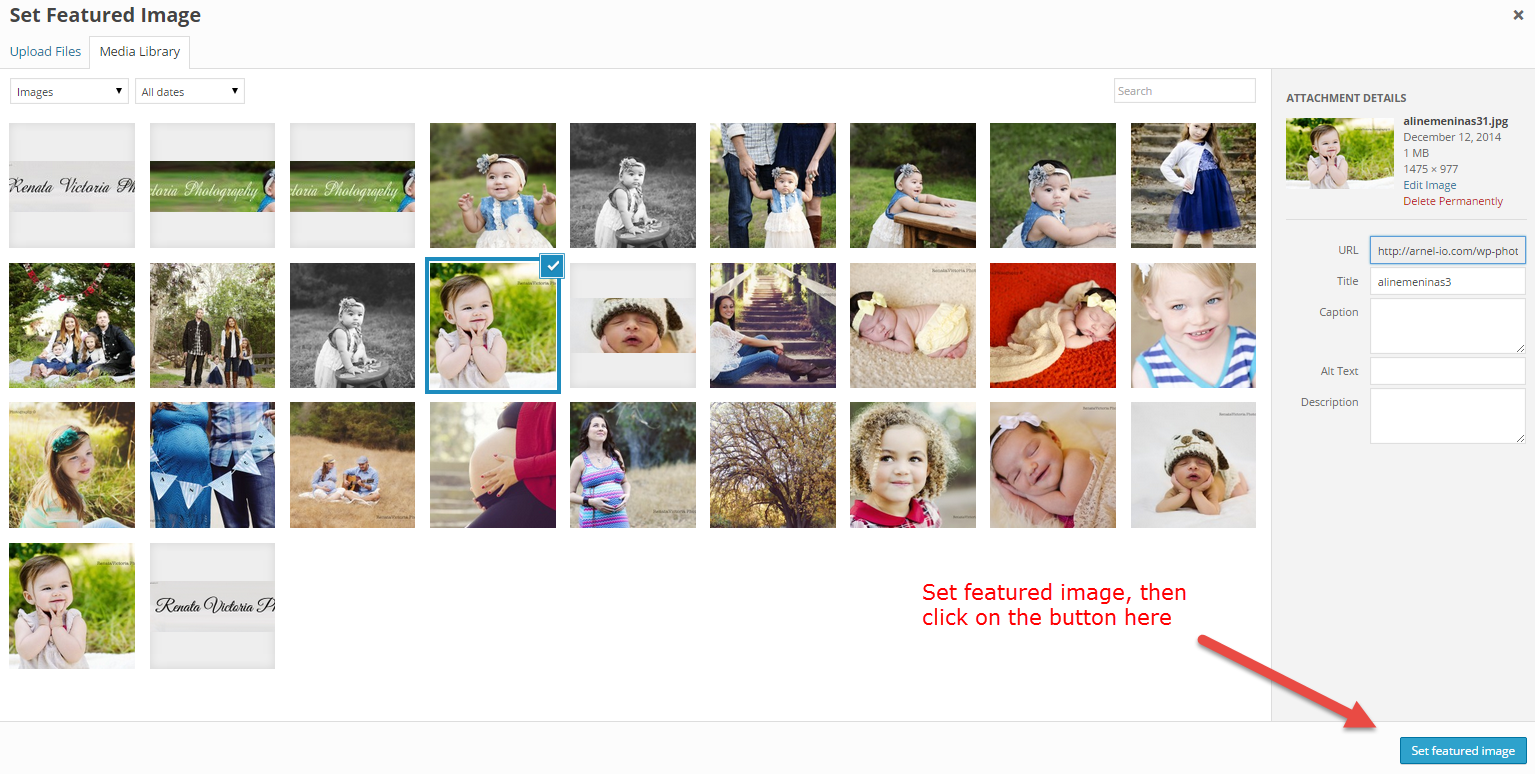
To set the Featured Image, look in the far right column of the page, then scroll down until you see Set Featured Image. Select an image from your media library, or upload an image. Once you have an image selected, click on Set featured image in the bottom right hand corner

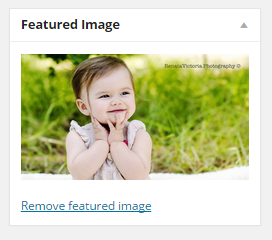
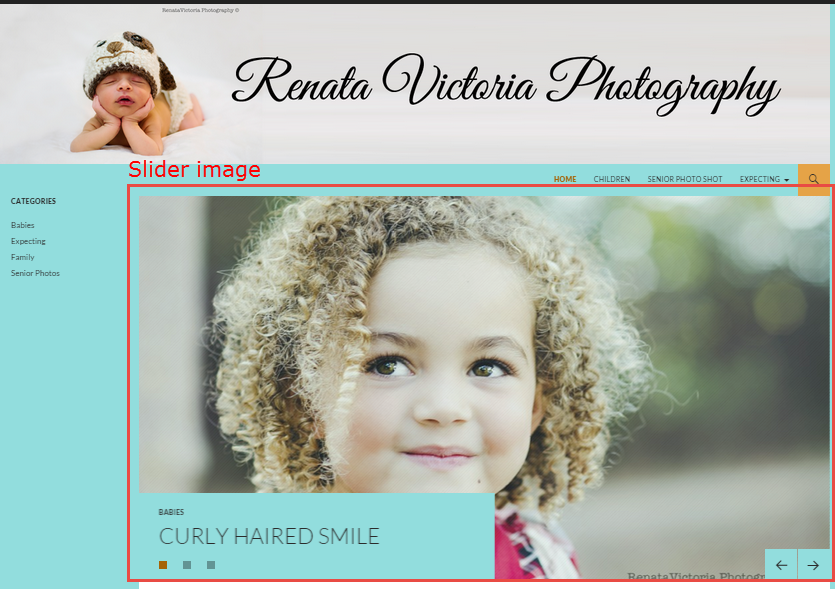
When the image feature is set, it will look like the image at right. Next, you will need to add text in the editor describing your image. When the image is completed, click on Publish or click on Save Draft if you want to publish it later. Note that although there is not a category labeled “featured”. WordPress identifies “featured” as a category. This will be important for the slider option that we will set a little later in this tutorial.
- Creating a Page is literally identical to creating a post, except that you would click on Pages then Add new in the menu to create a new page. A page also cannot be assigned to category or have a featured image or selected format (available in the right hand menus when creating posts).

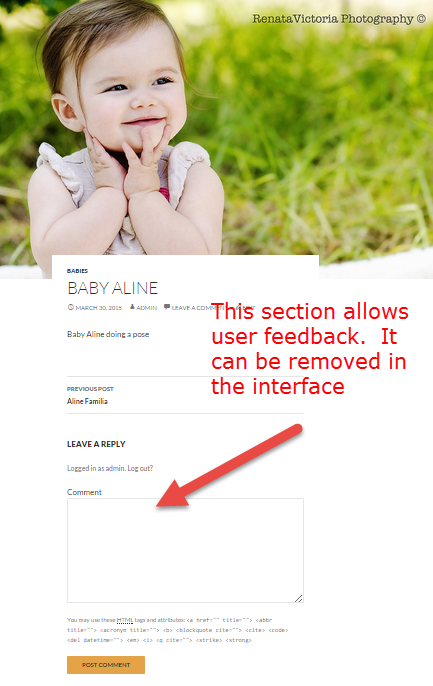
Each page and post also allows for interactivity via a comment option at the bottom of each page or post. Check out the Remove comments from a WordPress Page or Post tutorial to see how to quickly remove the option for comments. If you’re using your WordPress site as a Photography portfolio, you will often not want to have the comments enabled as it can distract from the pictures being displayed.

As per the static page that we created above, you can create galleries in either pages or posts. For detailed instructions, click on How to Create a Gallery in WordPress without a plugin.
Set the Slider for the Home Page
A feature of the Twenty-Fourteen theme is an image slider. This option set by going into the theme and customizing it. It can be set to a slider or grid pattern that features a category of images. This option requires that you have pages and posts that have been created before you can make use of the slider feature.
If you want to setup the slider options, check out the instructions below:

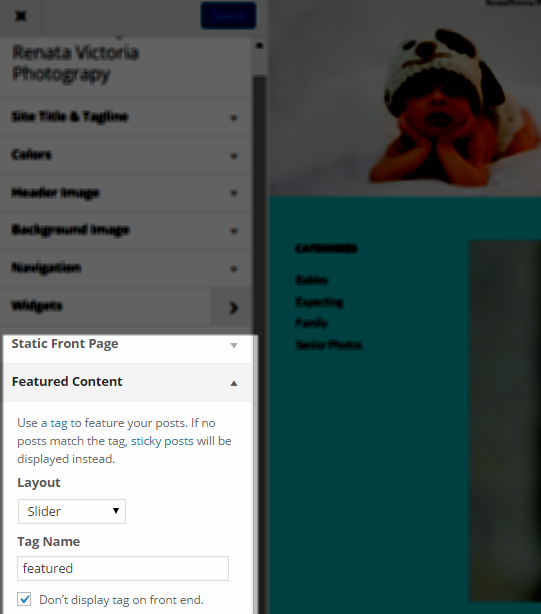
Click on Appearance, then click on Customize
- Scroll down then click on the option called Featured Content
- Click on the option labeled Layout and then select Slider
- The field that follows is labeled “Tag Name”. You can select a category or “featured’ if your posts have been defined with either tag. Posts that use the “Featured image” option are automatically labeled as “featured”. Select the tag name you are using (or “featured”)
- Once your slider settings are set, click on the Save and publish button at the top
Step – 6 Adding Menus and footers to your WordPress Portfolio Website
Use menus to help your viewers navigate to content buried in your site. Footers can also help, or they can be used as section of the website where information can be displayed. You will need to wait until pages and posts have been created before you can create menus as they are based on the content. For a tutorial on creating menus, check out Creating a Menu for your WordPress Photography Site. Menus consist of pages, links or categories. In the example below you can see menu to the right which is based on pages, and a menu in the left column that is based on categories. The position of the menus will depend on the theme. In this case, I am using the Twenty-Fourteen theme because of the default position of its menus. They do not interfere with images that are displayed on the website.
Adding Menus
- In the WordPress Administrator, click on Appearance
- Next click on Menus
- Build a menu using pages. Fill in the field option labeled “Menu name”. However you create your menus, if you use Pages, Links, or Categories, you will need to have content before you can create the menu. Select one of these options to create your menu. You will need to select more than one in order to make the menu useful.
- When you have more than one item in the menu list, you can use drag-and-drop to re-position the order of your menu.
- After you have your order set, click on SAVE MENU.
- By default, there are two locations that can be used menus in the twenty-fourteen theme. At the top of the page, click on the tab labeled Manage Locations.
- Select the location for your menus
- Click on Save Changes to complete your menus
Adding Footers
Footers are found within the Widgets section of WordPress. They are often used to provide information at the bottom of the page. In this case, we will create a simple footer to provide contact information. To create the contact info footer, you will need to first create a page called “Contact Info”. On the page, you can add an image, and text containing your contact info. Please see Create a Footer for WordPress for the complete tutorial.
- In the WordPress Administrator, click on Appearance, then Widgets
- In the right side of the screen you will see three areas: Primary Sidebar, Content Sidebar, and the Footer Widget Area. We will be concerned only with the footer area. Each area is like a container. You can select a widget at left and then drag-and-drop the widget into the area. Drag-and-drop the Pages widget into the Footer Widget.

Click on the Pages widget and then click on the title and type in “Contact Info”. If you have several pages and you want to exclude those pages from the Pages widget, you will need to get the Page IDs of each page in the Pages section and add them to the Exclude field.
- Click on SAVE in order to save your Footer widget.
WordPress is a very capable software for your photography portfolio website needs. It lets you control and modify what you want to display for your viewers with a minimum amount of effort. It also has powerful controls to allow you to communicate with your viewers through comments and posts. There are also thousands of themes and plugins that you can use to grow your website.
Now that you know the basics, learn how to how Set Up an Impressive Portfolio Page.






Here’s a nice video tutorial as well on making a portfolio website with WordPress:
https://youtu.be/3CvqRjQiapo
I find this info absolutely useful for me! I have an itch to create a portfolio of mine. I believe, it can help me land my dream job.