Table of Contents
If you are a Reseller, or simply hosting multiple websites on a VPS or Dedicated Server, the cPanel’s built-in AutoSSL feature lets you provide HTTPS connections on all of your sites for free. If you have multiple sites, across multiple cPanels, with multiple customers, you don’t need to waste time going into every individual cPanel and manually setting up AutoSSL — save time and do it all from within Web Host Manager (WHM).
- How AutoSSL and WHM Fit Together
- How to Add Free AutoSSL Certificates to Accounts
- Run AutoSSL for All Users
- Run AutoSSL for Specific Users
- View and Interpret the AutoSSL Log
- Allow AutoSSL to Replace Invalid/Expiring Certificates
- Change WHM AutoSSL Notifications
How AutoSSL and WHM Fit Together
cPanel’s AutoSSL allows you to install domain-validated SSL certificates on domains set up in cPanel accounts. It also allows you the ability to view the log files and select the users that you can secure with AutoSSL.
The AutoSSL feature has the following limitations:
- Certificates that cPanel, Inc. provides through AutoSSL can secure a maximum of 1,000 domains per certificate (Apache virtual host).
- AutoSSL will only include domains and subdomains that pass a Domain Control Validation (DCV) test, which proves ownership of the domain.
- AutoSSL does not secure wildcard domains.
- If the corresponding www. domain does not pass a DCV test, AutoSSL will not attempt to secure that www. domain.
- By default, AutoSSL will not attempt to replace pre-existing certificates that it did not issue.
The AutoSSL feature includes:
- AutoSSL includes corresponding www. domains for each domain and subdomain in the certificate, and those www. domains count towards any domain or rate limits. For example, if your domain is example.com, AutoSSL will automatically include www.example.com in the certificate.
- Each AutoSSL provider may wait for a specific amount of time to replace an AutoSSL-provided certificate before it expires. For example, AutoSSL will attempt to renew certificates that cPanel, Inc. provides when they expire within 15 days.
- Due to rate limits, AutoSSL prioritizes new certificates over the renewal of existing certificates.
- AutoSSL will replace certificates with overly weak security settings (for example, RSA modulus of 512-bit or less).
- AutoSSL uses a sort algorithm to determine the priority of domains to secure if a virtual host contains more than the provider’s limit of domain names.
- AutoSSL is an SSL that is auto-enabled forever – as long as you have a valid domain then the AutoSSL will renew automatically.
The users used by AutoSSL are the cPanel users created within your VPS or Dedicated server account. AutoSSL will check ALL domains within the user account unless you make an exception for them within the Manage Users option of AutoSSL.
How to Add Free AutoSSL Certificates to Accounts
Here’s a quick overview of the process for adding Free AutoSSL certificates to your reseller accounts:
- Create a Feature list that includes the AutoSSL feature.
- Create a Package in WHM. The package includes all of the options that added to an account cPanel interface. This will include the updated feature list.
- Modify the reseller accounts so that they include the updated package.
All of the steps below will require that you are logged in to WHM as the owner of the reseller account.
Creating a Feature List
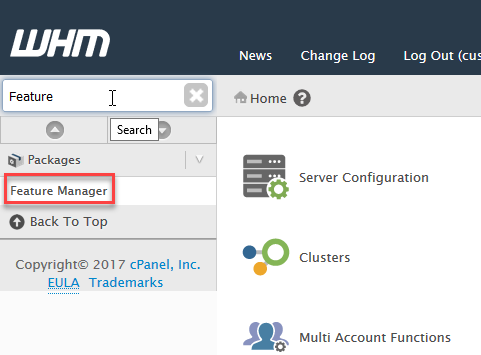
- In the main WHM screen, click on the search window in the top left and type “Feature.” This will bring up the Feature Manager option.

- If you’re just starting there will be no feature lists to edit, so you will need to create one. If you have a feature list created and want to edit, go the drop-down menu to the right and select the list you wish to edit. Click in the New feature list name box and then click on the Add Feature List button.

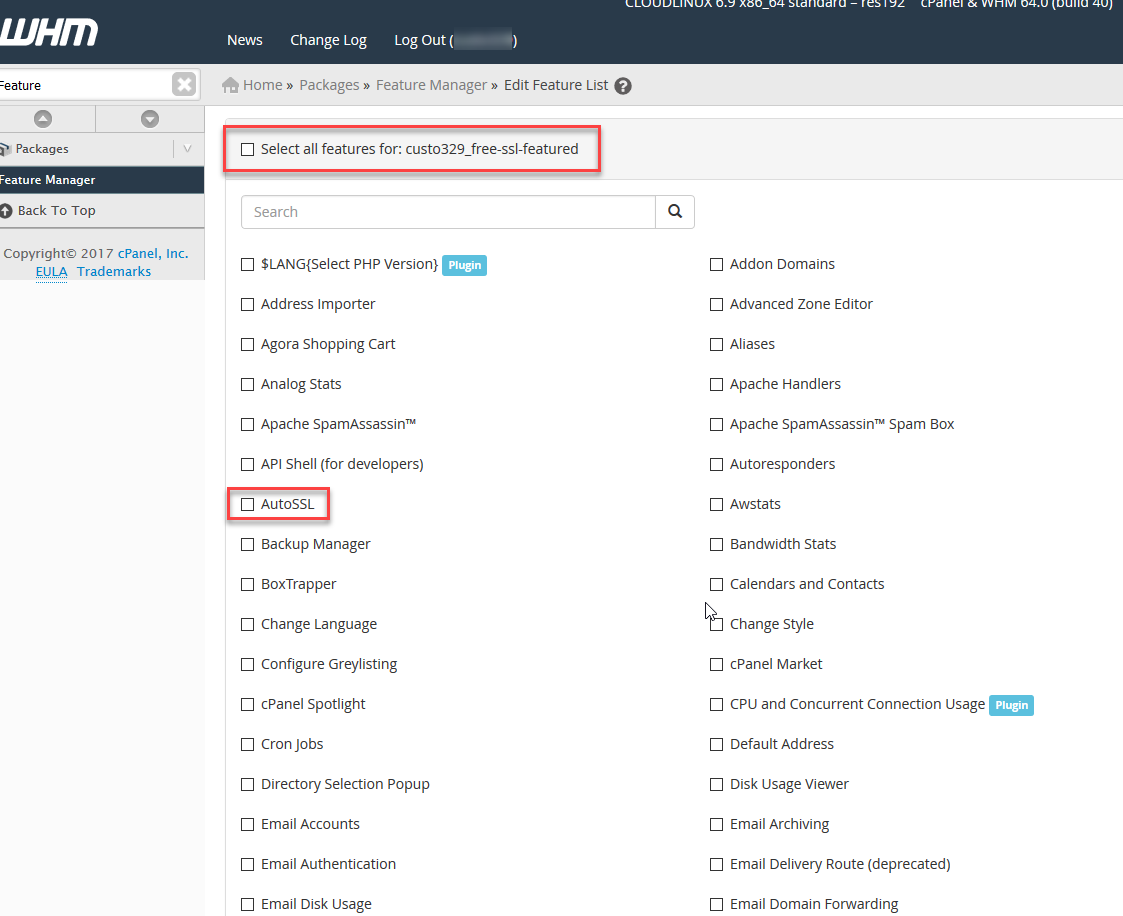
- The feature list identifies everything that will be shown to the user in cPanel. If you are interested in selecting what belongs to each user, then go through the list and add every feature that you wish for the user to have. Otherwise, you can select the option at the top of the page in order to select all of the features. The main thing that we’re trying to do here is select AutoSSL in the list.

- Scroll to the bottom of the page and click SAVE in order to save your Feature list.

Creating an Account Package
Note that cPanel creation is no longer unlimited. For more information, please see cPanel Pricing Changes. You can see the pricing that now applies to cPanel licenses. To learn more about the change, please see our FAQ on cPanel Pricing.
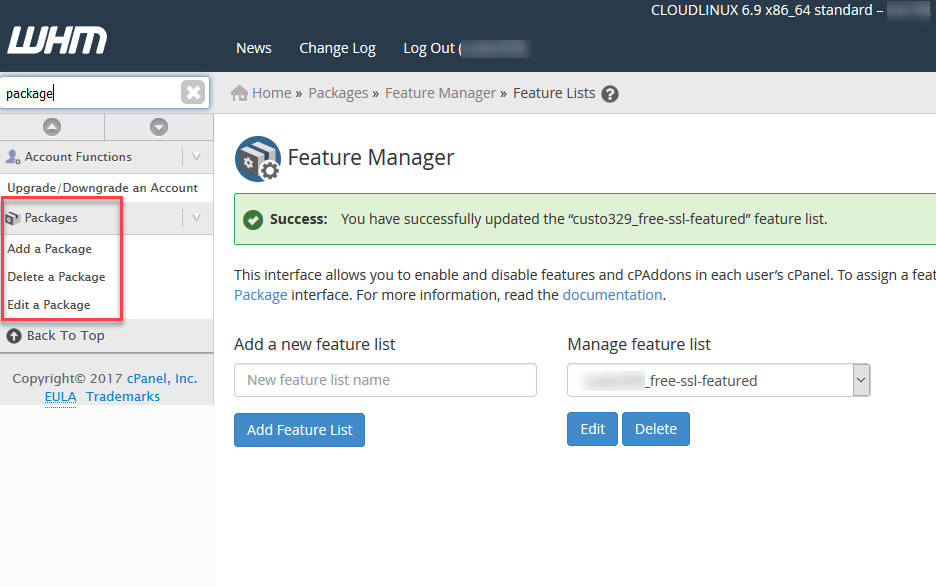
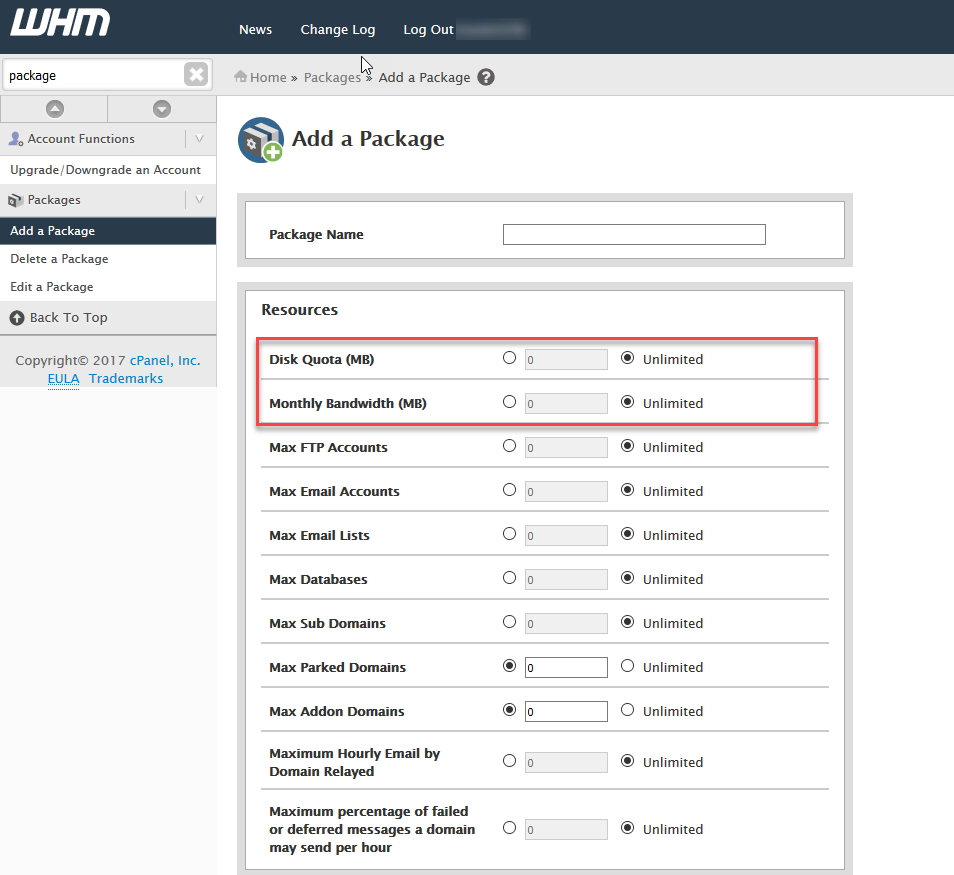
- Next, you will need to jump to the Packages section of WHM. Click on the search window at the top left-hand side of the page then type, “Package.” This will bring you to the Packages section of WHM. Note that if you have NOT created a package, then you will need to create a package in this section.

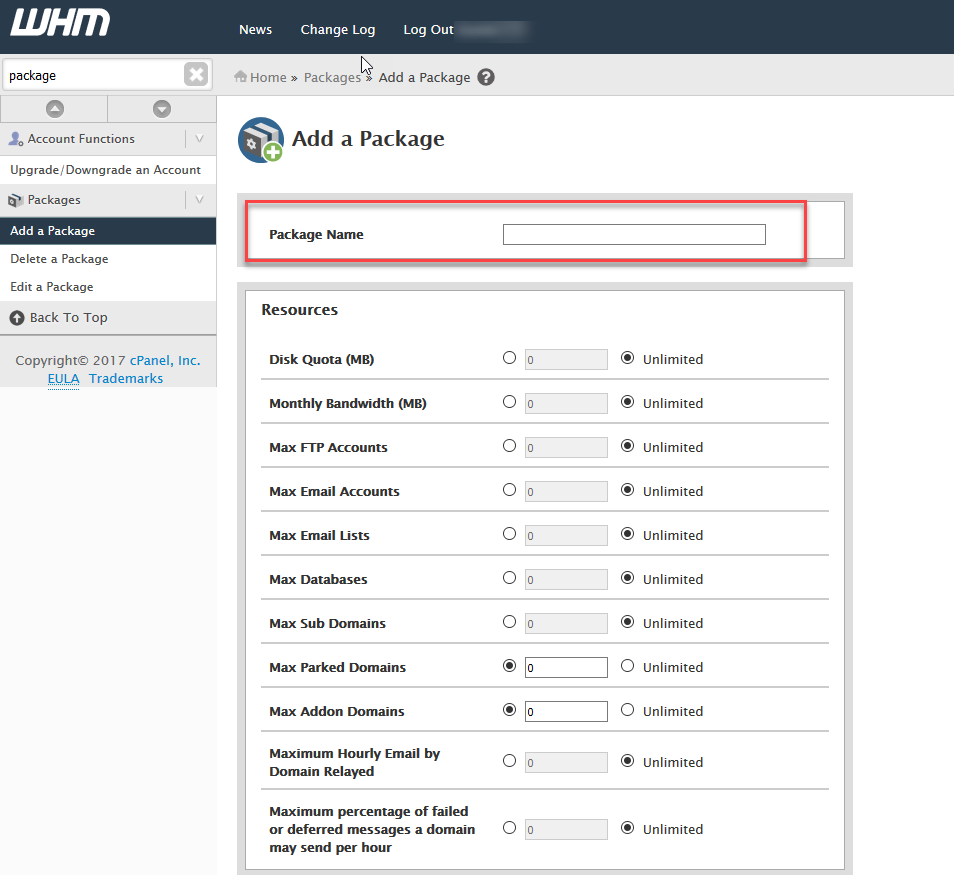
- Click on Add a Package, then name the package by typing in the field labeled Package Name.

- As a minimum, you will need to determine the allowed Disk Quota and Monthly Bandwidth allowed to the reseller account or the Package will not be created.

Packages with unlimited Disk quota and bandwidth are not permitted on Shared Reseller accounts, since without root access you have a set amount of resources to offer clients on your account plan.
On VPS and Dedicated Hosting accounts, it is possible for you to set both Disk Quota and Bandwidth to unlimited. Keep in mind, though, that this does not actually provide unlimited Disk Quota or Bandwidth to the account. It simply means that cPanel will not restrict this account’s use of either resource. “Unlimited” accounts can still use up all available resources on the server, right up until the point that the server itself runs out and starts experiencing technical issues.
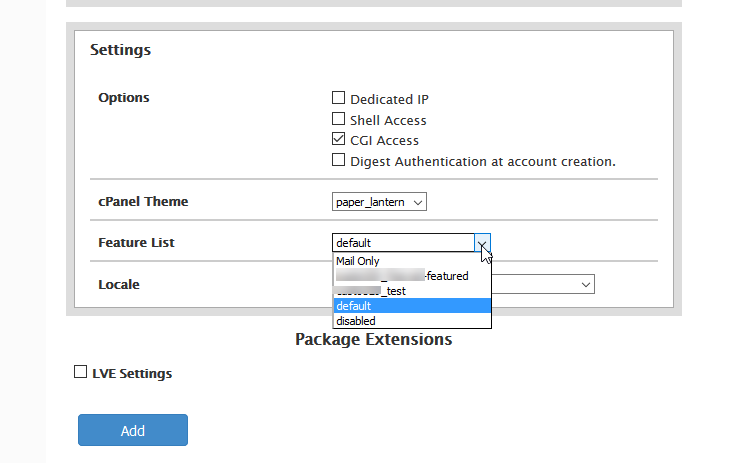
You need to watch out for overselling, or you may end up with multiple customers promised unlimited bandwidth or disk space hitting the limitations of your server. Keeping ahead of overselling, and adjusting your server to compensate before you run into any trouble, is a fundamental systems administrator skill; see the official cPanel documentation of overselling for more information and always work to communicate with your clients. - Once you have selected the resources allowed for the package you will need to configure the Settings. Among these settings is the option for selecting the Feature list (which includes AutoSSL). Scroll down until you you see the Settings.

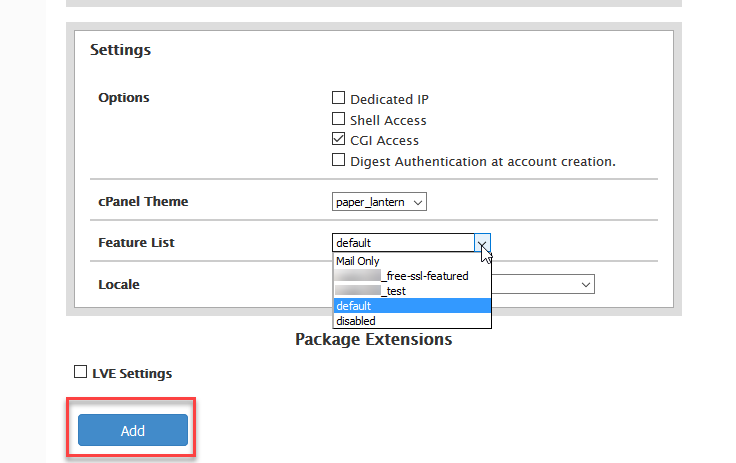
- Click on the drop-down menu for Feature list. Select the Feature list that you created earlier.

- Click on ADD at the bottom of the page in order to save your settings.

How to Modify the Account Listed in WHM
Now that you have created the feature list and added it to a package that can be assigned to the account, your next step is to add the package to the account where you want a free SSL to be applied (through AutoSSL).
Note that the addition of free AutoSSL certificates to reseller accounts (the accounts created by the reseller) are added automatically. In order to control the accounts that receive free AutoSSLs, the accounts in WHM would need to have the package updated to include the AutoSSL feature as per the steps above and below.
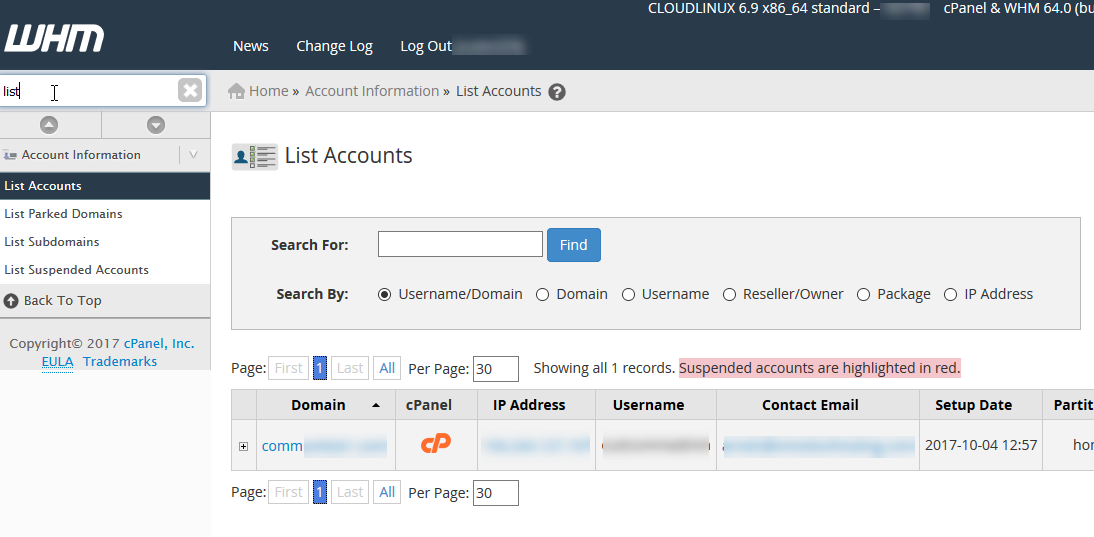
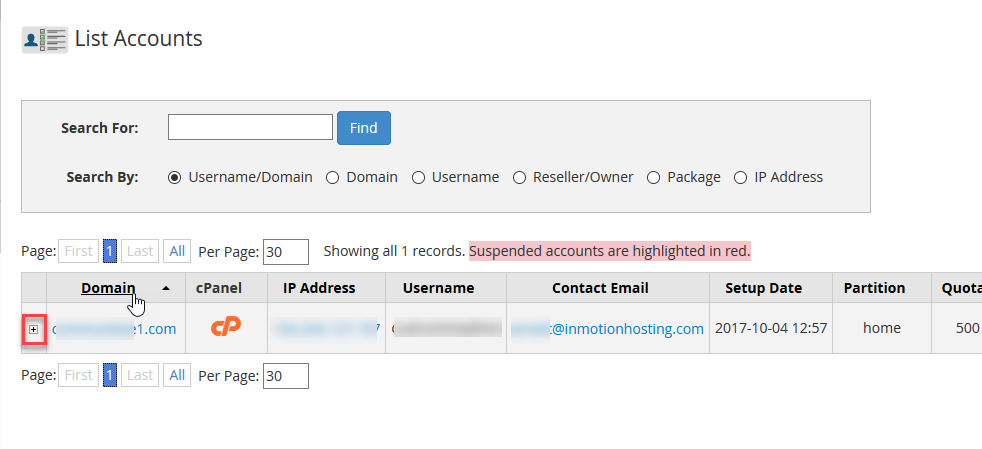
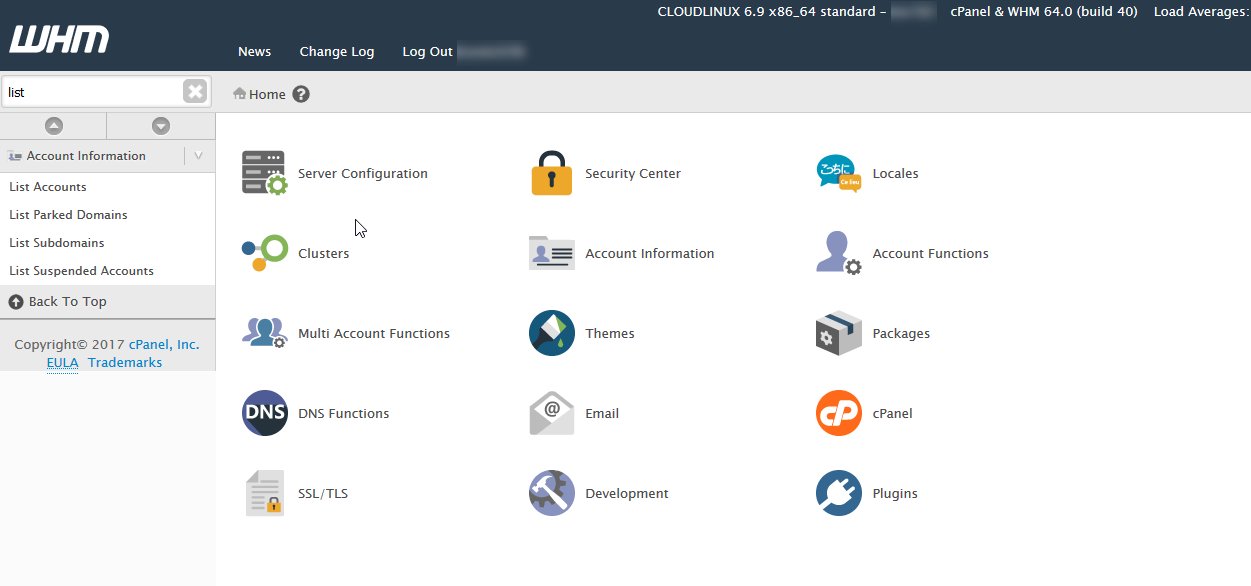
- In WHM, go to the Account section. To search for it in the search option of WHM (in the top left corner), type “list.” This will bring you to the Account Information section. Click on List Accounts.

- Find the domain that you wish to work with and click on the “+” sign to the left of the account.

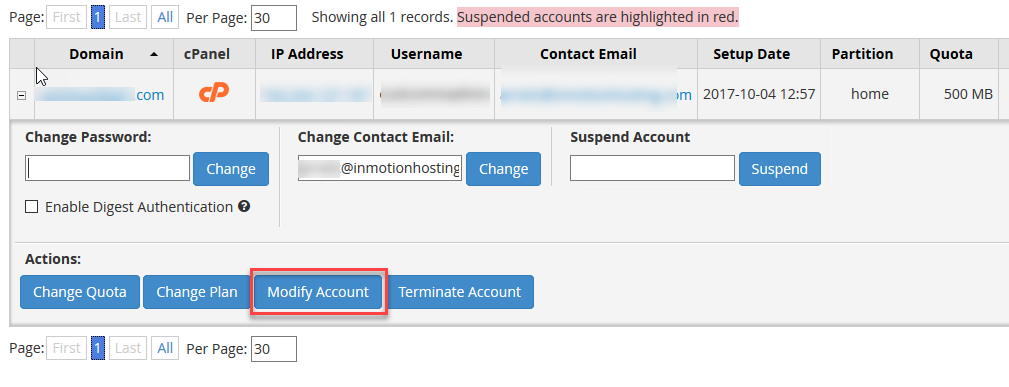
- Click on Modify Account.

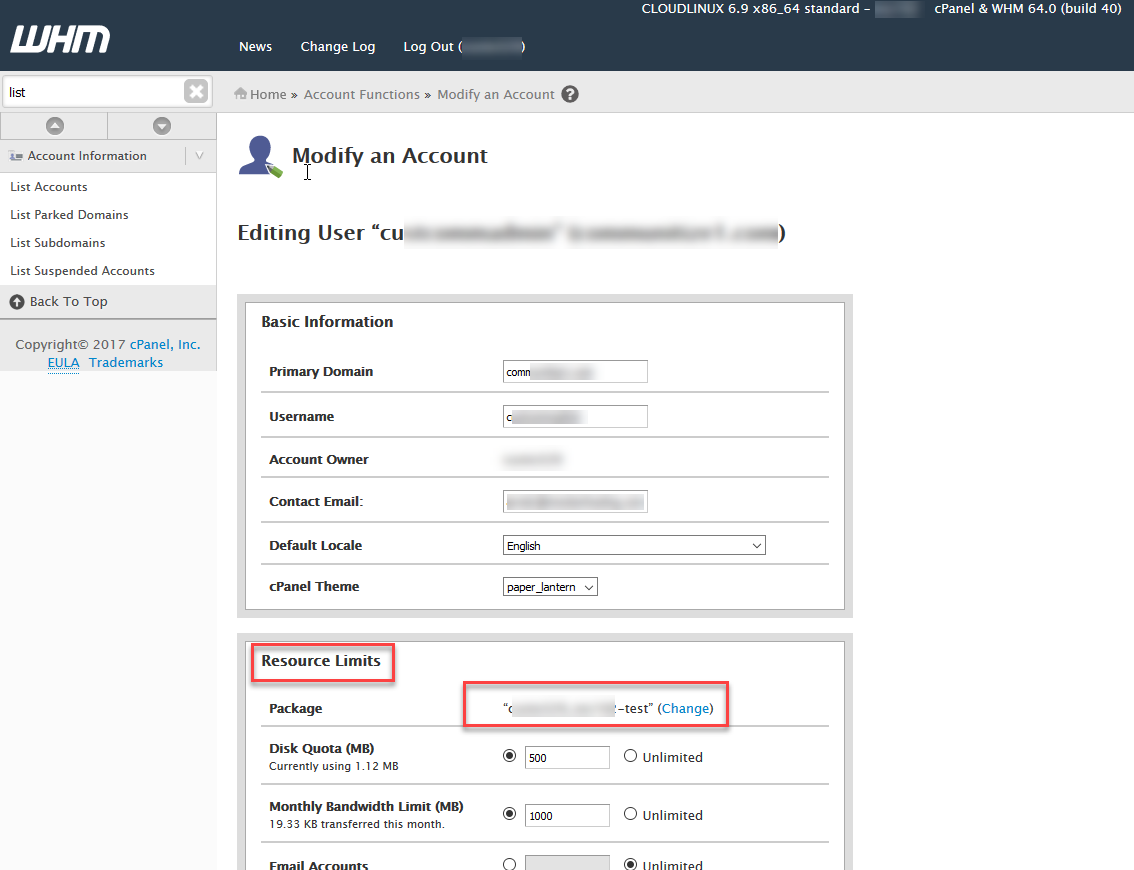
- Scroll down and find the Resource Limits section. You will see the package currently assigned to the account at the top of that section. Click on Change in order to select a different package.

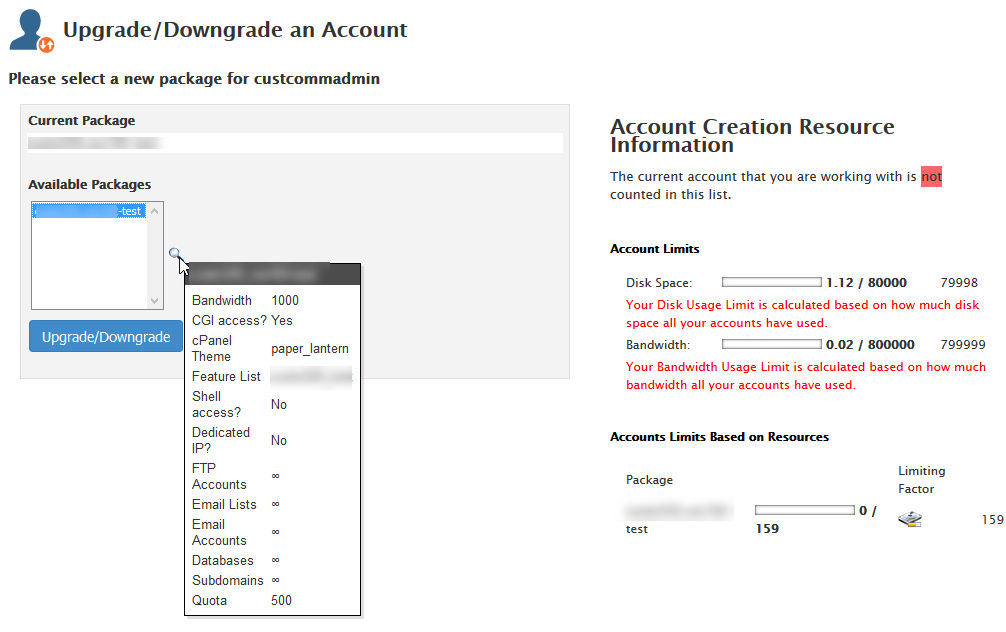
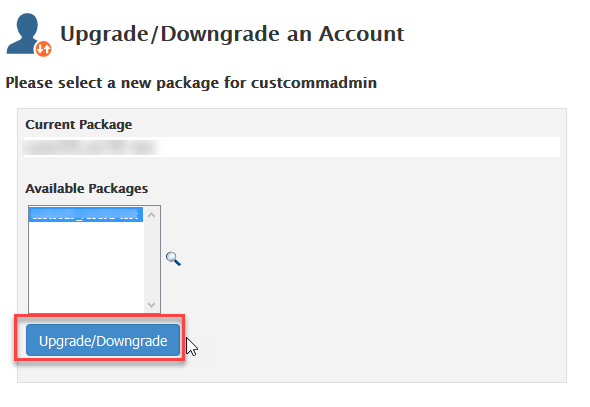
- The next screen will be titled Upgrade/Downgrade an Account. In the Available Packages section, click on the package you wish to use. If you hover it, then you will see a summary of the options that were configured in that package.

- If you are satisfied with your selection, then click on the button labeled Upgrade/Downgrade.

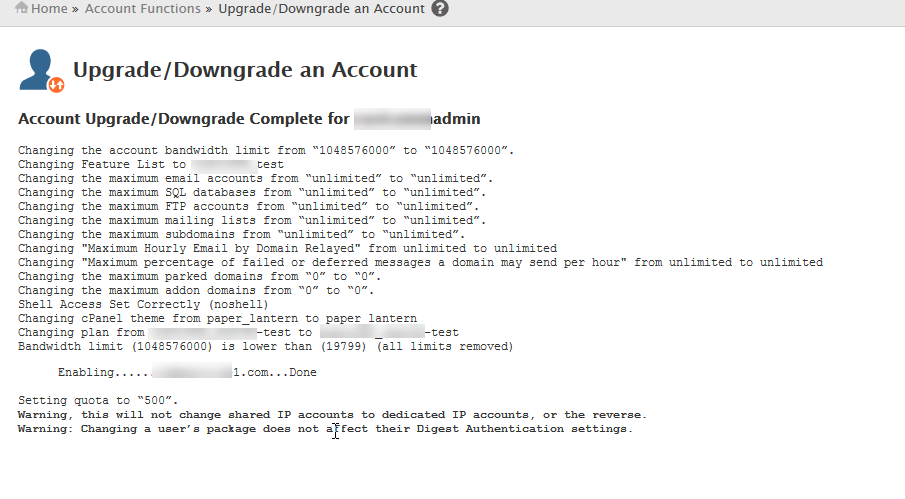
- You will then see a screen showing the changes that are applied to the account. Click on List Accounts in order to return to the list of accounts.

How to Verify a Free Certificate in cPanel
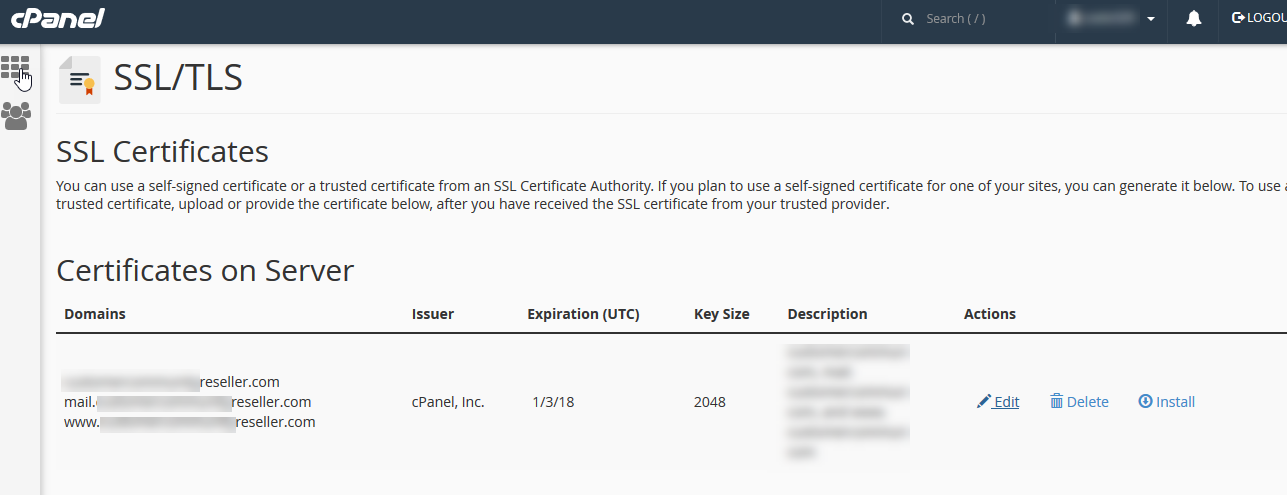
Once you have applied the package to the domain you will need to wait for the server to automatically apply the free AutoSSL to the account. It may take up to 24 hours but normally will take much less time. You can verify that a certificate has been applied by looking in the cPanel of the affected account.
- Log in to cPanel.
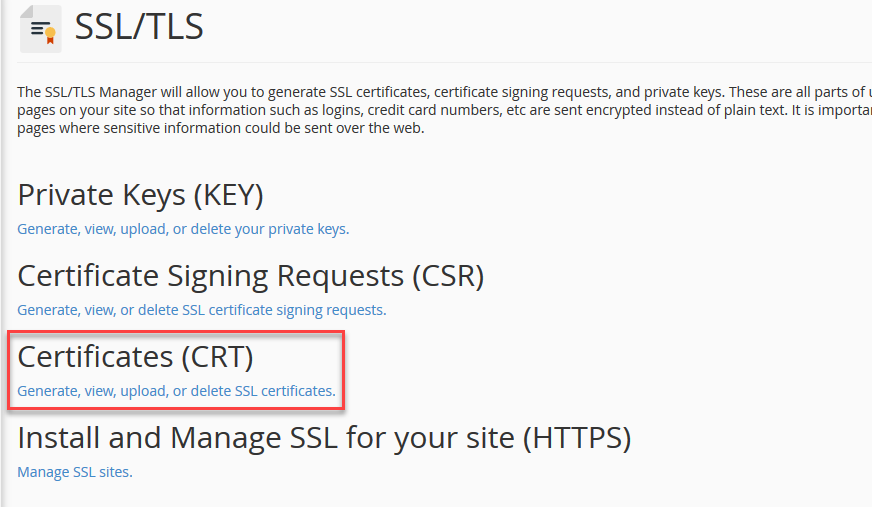
- Scroll to the Security section and click on the SSL/TLS icon.

- Under Certificates (CRT) click on the link labeled Generate, view, upload, or delete SSL certificates.

You will see a table listing the certificates applied to the domains listed in WHM. The Free AutoSSL certificate issuer is cPanel and the domains typically include the www and non-www versions of the domain as well as the mail server URL. AutoSSL certificates will automatically be updated, so the expiration date will be typically set 3 months out.
Run AutoSSL for All Users
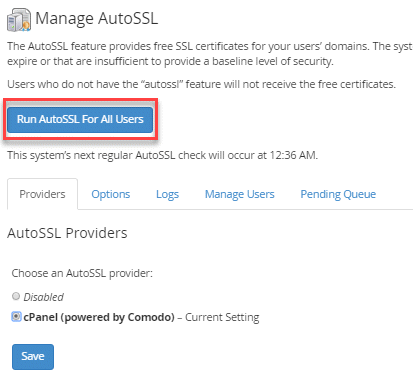
Before you begin, you will need to be logged into the Web Host Manager as a root user. The button labeled Run AutoSSL for All Users runs the module based on the options selected in the tabs below.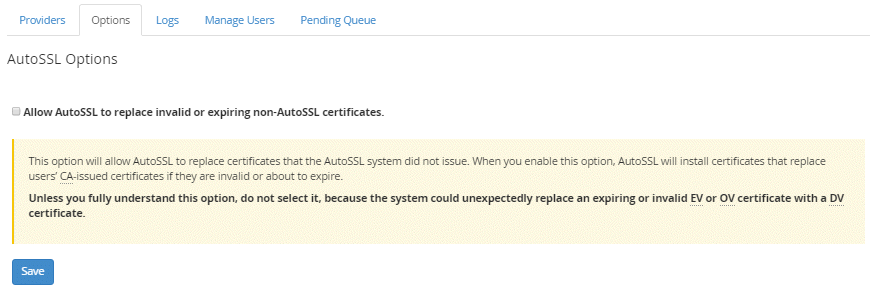
NOTE: If you want the AutoSSL option to replace invalid or expiring non-AutoSSL certificates, then click on the Options tab and click on Allow AutoSSL to replace invalid or expiring non-AutoSSL certificates. Make sure to read the warning. If you don’t know if you should replace your EV/OV or DV certificate, then do not select this option until you have spoken with a knowledgeable Web developer, administrator, or support person.
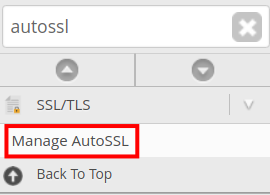
- Make sure you are logged in to WHM as the ‘root‘ user and click on Manage AutoSSL in the left side menu.
- Select the Certificate Provider (typically, the default certificate provider is Sectigo or Comodo, so you can skip this step).

- If necessary, click on the tab labeled Manage Users in order to disable AutoSSL for specific users. Make to click on Save button at the bottom of the screen if you have selected a user.

- Once you are sure of the users that you want to use AutoSSL with, click on the blue button labeled Run AutoSSL For All Users.

- NGINX users only! If you are using NGINX you will need to rebuild the NGINX configuration after running AutoSSL buy running the following commands via SSH as root.
ngxconf -u $user -rd
service nginx restart
service httpd restart
Run AutoSSL for Specific Users
- Make sure you are logged in to WHM as the ‘root‘ user and click on Manage AutoSSL in the left side menu.
- Select the Certificate Provider (typically, the default certificate provider is Comodo, so you can skip this step).

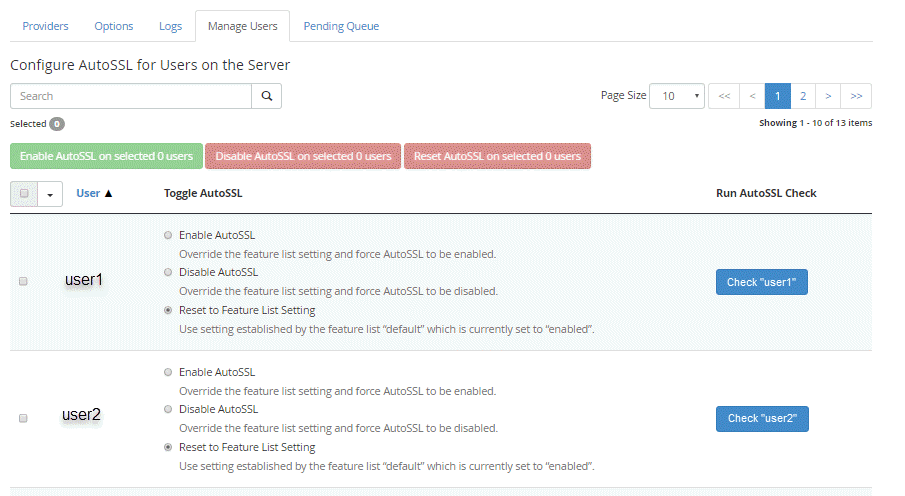
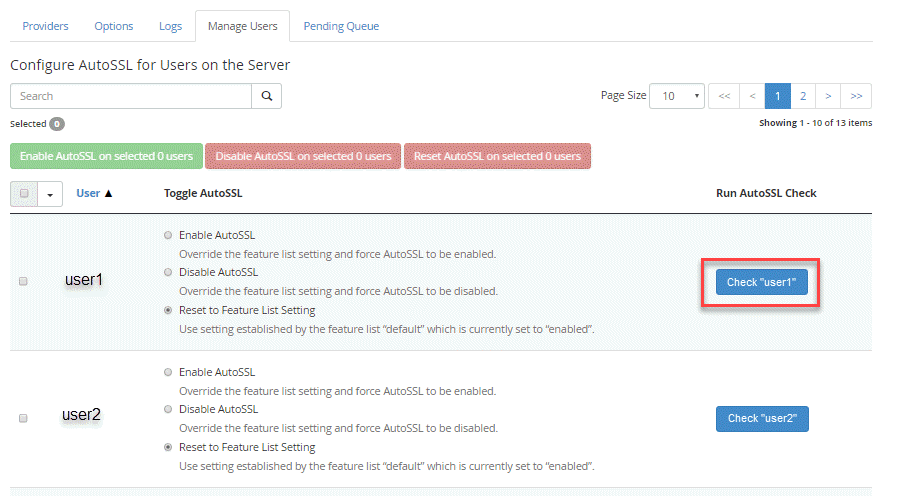
- Click on the tab labeled Manage Users in order to select or disable AutoSSL for specific users. Make to click on Save button at the bottom of the screen if you make any changes. You can disable AutoSSL for all the users that you do not wish to use AutoSSL.

- Click on the blue button labeled Check “user” in order to apply an SSL from AutoSSL. Note that when you check it, it checks ALL of the domains for that particular user.

- NGINX users only! If you are using NGINX you will need to rebuild the NGINX configuration after running AutoSSL buy running the following commands via SSH as root.
ngxconf -u $user -rd
service nginx restart
service httpd restart
View and Interpret the AutoSSL Log
If you are troubleshooting AutoSSL, the AutoSSL log is a good place to start. It keeps a record of changes to your SSL certificates and any errors or warnings that occur.
- Log into your Web Host Manager as the ‘root’ user.
- Type ‘autossl‘ in the search field.
- Click the Manage AutoSSL link under the SSL/TLS section.
- Open the Logs tab.
- You will then see a list of logs by date and time. Choose the one you want to view then click the View Log button.
- Scroll down to view the contents of the AutoSSL log.
Allow AutoSSL to Replace Invalid/Expiring Certificates
Note: You should not follow this guide if you are using Extended Validation (EV) SSL certificates.
- Log into your Web Host Manager as the ‘root’ user.
- In the search box type “autossl” without the quotation marks.

- Click the Manage AutoSSL link under the SSL/TLS section.

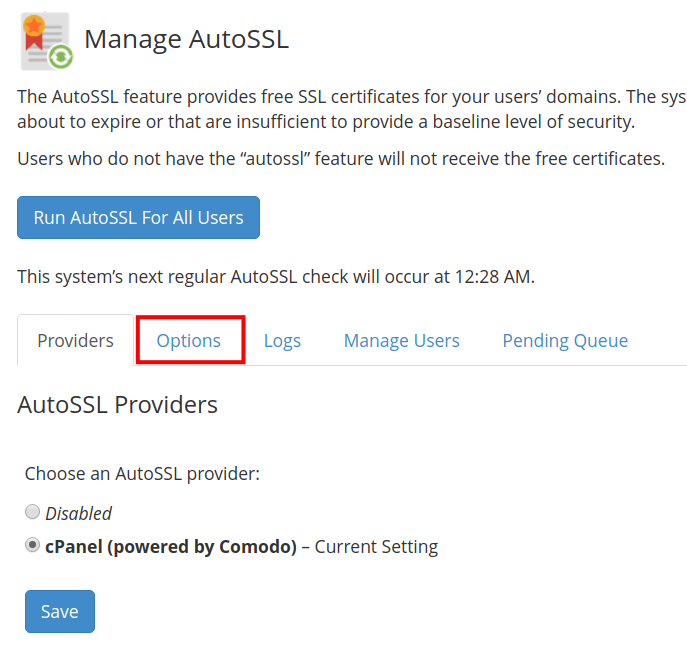
- You will then be on the “Manage AutoSSL” page, click the Options link.

Scroll down and check the box to Allow AutoSSL to replace invalid or expiring non-AutoSSL certificates.

- Click the Save button. You are finished when you see a “Success!” message on the top right of the page.
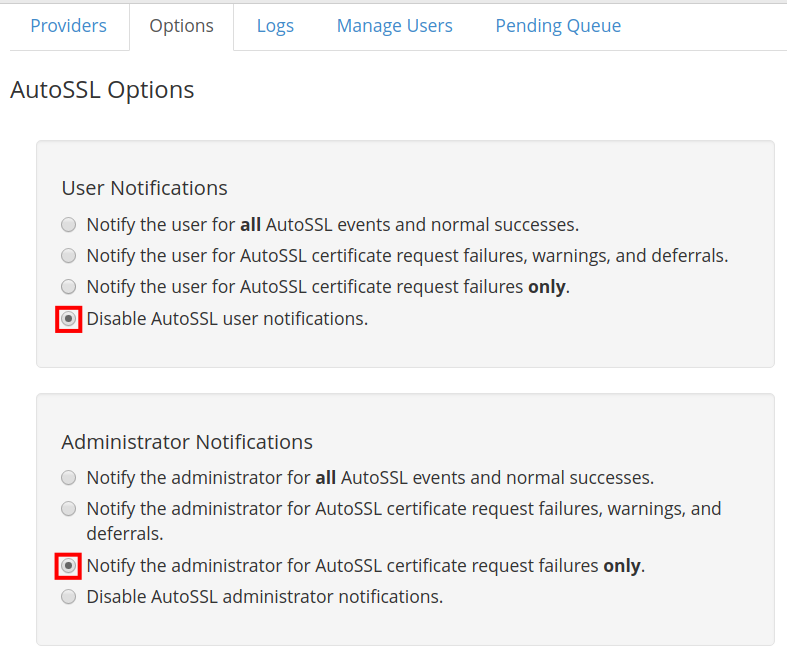
Change WHM AutoSSL Notifications
Did you start getting email notifications after allowing AutoSSL to replace Invalid/Expiring Certificates? These messages let you know AutoSSL information such as when an SSL renews, expires, or even fails. But, you can easily adjust the settings for when these are sent and who they are sent to. In this tutorial, we will show you how to change Autossl Notifications in your Web Host Manager WHM.
- Log into your Web Host Manager as the ‘root’ user.
- In the search box type “autossl” without the quotation marks.
- Click the Manage AutoSSL link under the SSL/TLS section.
- You will then be on the “Manage AutoSSL” page. Click on the Options link.
- You will see the User Notifications and Administrator Notifications sections. Choose from the available settings.

- After selecting your notification settings click the Save button. You are finished when you see a “Success!” message on the top right of the page.
For more details on AutoSSL management within WHM, be sure to check the Complete Guide to cPanel’s Free AutoSSL. If you notice that SSL are not being renewed, check out our guide that includes the Fix for AutoSSL Not Running on a VPS. For tips on WHM in general, please refer to our Web Host Manager education page.
Add value to your web design business by becoming a reseller. Offer web hosting, email, and domain registration to your services with our Reseller Hosting plans!
Fast NVMe SSD Storage
Security Suite, Free SSL and Dedicated IPs
Unlimited Bandwidth
